canRModeStandupClip (Extreme)


After entering a room in R-Mode, put some energy into reserves (set to Auto) and then have reserves trigger to force Samus into a standing pose.
This is commonly done with a jump into a mid-air morph to reach a height just below the ceiling when reserves trigger. Jumping and aiming down is also possible, in case Morph is unavailable or if there is not enough space to mid-air morph; aiming down does not reduce Samus' hitbox as much as morphing, so it requires more precise timing. In any case, it is generally important to not be holding down when the reserve trigger finishes, as this would be likely to cause Samus to bonk instead of clipping through.
Dependencies: canRMode, canUseEnemies
Strats ()
From: 5
Alcatraz Door
To: 8
Central Junction

Enter with direct G-Mode artificial morph, and perform a Crystal Flash to refill reserve energy. Do this all the way to the left, to prevent the Geemer from being destroyed by the lingering light orb. Wait for a global Geemer to make the long trip along the map, or shoot a Super 20 to 30 seconds after entering the room to knock it off the ceiling and save a lot of time. Either way, after the Geemer comes down into Alcatraz, shoot a Super to knock it off the ledge to make it bypass the light orb. Damage down until one Geemer hit away from running out of energy. If Samus has at least one Energy Tank, it will take longer to damage down, in which case an additional Super can be used to knock the Geemer onto the floating platform, to allow unlimited time for damaging down. A final Super can be used to knock the Geemer off the floating platform. Set reserves to manual, stand next to the bomb blocks, and wait for the Geemer to approach. Just before taking a hit, press pause. During the fade-out, hold forward to land quickly after knockback. At a precise moment just before the pause hits, jump and aim down; the aim-down can be buffered before jumping, e.g. by rolling from forward to down through a diagonal input. Set reserves to auto, then unpause while continuing to hold jump. If successful, the forced stand-up will occur close to the ceiling and while Samus still has upward momentum, allowing Samus to clip through. Entrance condition: {
"comeInWithGMode": {
"mode": "direct",
"morphed": true
}
}Requires: "canTrickyGMode"
{
"notable": "Alcatraz Escape G-Mode Crystal Flash Then Forced Standup"
}
"h_ZebesIsAwake"
"canBeVeryPatient"
{
"ammo": {
"type": "Super",
"count": 3
}
}
"h_artificialMorphCrystalFlash"
"canPauseAbuse"
{
"autoReserveTrigger": {}
}
"canRModeStandupClip"
{
"enemyDamage": {
"enemy": "Geemer (blue)",
"type": "contact",
"hits": 1
}
}Dev note: FIXME: A version of this strat could be added with canRiskPermanentLossOfAccess requiring fewer Supers and time, if Samus has no tanks. |
From: 2
Bottom Left Door
To: 3
Right Door


Come in with G-Mode Morph, after passing through the morph tunnel unmorph and exit G-Mode. Disable any E-Tanks and farm the Kago to put Energy into reserves. Get into postion under the top blocks and disable Varia. Time a down jump to reach the apex as reserves trigger. Release down during the reserve refil. Entrance condition: {
"comeInWithGMode": {
"mode": "direct",
"morphed": true
}
}Requires: "canArtificialMorph"
"h_heatProof"
"canRModeStandupClip"
"canBeVeryPatient"
"h_RModeCanRefillReserves"
{
"partialRefill": {
"type": "ReserveEnergy",
"limit": 100
}
}
{
"disableEquipment": "Varia"
}
{
"autoReserveTrigger": {
"implicitHeatFrames": "suitless"
}
}
{
"suitlessHeatFrames": 30
}Dev note: FIXME: Add suitless version. |
|


Enter with R-Mode, disable any E-Tanks and farm the Kago to put Energy into reserves. Get into postion under the top blocks and disable Varia. Time a down jump to reach the apex as reserves trigger. Release down during the reserve refill. A mid air morph increases the frame window Samus can clip through the blocks. Entrance condition: {
"comeInWithRMode": {}
}Requires: "h_heatProof"
"canMidAirMorph"
"canRModeStandupClip"
"h_RModeCanRefillReserves"
{
"partialRefill": {
"type": "ReserveEnergy",
"limit": 100
}
}
{
"disableEquipment": "Varia"
}
{
"autoReserveTrigger": {
"implicitHeatFrames": "suitless"
}
}
{
"suitlessHeatFrames": 30
}Dev note: FIXME: Add suitless version. |
|


Perform a Crystal Flash in order to refill reserves. Position Samus below the 2-tile space of the ceiling Morph tunnel. Jump as Samus reaches 4 Energy, and mid-air morph, timed so that reserves trigger while Samus still has upward momentum just before Samus would hit the ceiling. If done properly, the R-mode standup will cause Samus to clip into the ceiling Morph tunnel. If successful, Samus will end up crouched in the tunnel; press down to morph, then roll out to the right to exit the room. With a mid-air morph, this has a 4-frame window for the jump. It is also an option to pause abuse: instead of jumping at a precise Energy value, set reserves to manual, wait until Samus is close to zero Energy, then press pause and wait a moment before jumping (firing a shot when pausing may help create a visual cue), so that Samus is at 0 Energy and in position just below the ceiling when the pause hits. Then set reserves to auto (and re-equip Varia if available) and unpause. Entrance condition: {
"comeInWithRMode": {}
}Requires: "h_heatedCrystalFlash"
"canRModeStandupClip"
"canInsaneJump"
{
"heatFrames": 140
}
{
"disableEquipment": "Varia"
}
{
"autoReserveTrigger": {}
}
{
"heatFrames": 275
}
{
"or": [
"canDash",
{
"heatFrames": 15
}
]
}Dev note: Jumping using Spring Ball is also possible, which simplifies the movement by avoiding the need for a mid-air morph; it still has a 4-frame window for the jump timing. Jumping and aiming down is also possible but only gives a 2-frame window for the jump. |
From: 4
Gamet Farm Junction
To: 3
Top Door

Position below the door, jump when Samus reaches 7 Energy, and mid-air morph, timed so that reserves trigger while Samus still has upward momentum just before Samus would hit the door. If done properly, the R-mode standup will cause Samus to clip past the door shell. With a mid-air morph, this has a 5-frame window for the jump. Otherwise, with a jump aim-down it has a 3-frame window. If Spring Ball is available, jumping in Spring Ball increases the window to 6 frames. In any case, it may help to pause abuse: instead of jumping at a precise Energy value, set reserves to manual, wait until Samus is close to zero Energy, and press pause a moment before jumping, so that Samus is at 0 energy and in position just below the door when the pause hits. Then set reserves to auto (and re-equip Varia if available), and unpause. Requires: {
"obstaclesCleared": [
"R-Mode"
]
}
"canDash"
"canRModeStandupClip"
"canInsaneJump"
{
"or": [
"canMidAirMorph",
"canBeVeryPatient"
]
}
{
"heatFrames": 210
}
{
"disableEquipment": "Varia"
}
{
"autoReserveTrigger": {}
}
{
"heatFrames": 5
}Bypasses door shell: true |
|

Perform a Crystal Flash in order to put energy into reserves. Position below the door, jump when Samus reaches 7 Energy, and mid-air morph. If done properly, Samus will clip past the door shell. With a mid-air morph, this has a 5-frame window for the jump. If Spring Ball is available, jumping in Spring Ball increases the window to 6 frames. In either case it may help to pause abuse: instead of jumping at a precise Energy value, set reserves to manual, wait until Samus is close to zero Energy, and press pause a moment before jumping, so that Samus is at 0 energy and in position just below the door when the pause hits. Then set reserves to auto (and re-equip Varia if available) and unpause. Entrance condition: {
"comeInWithRMode": {}
}Requires: "h_heatedCrystalFlash"
"canRModeStandupClip"
"canInsaneJump"
{
"heatFrames": 170
}
{
"disableEquipment": "Varia"
}
{
"autoReserveTrigger": {}
}Bypasses door shell: true |
From: 3
Bottom Right Door
To: 1
Top Door
Perform a Crystal Flash in order to put energy into reserves. Position below the door, jump when Samus reaches 7 Energy, and mid-air morph, timed so that reserves trigger while Samus still has upward momentum just before Samus would hit the door. If done properly, the R-mode standup will cause Samus to clip past the door shell. With a mid-air morph, this has a 5-frame window for the jump. If Spring Ball is available, jumping in Spring Ball increases the window to 6 frames. In either case it may help to pause abuse: instead of jumping at a precise Energy value, set reserves to manual, wait until Samus is close to zero Energy, and press pause a moment before jumping, so that Samus is at 0 energy and in position just below the door when the pause hits. Then set reserves to auto (and re-equip Varia if available) and unpause. Entrance condition: {
"comeInWithRMode": {}
}Requires: "h_heatedCrystalFlash"
"canRModeStandupClip"
"canInsaneJump"
{
"heatFrames": 280
}
{
"disableEquipment": "Varia"
}
{
"autoReserveTrigger": {}
}
{
"heatFrames": 5
}Bypasses door shell: true |
From: 2
Bottom Right Door
To: 4
Junction Above Acid Plug, Without Acid


Entrance condition: {
"comeInWithRMode": {}
}Requires: "canRModeStandupClip"
"h_RModeCanRefillReserves"
"h_heatProof"
"Morph"
{
"or": [
"h_bombThings",
{
"haveBlueSuit": {}
}
]
}
{
"or": [
"HiJump",
"canWallJump",
"canSpringBallJumpMidAir",
"canDoubleBombJump"
]
}
{
"partialRefill": {
"type": "ReserveEnergy",
"limit": 100
}
}
{
"disableEquipment": "Varia"
}
{
"autoReserveTrigger": {
"implicitHeatFrames": "suitless"
}
}
{
"suitlessHeatFrames": 30
} |
|


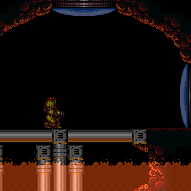
Use a Crystal Flash to refill reserve energy. If Golden Torizo is alive, perform the Crystal Flash in the left corner of the room; otherwise it can be done near the door. Then use heat damage to trigger an R-mode forced standup near the crumble blocks with upward momentum, in order to clip up through them. Several different combinations of items and techniques can make this possible: 1) Space Jump, with a mid-air morph (not required but makes it easier), 2) HiJump and a mid-air Spring Ball jump, most easily by equipping both HiJump and SpringBall during the pause, 3) A walljump into Spring Ball jump, equipping Spring Ball soon after the wall jump into order to gain horizontal speed before the mid-air jump. 4) HiJump and Speedbooster, running and jumping into a mid-air morph, In every case, precise timing is needed to be in the correct location when reserves trigger, just below the crumbles but without bonking them. Having less upward momentum can provide more lenience for timing the forced standup clip, though if Samus' momentum is not enough to make it onto the ledge then a crumble jump may also be required. Entrance condition: {
"comeInWithRMode": {}
}Requires: {
"notable": "R-Mode Forced Standup Clip"
}
"canRModeStandupClip"
{
"or": [
{
"or": [
"f_DefeatedGoldenTorizo",
{
"obstaclesCleared": [
"f_DefeatedGoldenTorizo"
]
}
]
},
{
"heatFrames": 100
}
]
}
"h_heatedCrystalFlash"
{
"or": [
{
"and": [
"SpaceJump",
"can4HighMidAirMorph"
]
},
{
"and": [
"HiJump",
"canSpringBallJumpMidAir"
]
},
{
"and": [
"HiJump",
"canSpeedyJump",
"canMidAirMorph",
"canCrumbleJump"
]
},
{
"and": [
"h_trickySpringwall",
"canCrumbleJump"
]
}
]
}
{
"resourceCapacity": [
{
"type": "RegularEnergy",
"count": 99
}
]
}
{
"autoReserveTrigger": {}
}
{
"heatFrames": 100
}Clears obstacles: door_2 Dev note: FIXME: A variant of this strat could go to the item node instead of the door, possibly with slightly different heat frames at the end. FIXME: As an alternative to doing a Crystal Flash, Golden Torizo could be used as a farm, with canRiskPermanentLossOfAccess. |
From: 1
Bottom Left Door
To: 2
Top Right Door


Entrance condition: {
"comeInWithRMode": {}
}Requires: "canRModeStandupClip"
"h_RModeCanRefillReserves"
"h_heatProof"
{
"or": [
"Plasma",
"ScrewAttack"
]
}
{
"or": [
"canMidAirMorph",
"canBeVeryPatient"
]
}
{
"partialRefill": {
"type": "ReserveEnergy",
"limit": 40
}
}
{
"disableEquipment": "Varia"
}
{
"autoReserveTrigger": {
"implicitHeatFrames": "suitless"
}
}
{
"suitlessHeatFrames": 30
} |
From: 2
Item (Behind the Bomb Wall)
To: 1
Left Door


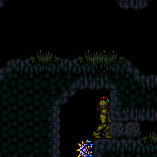
In R-Mode, kill the Coverns until there is Energy in Samus's Reserves. Get into the Morph tunnel and go to the far left. Wait for Coverns to damage Samus down until Reserves trigger, forcing a stand up and enabling her to escape. Note that it is required to break the bomb block above the Morph tunnel as well, in order to clip out. Requires: {
"notable": "R-Mode Standup Clip"
}
{
"obstaclesCleared": [
"R-Mode"
]
}
"canRModeStandupClip"
"canCeilingClip"
{
"or": [
{
"and": [
{
"disableEquipment": "ETank"
},
{
"or": [
"canBePatient",
{
"resourceAvailable": [
{
"type": "Energy",
"count": 80
}
]
}
]
}
]
},
"canBeExtremelyPatient"
]
}
{
"partialRefill": {
"type": "ReserveEnergy",
"limit": 20
}
}
{
"or": [
"canTrivialMidAirMorph",
"h_useSpringBall",
"h_bombThings"
]
}
{
"autoReserveTrigger": {}
}Resets obstacles: R-Mode Dev note: If Phantoon is alive, 'Base' can be used instead. Note that this strat is useless in vanilla, as the item only spawns if Phantoon has been killed. |
From: 1
Bottom Left Door
To: 2
Right Door


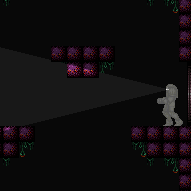
Lure a Mochtroid, stand below the crumbles, and perform a suitless jump and aim down, timed so that the reserve trigger forced standup happens just before Samus contacts the crumbles and still has upwards momentum. Release down before the refill completes, pressing down again when Samus approaches the peak of her jump. If Morph is available a jump morph can be used for more leniency, giving a 8 frame window compared to 3 frames for the regular jump. If Spring Ball is also available, jumping in Spring Ball increases the window to 9 frames. Entrance condition: {
"comeInWithRMode": {},
"comesThroughToilet": "any"
}Requires: "canRModeStandupClip"
{
"disableEquipment": "ETank"
}
{
"disableEquipment": "Gravity"
}
{
"disableEquipment": "HiJump"
}
{
"resourceAvailable": [
{
"type": "Energy",
"count": 99
}
]
}
{
"or": [
"canBeVeryPatient",
{
"and": [
"canMidAirMorph",
"canBePatient"
]
}
]
}
{
"partialRefill": {
"type": "ReserveEnergy",
"limit": 20
}
}
{
"autoReserveTrigger": {}
} |
From: 2
Right Door
To: 1
Bottom Left Door


Lure a Mochtroid, stand below the crumbles, and perform a suitless jump and aim down, timed so that the reserve trigger forced standup happens just before Samus contacts the crumbles and still has upwards momentum. Release down before the refill completes, pressing down again when Samus approaches the peak of her jump. If Morph is available a jump morph can be used for more leniency, giving an 8-frame window compared to 3 frames for the regular jump. If Spring Ball is also available, jumping in Spring Ball increases the window to 9 frames. Entrance condition: {
"comeInWithRMode": {}
}Requires: "canRModeStandupClip"
{
"disableEquipment": "ETank"
}
{
"disableEquipment": "Gravity"
}
{
"disableEquipment": "HiJump"
}
{
"resourceAvailable": [
{
"type": "Energy",
"count": 99
}
]
}
{
"or": [
"canBeVeryPatient",
{
"and": [
"canMidAirMorph",
"canBePatient"
]
}
]
}
{
"partialRefill": {
"type": "ReserveEnergy",
"limit": 20
}
}
{
"autoReserveTrigger": {}
} |