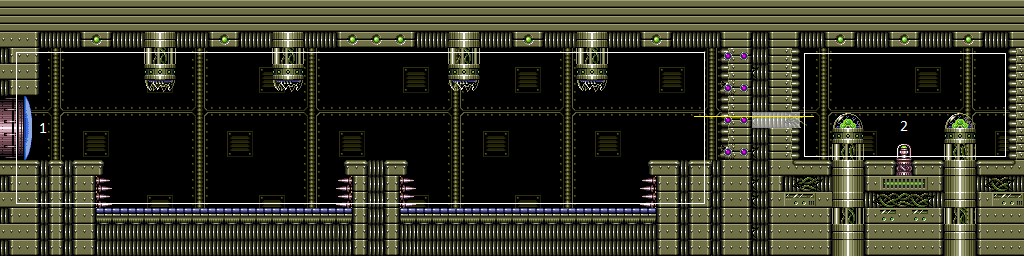
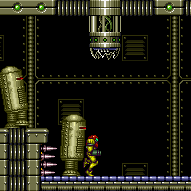
Wrecked Ship East Super Room
Room ID: 163
|
Exit condition: {
"leaveWithRunway": {
"length": 5.5,
"openEnd": 1
}
}Dev note: Note that this room has a half-width runway tile. It is possible to extend this runway with a Covern with canRiskPermanentLossOfAccess, but it is very difficult to position the Covern. The Covern can easily be positioned 2 pixels above the runway with Morph, but that can't be used to extend short shinecharge strats. |
From: 1
Left Door
To: 1
Left Door
Requires: "f_DefeatedPhantoon"
{
"enemyKill": {
"enemies": [
[
"Bull",
"Bull"
]
]
}
}
"canShinechargeMovement"
{
"canShineCharge": {
"usedTiles": 20,
"openEnd": 2
}
}
{
"shineChargeFrames": 85
}Exit condition: {
"leaveShinecharged": {}
} |
|
The effective runway length is shortened due to the conveyor moving in the same direction as Samus. If needing the highest possible speed, run on the conveyor furthest from the door. Requires: {
"enemyKill": {
"enemies": [
[
"Bull",
"Bull"
]
]
}
}
"canTrickyJump"
"SpaceJump"Exit condition: {
"leaveSpinning": {
"remoteRunway": {
"length": 8,
"openEnd": 0
}
}
} |
|
If needing the highest possible speed, run on the conveyor furthest from the door. Requires: {
"not": "f_DefeatedPhantoon"
}
"canRiskPermanentLossOfAccess"
"SpaceJump"Exit condition: {
"leaveSpinning": {
"remoteRunway": {
"length": 11,
"openEnd": 2
}
}
} |
|
Run on the conveyor closest to the door; its effective length is shortened due to moving in the same direction as Samus. Requires: {
"enemyKill": {
"enemies": [
[
"Bull",
"Bull"
]
]
}
}
"canTrickyJump"Exit condition: {
"leaveWithMockball": {
"remoteRunway": {
"length": 8,
"openEnd": 0
},
"landingRunway": {
"length": 3,
"openEnd": 1
}
}
} |
From: 1
Left Door
To: 1
Left Door
Requires: {
"not": "f_DefeatedPhantoon"
}
"canRiskPermanentLossOfAccess"Exit condition: {
"leaveWithMockball": {
"remoteRunway": {
"length": 11,
"openEnd": 2
},
"landingRunway": {
"length": 3,
"openEnd": 1
}
}
} |
From: 1
Left Door
To: 1
Left Door
Run on the conveyor closest to the door; its effective length is shortened due to moving in the same direction as Samus. Requires: {
"enemyKill": {
"enemies": [
[
"Bull",
"Bull"
]
]
}
}
"canTrickyJump"Exit condition: {
"leaveWithSpringBallBounce": {
"remoteRunway": {
"length": 8,
"openEnd": 0
},
"landingRunway": {
"length": 3,
"openEnd": 1
},
"movementType": "uncontrolled"
}
} |
From: 1
Left Door
To: 1
Left Door
Requires: {
"not": "f_DefeatedPhantoon"
}
"canRiskPermanentLossOfAccess"Exit condition: {
"leaveWithSpringBallBounce": {
"remoteRunway": {
"length": 11,
"openEnd": 2
},
"landingRunway": {
"length": 3,
"openEnd": 1
},
"movementType": "uncontrolled"
}
} |
|
The effective runway length is shortened due to the conveyor moving in the same direction as Samus. If needing the highest possible speed, use the conveyor furthest from the door. Requires: {
"enemyKill": {
"enemies": [
[
"Bull",
"Bull"
]
]
}
}
"canTrickyJump"Exit condition: {
"leaveSpaceJumping": {
"remoteRunway": {
"length": 8,
"openEnd": 0
}
}
} |
From: 1
Left Door
To: 1
Left Door
Requires: {
"not": "f_DefeatedPhantoon"
}
"canRiskPermanentLossOfAccess"Exit condition: {
"leaveSpaceJumping": {
"remoteRunway": {
"length": 11,
"openEnd": 2
}
}
} |
From: 1
Left Door
To: 1
Left Door
Shortcharge by running right on the conveyor closest to the door, gain blue speed, and jump onto the platform to the right with temporary blue. Then use X-ray to turn and ride the conveyor back to the left and reach the door. Requires: "f_DefeatedPhantoon"
{
"enemyKill": {
"enemies": [
[
"Bull",
"Bull"
]
]
}
}
{
"getBlueSpeed": {
"usedTiles": 20,
"openEnd": 2
}
}
"canChainTemporaryBlue"
"canXRayTurnaround"Exit condition: {
"leaveWithTemporaryBlue": {}
} |
From: 1
Left Door
To: 1
Left Door


Requires: {
"not": "f_DefeatedPhantoon"
}
"canRiskPermanentLossOfAccess"
{
"canShineCharge": {
"usedTiles": 14,
"openEnd": 0
}
}
"canChainTemporaryBlue"Exit condition: {
"leaveWithTemporaryBlue": {}
} |
From: 1
Left Door
To: 1
Left Door


Jump into the side of the spark to avoid taking extra damage. Requires: "f_DefeatedPhantoon"
"canShinechargeMovement"
"canInsaneJump"
{
"canShineCharge": {
"usedTiles": 20,
"openEnd": 2
}
}
{
"thornHits": 1
}
"h_spikeSuitThornHitLeniency"
"canSpikeSuit"
{
"shinespark": {
"frames": 1,
"excessFrames": 1
}
} |
From: 1
Left Door
To: 1
Left Door


Entrance condition: {
"comeInShinecharging": {
"length": 5,
"openEnd": 0
}
}Requires: "f_DefeatedPhantoon"
{
"thornHits": 1
}
"h_spikeSuitThornHitLeniency"
{
"enemyDamage": {
"enemy": "Bull",
"type": "contact",
"hits": 1
}
}
{
"or": [
"canShinechargeMovementTricky",
{
"thornHits": 3
}
]
}
"canPatientSpikeSuit"
{
"shinespark": {
"frames": 1,
"excessFrames": 1
}
} |
From: 1
Left Door
To: 1
Left Door


Entrance condition: {
"comeInShinecharged": {}
}Requires: "f_DefeatedPhantoon"
{
"or": [
{
"and": [
{
"shineChargeFrames": 55
},
{
"spikeHits": 1
},
"h_spikeSuitSpikeHitLeniency",
"canPatientSpikeSuit",
{
"shinespark": {
"frames": 4,
"excessFrames": 4
}
}
]
},
{
"and": [
{
"shineChargeFrames": 135
},
{
"enemyDamage": {
"enemy": "Bull",
"type": "contact",
"hits": 1
}
},
{
"or": [
"canShinechargeMovementTricky",
{
"thornHits": 3
}
]
},
{
"thornHits": 1
},
"h_spikeSuitThornHitLeniency",
"canPatientSpikeSuit",
{
"shinespark": {
"frames": 1,
"excessFrames": 1
}
}
]
}
]
} |
From: 1
Left Door
To: 1
Left Door


Requires: "f_DefeatedPhantoon"
{
"enemyKill": {
"enemies": [
[
"Bull",
"Bull"
]
]
}
}
{
"canShineCharge": {
"usedTiles": 20,
"openEnd": 2
}
}
{
"spikeHits": 1
}
"h_spikeXModeBlueSuit"
{
"shinespark": {
"frames": 2
}
} |
From: 1
Left Door
To: 1
Left Door
Entrance condition: {
"comeInShinecharging": {
"length": 5,
"openEnd": 0
}
}Requires: "f_DefeatedPhantoon"
{
"spikeHits": 1
}
"h_spikeXModeBlueSuit"
{
"shinespark": {
"frames": 2
}
} |
From: 1
Left Door
To: 1
Left Door


Entrance condition: {
"comeInShinecharged": {}
}Requires: "f_DefeatedPhantoon"
{
"shineChargeFrames": 105
}
{
"spikeHits": 1
}
"h_spikeXModeBlueSuit"
{
"shinespark": {
"frames": 2
}
} |
|
Requires: {
"obstaclesNotCleared": [
"R-Mode"
]
}
"h_CrystalFlash"Dev note: The Bull and Workrobot projectiles aren't a problem. |
|


Requires: {
"obstaclesNotCleared": [
"R-Mode"
]
}
"f_DefeatedPhantoon"
{
"or": [
{
"resourceAvailable": [
{
"type": "RegularEnergy",
"count": 50
}
]
},
{
"resetRoom": {
"nodes": [
1
]
}
}
]
}
"h_10PowerBombCrystalFlash"Resets obstacles: R-Mode |
From: 1
Left Door
To: 1
Left Door
Exit condition: {
"leaveWithGModeSetup": {}
} |
|
Requires: {
"or": [
{
"enemyDamage": {
"enemy": "Covern",
"type": "contact",
"hits": 1
}
},
{
"and": [
{
"enemyDamage": {
"enemy": "Bull",
"type": "contact",
"hits": 1
}
},
"f_DefeatedPhantoon"
]
}
]
}Dev note: The Covern will do more damage than the Bull, so there is no canRiskPermanentLossOfAccess. |
|
Entrance condition: {
"comeInWithRMode": {}
}Clears obstacles: R-Mode |
|
Requires: "f_DefeatedPhantoon"
{
"resetRoom": {
"nodes": [
1
]
}
}
{
"or": [
"ScrewAttack",
"canPseudoScrew",
{
"haveBlueSuit": {}
},
"Plasma",
"Grapple",
{
"and": [
"h_useMorphBombs",
{
"or": [
"canInsaneJump",
{
"enemyDamage": {
"enemy": "Bull",
"type": "contact",
"hits": 2
}
}
]
},
{
"cycleFrames": 300
}
]
}
]
}
{
"cycleFrames": 300
}Resets obstacles: R-Mode Farm cycle drops: 2 Bull |
From: 1
Left Door
To: 1
Left Door
There are additional requirements for killing the Bull enemy who appears when Phantoon is defeated. Requires: {
"not": "f_DefeatedPhantoon"
}
{
"resetRoom": {
"nodes": [
1
]
}
}
{
"or": [
"ScrewAttack",
{
"haveBlueSuit": {}
},
{
"and": [
"Plasma",
{
"cycleFrames": 60
}
]
},
{
"and": [
"Grapple",
{
"or": [
"Wave",
"Spazer"
]
},
{
"cycleFrames": 150
}
]
},
{
"and": [
"canPseudoScrew",
{
"or": [
"canFarmWhileShooting",
{
"cycleFrames": 300
}
]
},
{
"cycleFrames": 120
}
]
}
]
}
{
"cycleFrames": 480
}Resets obstacles: R-Mode Farm cycle drops: 2 Custom Covern (Bull) Dev note: This is Covern farm with a reduced drop chance so as to be applicable while powered off without breaking the powered on state. The weaponry must be able to kill a Bull and follow the dissappearing cycle of a Covern. Resetting the room is slower than waiting for the Covern to respawn, so it is counted as 2 drops. These Coverns have no Super or Missile drop chance. |
|
Any beam can kill the Atomics by aiming for the seam in the glass. The drop may be hard to collect; try spin jumping along the side of the glass. Requires: {
"not": "f_DefeatedPhantoon"
}
"canRiskPermanentLossOfAccess"
{
"resetRoom": {
"nodes": [
1
]
}
}
"canDodgeWhileShooting"
{
"or": [
{
"and": [
"Plasma",
{
"cycleFrames": 1020
}
]
},
{
"and": [
"Wave",
{
"cycleFrames": 960
}
]
},
{
"and": [
"Spazer",
{
"cycleFrames": 1400
}
]
}
]
}Resets obstacles: R-Mode Farm cycle drops: 4 Trapped Atomic Dev note: Other options should just farm the Covern. |
|
Requires: {
"not": "f_DefeatedPhantoon"
}
"canRiskPermanentLossOfAccess"
{
"or": [
"ScrewAttack",
{
"haveBlueSuit": {}
},
{
"and": [
"Plasma",
{
"cycleFrames": 60
}
]
},
{
"and": [
"Wave",
{
"cycleFrames": 120
}
]
},
{
"and": [
"Spazer",
{
"cycleFrames": 150
}
]
},
{
"and": [
"Ice",
"canDodgeWhileShooting",
{
"cycleFrames": 240
}
]
},
{
"and": [
"canPseudoScrew",
"canFarmWhileShooting",
{
"cycleFrames": 120
}
]
},
{
"cycleFrames": 540
}
]
}
{
"cycleFrames": 480
}Farm cycle drops: 1 Covern |
From: 1
Left Door
To: 1
Left Door
Entrance condition: {
"comeInShinecharging": {
"length": 4.5,
"openEnd": 0
},
"comesInHeated": "no"
}Requires: "h_CrystalSpark" |
|
Requires: {
"not": "f_DefeatedPhantoon"
}
"canRiskPermanentLossOfAccess"
{
"canShineCharge": {
"usedTiles": 14,
"openEnd": 0
}
}
"h_CrystalSpark"Dev note: With the power on, this gives a longer runway, but it is not reasonable to get to solid ground and place the Power Bomb. |
From: 1
Left Door
To: 1
Left Door
Power Off: Farm using Coverns or trapped Atomics. Use any conveyor belt to shinecharge and then use the next Covern spawn to interrupt. Power On: Kill the Bulls for energy. Run against a conveyor belt direction to shinecharge, and then use the spikes to pause abuse and interrupt. Requires: {
"obstaclesCleared": [
"R-Mode"
]
}
{
"or": [
"h_CrystalFlashForReserveEnergy",
{
"and": [
"h_RModeCanRefillReserves",
{
"enemyKill": {
"enemies": [
[
"Bull",
"Bull"
]
],
"excludedWeapons": [
"PowerBomb"
]
}
},
{
"resourceMissingAtMost": [
{
"type": "PowerBomb",
"count": 0
}
]
},
{
"partialRefill": {
"type": "ReserveEnergy",
"limit": 40
}
}
]
}
]
}
{
"or": [
{
"canShineCharge": {
"usedTiles": 14,
"openEnd": 0
}
},
{
"and": [
"f_DefeatedPhantoon",
{
"canShineCharge": {
"usedTiles": 20,
"openEnd": 2
}
}
]
}
]
}
{
"autoReserveTrigger": {
"maxReserveEnergy": 95
}
}
"canRModePauseAbuseSparkInterrupt"Resets obstacles: R-Mode |
|

By normal means, the path can't be passed unless the Workrobot is activated (so Phantoon dead) Requires: "h_destroyBombWalls"
"f_DefeatedPhantoon"
{
"or": [
"canTrivialMidAirMorph",
"h_useSpringBall",
"h_bombThings",
{
"and": [
"Morph",
"canUseEnemies"
]
}
]
} |
From: 1
Left Door
To: 2
Item (Behind the Bomb Wall)
Requires: "f_DefeatedPhantoon"
{
"haveBlueSuit": {}
}
"Morph"Dev note: FIXME: This could be possible with artificial morph, Spring, and at least one laser projectile. But PLMs will already be overloaded, so the only way out is if the item is Morph. |
From: 1
Left Door
To: 2
Item (Behind the Bomb Wall)

Run on the conveyor to build Speed for breaking the bomb block. Push the right side Worker Robot onto the conveyor Jump low into the wall so Samus' head touches the block. Speed can be used to clear the Bulls. Requires: "f_DefeatedPhantoon"
"canCarefulJump"
{
"or": [
"canDodgeWhileShooting",
{
"enemyKill": {
"enemies": [
[
"Bull",
"Bull"
]
]
}
},
{
"enemyDamage": {
"enemy": "Bull",
"type": "contact",
"hits": 1
}
}
]
}
{
"getBlueSpeed": {
"usedTiles": 18,
"openEnd": 1
}
}
"h_blueJump"
{
"or": [
"canTrivialMidAirMorph",
"h_useSpringBall",
"h_bombThings"
]
}Dev note: Space Jumping from left conveyor feels a little harder. |
From: 1
Left Door
To: 2
Item (Behind the Bomb Wall)
Kago through the Workrobot by jumping, pressing down, then morphing and moving right just before hitting the robot. The bomb blocks can be broken with a bomb, Power Bomb, or using Screw Attack. If using bombs, be careful when breaking the bottom bomb block - if morphed, you will be pushed into it and stuck. To do this, place a bomb at the bottom, then a bomb at the peak boost height and unmorph before landing. Alternatively use a short jump morph. If the morph tunnel is open, kagoing through the robot will force Samus into it. Requires: "canMidAirMorph" "h_destroyBombWalls" "canKago" Dev note: If Phantoon is alive, 'Base' can be used instead. Note that this strat is useless in vanilla, as the item only spawns if Phantoon has been killed. |
From: 1
Left Door
To: 2
Item (Behind the Bomb Wall)


Kago into the worker robot and start running away from the wall until the bomb blocks are broken with SpeedBooster. The short charge taps are extremely precise because gaining too much run speed and Samus will exit the robot. Requires: {
"notable": "Robot Clip Run-In-Place"
}
"canMidAirMorph"
{
"getBlueSpeed": {
"usedTiles": 15,
"openEnd": 1
}
}
"canSlowShortCharge"
"canKago"Dev note: If Phantoon is dead, 'Blue Speed Jump' can be used instead. Note that this strat is useless in vanilla, as the item only spawns if Phantoon has been killed. |
From: 1
Left Door
To: 2
Item (Behind the Bomb Wall)
Kagoing into the worker robot will break the bomb block and push Samus into the morph tunnel. Requires: "canMidAirMorph"
"canKago"
{
"haveBlueSuit": {}
}Dev note: Note that this strat is useless in vanilla, as the item only spawns if Phantoon has been killed. |
From: 1
Left Door
To: 2
Item (Behind the Bomb Wall)
Kago into the worker robot and shinespark into the wall in order to break the bomb block. Either spark diagonally against the wall or horizontally while not crouched. Requires: "canMidAirMorph"
"canKago"
{
"useFlashSuit": {}
}
{
"shinespark": {
"frames": 1,
"excessFrames": 1
}
}Dev note: Note that this strat is useless in vanilla, as the item only spawns if Phantoon has been killed. |
|
By normal means, the path can't be passed unless the Workrobot is activated (so Phantoon dead) Requires: "f_DefeatedPhantoon"
{
"or": [
"canTrivialMidAirMorph",
"h_useSpringBall",
"h_bombThings"
]
}Dev note: This doesn't require breaking the bomb blocks on the premise that you can't get here without breaking them. |
From: 2
Item (Behind the Bomb Wall)
To: 1
Left Door


Crystal flash to force a standup then spin jump up then morph to bypass the dead robot. Use Coverns to damage down if necessary. Note that if the Covern spawns on Samus while crystal flashing, it will deal large amounts of damage. To avoid this, it is recommended to kill the Covern and leave its drop, then quickly get in the morph tunnel and CF. Requires: {
"obstaclesNotCleared": [
"R-Mode"
]
}
{
"notable": "Crystal Flash Clip"
}
{
"or": [
"canTrivialMidAirMorph",
"h_useSpringBall",
"h_bombThings"
]
}
"h_CrystalFlash"
"canCeilingClip"Dev note: If Phantoon is alive, 'Base' can be used instead. Note that this strat is useless in vanilla, as the item only spawns if Phantoon has been killed. |
From: 2
Item (Behind the Bomb Wall)
To: 1
Left Door


In R-Mode, kill the Coverns until there is Energy in Samus's Reserves. Get into the Morph tunnel and go to the far left. Wait for Coverns to damage Samus down until Reserves trigger, forcing a stand up and enabling her to escape. Note that it is required to break the bomb block above the Morph tunnel as well, in order to clip out. Requires: {
"notable": "R-Mode Standup Clip"
}
{
"obstaclesCleared": [
"R-Mode"
]
}
"canRModeStandupClip"
"canCeilingClip"
{
"or": [
{
"and": [
{
"disableEquipment": "ETank"
},
{
"or": [
"canBePatient",
{
"resourceAvailable": [
{
"type": "Energy",
"count": 80
}
]
}
]
}
]
},
"canBeExtremelyPatient"
]
}
{
"partialRefill": {
"type": "ReserveEnergy",
"limit": 20
}
}
{
"or": [
"canTrivialMidAirMorph",
"h_useSpringBall",
"h_bombThings"
]
}
{
"autoReserveTrigger": {}
}Resets obstacles: R-Mode Dev note: If Phantoon is alive, 'Base' can be used instead. Note that this strat is useless in vanilla, as the item only spawns if Phantoon has been killed. |
{
"$schema": "../../../schema/m3-room.schema.json",
"id": 163,
"name": "Wrecked Ship East Super Room",
"area": "Wrecked Ship",
"subarea": "Main",
"roomAddress": "0x7CDF1",
"roomEnvironments": [
{
"heated": false
}
],
"mapTileMask": [
[
1,
1,
1,
1
]
],
"nodes": [
{
"id": 1,
"name": "Left Door",
"nodeType": "door",
"nodeSubType": "blue",
"nodeAddress": "0x001a2f4",
"doorOrientation": "left",
"doorEnvironments": [
{
"physics": "air"
}
],
"mapTileMask": [
[
2,
2,
2,
1
]
]
},
{
"id": 2,
"name": "Item (Behind the Bomb Wall)",
"nodeType": "item",
"nodeSubType": "visible",
"nodeItem": "Super",
"nodeAddress": "0x7C365",
"locks": [
{
"name": "Wrecked Ship Right Super Spawn Lock",
"lockType": "gameFlag",
"unlockStrats": [
{
"name": "Base",
"requires": [
{
"or": [
"f_DefeatedPhantoon",
"h_allItemsSpawned"
]
}
],
"flashSuitChecked": true,
"blueSuitChecked": true,
"note": "The item doesn't spawn until Phantoon is defeated."
}
]
}
],
"mapTileMask": [
[
1,
1,
1,
2
]
]
}
],
"obstacles": [
{
"id": "R-Mode",
"name": "Entered with R-Mode",
"obstacleType": "abstract"
}
],
"enemies": [
{
"id": "e1",
"groupName": "Wrecked Ship East Supers Covern",
"enemyName": "Covern",
"quantity": 1,
"homeNodes": [
1,
2
],
"stopSpawn": [
"f_DefeatedPhantoon"
]
},
{
"id": "e2",
"groupName": "Wrecked Ship East Supers Bulls",
"enemyName": "Bull",
"quantity": 2,
"homeNodes": [
1
],
"spawn": [
"f_DefeatedPhantoon"
]
},
{
"id": "e3",
"groupName": "Wrecked Ship East Supers Workrobots",
"enemyName": "Workrobot",
"quantity": 2,
"homeNodes": [
1
],
"spawn": [
"f_DefeatedPhantoon"
]
},
{
"id": "e4",
"groupName": "Wrecked Ship East Supers Trapped Atomics",
"enemyName": "Trapped Atomic",
"quantity": 4,
"homeNodes": [
1
],
"stopSpawn": [
"f_DefeatedPhantoon"
]
},
{
"id": "e5",
"groupName": "Wrecked Ship East Supers Custom Covern",
"enemyName": "Custom Covern (Bull)",
"quantity": 1,
"homeNodes": [
1
],
"stopSpawn": [
"f_DefeatedPhantoon"
],
"note": "This represents a Covern that has a reduced drop chance that would be logically possible in the powered on state of Wrecked ship."
}
],
"strats": [
{
"link": [
1,
1
],
"name": "Base (Unlock Door)",
"requires": [],
"unlocksDoors": [
{
"types": [
"ammo"
],
"requires": []
}
],
"flashSuitChecked": true,
"blueSuitChecked": true
},
{
"link": [
1,
1
],
"name": "Base (Come In Normally)",
"entranceCondition": {
"comeInNormally": {}
},
"requires": [],
"flashSuitChecked": true,
"blueSuitChecked": true
},
{
"link": [
1,
1
],
"name": "Base (Come In With Mockball)",
"entranceCondition": {
"comeInWithMockball": {
"adjacentMinTiles": 0,
"remoteAndLandingMinTiles": [
[
0,
0
]
],
"speedBooster": "any"
}
},
"requires": [],
"flashSuitChecked": true,
"blueSuitChecked": true
},
{
"name": "Base",
"requires": [
{
"or": [
"f_DefeatedPhantoon",
"h_allItemsSpawned"
]
}
],
"flashSuitChecked": true,
"blueSuitChecked": true,
"note": "The item doesn't spawn until Phantoon is defeated.",
"link": [
2,
2
],
"collectsItems": [
2
]
},
{
"id": 1,
"link": [
1,
1
],
"name": "Leave with Runway",
"requires": [],
"exitCondition": {
"leaveWithRunway": {
"length": 5.5,
"openEnd": 1
}
},
"flashSuitChecked": true,
"blueSuitChecked": true,
"devNote": [
"Note that this room has a half-width runway tile.",
"It is possible to extend this runway with a Covern with canRiskPermanentLossOfAccess, but it is very difficult to position the Covern.",
"The Covern can easily be positioned 2 pixels above the runway with Morph, but that can't be used to extend short shinecharge strats."
]
},
{
"id": 2,
"link": [
1,
1
],
"name": "Leave Shinecharged, Conveyor Run",
"requires": [
"f_DefeatedPhantoon",
{
"enemyKill": {
"enemies": [
[
"Bull",
"Bull"
]
]
}
},
"canShinechargeMovement",
{
"canShineCharge": {
"usedTiles": 20,
"openEnd": 2
}
},
{
"shineChargeFrames": 85
}
],
"exitCondition": {
"leaveShinecharged": {}
},
"flashSuitChecked": true,
"blueSuitChecked": true
},
{
"id": 3,
"link": [
1,
1
],
"name": "Leave Spinning",
"requires": [
{
"enemyKill": {
"enemies": [
[
"Bull",
"Bull"
]
]
}
},
"canTrickyJump",
"SpaceJump"
],
"exitCondition": {
"leaveSpinning": {
"remoteRunway": {
"length": 8,
"openEnd": 0
}
}
},
"flashSuitChecked": true,
"blueSuitChecked": true,
"note": [
"The effective runway length is shortened due to the conveyor moving in the same direction as Samus.",
"If needing the highest possible speed, run on the conveyor furthest from the door."
]
},
{
"id": 4,
"link": [
1,
1
],
"name": "Leave Spinning (Power Off)",
"requires": [
{
"not": "f_DefeatedPhantoon"
},
"canRiskPermanentLossOfAccess",
"SpaceJump"
],
"exitCondition": {
"leaveSpinning": {
"remoteRunway": {
"length": 11,
"openEnd": 2
}
}
},
"flashSuitChecked": true,
"blueSuitChecked": true,
"note": [
"If needing the highest possible speed, run on the conveyor furthest from the door."
]
},
{
"id": 5,
"link": [
1,
1
],
"name": "Leave With Mockball",
"requires": [
{
"enemyKill": {
"enemies": [
[
"Bull",
"Bull"
]
]
}
},
"canTrickyJump"
],
"exitCondition": {
"leaveWithMockball": {
"remoteRunway": {
"length": 8,
"openEnd": 0
},
"landingRunway": {
"length": 3,
"openEnd": 1
}
}
},
"flashSuitChecked": true,
"blueSuitChecked": true,
"note": "Run on the conveyor closest to the door; its effective length is shortened due to moving in the same direction as Samus."
},
{
"id": 6,
"link": [
1,
1
],
"name": "Leave With Mockball (Power Off)",
"requires": [
{
"not": "f_DefeatedPhantoon"
},
"canRiskPermanentLossOfAccess"
],
"exitCondition": {
"leaveWithMockball": {
"remoteRunway": {
"length": 11,
"openEnd": 2
},
"landingRunway": {
"length": 3,
"openEnd": 1
}
}
},
"flashSuitChecked": true,
"blueSuitChecked": true
},
{
"id": 7,
"link": [
1,
1
],
"name": "Leave With Spring Ball Bounce",
"requires": [
{
"enemyKill": {
"enemies": [
[
"Bull",
"Bull"
]
]
}
},
"canTrickyJump"
],
"exitCondition": {
"leaveWithSpringBallBounce": {
"remoteRunway": {
"length": 8,
"openEnd": 0
},
"landingRunway": {
"length": 3,
"openEnd": 1
},
"movementType": "uncontrolled"
}
},
"flashSuitChecked": true,
"blueSuitChecked": true,
"note": "Run on the conveyor closest to the door; its effective length is shortened due to moving in the same direction as Samus."
},
{
"id": 8,
"link": [
1,
1
],
"name": "Leave With Spring Ball Bounce (Power Off)",
"requires": [
{
"not": "f_DefeatedPhantoon"
},
"canRiskPermanentLossOfAccess"
],
"exitCondition": {
"leaveWithSpringBallBounce": {
"remoteRunway": {
"length": 11,
"openEnd": 2
},
"landingRunway": {
"length": 3,
"openEnd": 1
},
"movementType": "uncontrolled"
}
},
"flashSuitChecked": true,
"blueSuitChecked": true
},
{
"id": 9,
"link": [
1,
1
],
"name": "Leave Space Jumping",
"requires": [
{
"enemyKill": {
"enemies": [
[
"Bull",
"Bull"
]
]
}
},
"canTrickyJump"
],
"exitCondition": {
"leaveSpaceJumping": {
"remoteRunway": {
"length": 8,
"openEnd": 0
}
}
},
"flashSuitChecked": true,
"blueSuitChecked": true,
"note": [
"The effective runway length is shortened due to the conveyor moving in the same direction as Samus.",
"If needing the highest possible speed, use the conveyor furthest from the door."
]
},
{
"id": 10,
"link": [
1,
1
],
"name": "Leave Space Jumping (Power Off)",
"requires": [
{
"not": "f_DefeatedPhantoon"
},
"canRiskPermanentLossOfAccess"
],
"exitCondition": {
"leaveSpaceJumping": {
"remoteRunway": {
"length": 11,
"openEnd": 2
}
}
},
"flashSuitChecked": true,
"blueSuitChecked": true
},
{
"id": 11,
"link": [
1,
1
],
"name": "Leave With Temporary Blue (Power On)",
"requires": [
"f_DefeatedPhantoon",
{
"enemyKill": {
"enemies": [
[
"Bull",
"Bull"
]
]
}
},
{
"getBlueSpeed": {
"usedTiles": 20,
"openEnd": 2
}
},
"canChainTemporaryBlue",
"canXRayTurnaround"
],
"exitCondition": {
"leaveWithTemporaryBlue": {}
},
"flashSuitChecked": true,
"blueSuitChecked": true,
"note": [
"Shortcharge by running right on the conveyor closest to the door, gain blue speed, and jump onto the platform to the right with temporary blue.",
"Then use X-ray to turn and ride the conveyor back to the left and reach the door."
]
},
{
"id": 12,
"link": [
1,
1
],
"name": "Leave With Temporary Blue (Power Off)",
"requires": [
{
"not": "f_DefeatedPhantoon"
},
"canRiskPermanentLossOfAccess",
{
"canShineCharge": {
"usedTiles": 14,
"openEnd": 0
}
},
"canChainTemporaryBlue"
],
"exitCondition": {
"leaveWithTemporaryBlue": {}
},
"flashSuitChecked": true,
"blueSuitChecked": true
},
{
"id": 30,
"link": [
1,
1
],
"name": "Gain Flash Suit (Spikesuit), Conveyor Run",
"requires": [
"f_DefeatedPhantoon",
"canShinechargeMovement",
"canInsaneJump",
{
"canShineCharge": {
"usedTiles": 20,
"openEnd": 2
}
},
{
"thornHits": 1
},
"h_spikeSuitThornHitLeniency",
"canSpikeSuit",
{
"shinespark": {
"frames": 1,
"excessFrames": 1
}
}
],
"flashSuitChecked": true,
"blueSuitChecked": true,
"note": [
"Jump into the side of the spark to avoid taking extra damage."
]
},
{
"id": 31,
"link": [
1,
1
],
"name": "Come in Shinecharging, Gain Flash Suit (Spikesuit)",
"entranceCondition": {
"comeInShinecharging": {
"length": 5,
"openEnd": 0
}
},
"requires": [
"f_DefeatedPhantoon",
{
"thornHits": 1
},
"h_spikeSuitThornHitLeniency",
{
"enemyDamage": {
"enemy": "Bull",
"type": "contact",
"hits": 1
}
},
{
"or": [
"canShinechargeMovementTricky",
{
"thornHits": 3
}
]
},
"canPatientSpikeSuit",
{
"shinespark": {
"frames": 1,
"excessFrames": 1
}
}
],
"flashSuitChecked": true,
"blueSuitChecked": true
},
{
"id": 32,
"link": [
1,
1
],
"name": "Come in Shinecharged, Gain Flash Suit (Spikesuit)",
"entranceCondition": {
"comeInShinecharged": {}
},
"requires": [
"f_DefeatedPhantoon",
{
"or": [
{
"and": [
{
"shineChargeFrames": 55
},
{
"spikeHits": 1
},
"h_spikeSuitSpikeHitLeniency",
"canPatientSpikeSuit",
{
"shinespark": {
"frames": 4,
"excessFrames": 4
}
}
]
},
{
"and": [
{
"shineChargeFrames": 135
},
{
"enemyDamage": {
"enemy": "Bull",
"type": "contact",
"hits": 1
}
},
{
"or": [
"canShinechargeMovementTricky",
{
"thornHits": 3
}
]
},
{
"thornHits": 1
},
"h_spikeSuitThornHitLeniency",
"canPatientSpikeSuit",
{
"shinespark": {
"frames": 1,
"excessFrames": 1
}
}
]
}
]
}
],
"flashSuitChecked": true,
"blueSuitChecked": true
},
{
"id": 33,
"link": [
1,
1
],
"name": "Gain Blue Suit (X-Mode), Conveyor Run",
"requires": [
"f_DefeatedPhantoon",
{
"enemyKill": {
"enemies": [
[
"Bull",
"Bull"
]
]
}
},
{
"canShineCharge": {
"usedTiles": 20,
"openEnd": 2
}
},
{
"spikeHits": 1
},
"h_spikeXModeBlueSuit",
{
"shinespark": {
"frames": 2
}
}
],
"flashSuitChecked": true,
"blueSuitChecked": true
},
{
"id": 34,
"link": [
1,
1
],
"name": "Come in Shinecharging, Gain Blue Suit (X-Mode)",
"entranceCondition": {
"comeInShinecharging": {
"length": 5,
"openEnd": 0
}
},
"requires": [
"f_DefeatedPhantoon",
{
"spikeHits": 1
},
"h_spikeXModeBlueSuit",
{
"shinespark": {
"frames": 2
}
}
],
"flashSuitChecked": true,
"blueSuitChecked": true
},
{
"id": 35,
"link": [
1,
1
],
"name": "Come in Shinecharged, Gain Blue Suit (X-Mode)",
"entranceCondition": {
"comeInShinecharged": {}
},
"requires": [
"f_DefeatedPhantoon",
{
"shineChargeFrames": 105
},
{
"spikeHits": 1
},
"h_spikeXModeBlueSuit",
{
"shinespark": {
"frames": 2
}
}
],
"flashSuitChecked": true,
"blueSuitChecked": true
},
{
"id": 13,
"link": [
1,
1
],
"name": "Crystal Flash",
"requires": [
{
"obstaclesNotCleared": [
"R-Mode"
]
},
"h_CrystalFlash"
],
"flashSuitChecked": true,
"blueSuitChecked": true,
"devNote": "The Bull and Workrobot projectiles aren't a problem."
},
{
"id": 29,
"link": [
1,
1
],
"name": "10 Power Bomb Crystal Flash",
"requires": [
{
"obstaclesNotCleared": [
"R-Mode"
]
},
"f_DefeatedPhantoon",
{
"or": [
{
"resourceAvailable": [
{
"type": "RegularEnergy",
"count": 50
}
]
},
{
"resetRoom": {
"nodes": [
1
]
}
}
]
},
"h_10PowerBombCrystalFlash"
],
"resetsObstacles": [
"R-Mode"
],
"flashSuitChecked": true,
"blueSuitChecked": true
},
{
"id": 14,
"link": [
1,
1
],
"name": "G-Mode Setup - Get Hit By Covern or Bull",
"requires": [],
"exitCondition": {
"leaveWithGModeSetup": {}
},
"flashSuitChecked": true,
"blueSuitChecked": true
},
{
"id": 15,
"link": [
1,
1
],
"name": "G-Mode Regain Mobility",
"requires": [
{
  "or": [
    {
      "enemyDamage": {
        "enemy": "Covern",
        "type": "contact",
        "hits": 1
      }
    },
    {
      "and": [
        {
          "enemyDamage": {
            "enemy": "Bull",
            "type": "contact",
            "hits": 1
          }
        },
        "f_DefeatedPhantoon"
      ]
    }
  ]
}
],
"gModeRegainMobility": {},
"flashSuitChecked": true,
"blueSuitChecked": true,
"devNote": "The Covern will do more damage than the Bull, so there is no canRiskPermanentLossOfAccess."
},
{
"id": 16,
"link": [
1,
1
],
"name": "R-Mode Entry",
"entranceCondition": {
"comeInWithRMode": {}
},
"requires": [],
"clearsObstacles": [
"R-Mode"
],
"flashSuitChecked": true,
"blueSuitChecked": true
},
{
"id": 26,
"link": [
1,
1
],
"name": "Bull Farm",
"requires": [
"f_DefeatedPhantoon",
{
"resetRoom": {
"nodes": [
1
]
}
},
{
"or": [
"ScrewAttack",
"canPseudoScrew",
{
"haveBlueSuit": {}
},
"Plasma",
"Grapple",
{
"and": [
"h_useMorphBombs",
{
"or": [
"canInsaneJump",
{
"enemyDamage": {
"enemy": "Bull",
"type": "contact",
"hits": 2
}
}
]
},
{
"cycleFrames": 300
}
]
}
]
},
{
"cycleFrames": 300
}
],
"resetsObstacles": [
"R-Mode"
],
"farmCycleDrops": [
{
"enemy": "Bull",
"count": 2
}
],
"flashSuitChecked": true,
"blueSuitChecked": true
},
{
"id": 27,
"link": [
1,
1
],
"name": "Conservative Covern Farm (Power Off)",
"requires": [
{
"not": "f_DefeatedPhantoon"
},
{
"resetRoom": {
"nodes": [
1
]
}
},
{
"or": [
"ScrewAttack",
{
"haveBlueSuit": {}
},
{
"and": [
"Plasma",
{
"cycleFrames": 60
}
]
},
{
"and": [
"Grapple",
{
"or": [
"Wave",
"Spazer"
]
},
{
"cycleFrames": 150
}
]
},
{
"and": [
"canPseudoScrew",
{
"or": [
"canFarmWhileShooting",
{
"cycleFrames": 300
}
]
},
{
"cycleFrames": 120
}
]
}
]
},
{
"cycleFrames": 480
}
],
"resetsObstacles": [
"R-Mode"
],
"farmCycleDrops": [
{
"enemy": "Custom Covern (Bull)",
"count": 2
}
],
"flashSuitChecked": true,
"blueSuitChecked": true,
"note": "There are additional requirements for killing the Bull enemy who appears when Phantoon is defeated.",
"devNote": [
"This is Covern farm with a reduced drop chance so as to be applicable while powered off without breaking the powered on state.",
"The weaponry must be able to kill a Bull and follow the dissappearing cycle of a Covern.",
"Resetting the room is slower than waiting for the Covern to respawn, so it is counted as 2 drops.",
"These Coverns have no Super or Missile drop chance."
]
},
{
"id": 17,
"link": [
1,
1
],
"name": "Atomics Farm (Power Off)",
"requires": [
{
"not": "f_DefeatedPhantoon"
},
"canRiskPermanentLossOfAccess",
{
"resetRoom": {
"nodes": [
1
]
}
},
"canDodgeWhileShooting",
{
"or": [
{
"and": [
"Plasma",
{
"cycleFrames": 1020
}
]
},
{
"and": [
"Wave",
{
"cycleFrames": 960
}
]
},
{
"and": [
"Spazer",
{
"cycleFrames": 1400
}
]
}
]
}
],
"resetsObstacles": [
"R-Mode"
],
"farmCycleDrops": [
{
"enemy": "Trapped Atomic",
"count": 4
}
],
"flashSuitChecked": true,
"blueSuitChecked": true,
"note": [
"Any beam can kill the Atomics by aiming for the seam in the glass.",
"The drop may be hard to collect; try spin jumping along the side of the glass."
],
"devNote": "Other options should just farm the Covern."
},
{
"id": 28,
"link": [
1,
1
],
"name": "Covern Farm",
"requires": [
{
"not": "f_DefeatedPhantoon"
},
"canRiskPermanentLossOfAccess",
{
"or": [
"ScrewAttack",
{
"haveBlueSuit": {}
},
{
"and": [
"Plasma",
{
"cycleFrames": 60
}
]
},
{
"and": [
"Wave",
{
"cycleFrames": 120
}
]
},
{
"and": [
"Spazer",
{
"cycleFrames": 150
}
]
},
{
"and": [
"Ice",
"canDodgeWhileShooting",
{
"cycleFrames": 240
}
]
},
{
"and": [
"canPseudoScrew",
"canFarmWhileShooting",
{
"cycleFrames": 120
}
]
},
{
"cycleFrames": 540
}
]
},
{
"cycleFrames": 480
}
],
"farmCycleDrops": [
{
"enemy": "Covern",
"count": 1
}
],
"flashSuitChecked": true,
"blueSuitChecked": true
},
{
"id": 39,
"link": [
1,
1
],
"name": "Come in Shinecharging, Crystal Spark",
"entranceCondition": {
"comeInShinecharging": {
"length": 4.5,
"openEnd": 0
},
"comesInHeated": "no"
},
"requires": [
"h_CrystalSpark"
],
"flashSuitChecked": true,
"blueSuitChecked": true
},
{
"id": 40,
"link": [
1,
1
],
"name": "Crystal Spark (In-Room)",
"requires": [
{
"not": "f_DefeatedPhantoon"
},
"canRiskPermanentLossOfAccess",
{
"canShineCharge": {
"usedTiles": 14,
"openEnd": 0
}
},
"h_CrystalSpark"
],
"flashSuitChecked": true,
"blueSuitChecked": true,
"devNote": "With the power on, this gives a longer runway, but it is not reasonable to get to solid ground and place the Power Bomb."
},
{
"id": 36,
"link": [
1,
1
],
"name": "R-Mode Pause Abuse Spark Interrupt",
"requires": [
{
"obstaclesCleared": [
"R-Mode"
]
},
{
"or": [
"h_CrystalFlashForReserveEnergy",
{
"and": [
"h_RModeCanRefillReserves",
{
"enemyKill": {
"enemies": [
[
"Bull",
"Bull"
]
],
"excludedWeapons": [
"PowerBomb"
]
}
},
{
"resourceMissingAtMost": [
{
"type": "PowerBomb",
"count": 0
}
]
},
{
"partialRefill": {
"type": "ReserveEnergy",
"limit": 40
}
}
]
}
]
},
{
"or": [
{
"canShineCharge": {
"usedTiles": 14,
"openEnd": 0
}
},
{
"and": [
"f_DefeatedPhantoon",
{
"canShineCharge": {
"usedTiles": 20,
"openEnd": 2
}
}
]
}
]
},
{
"autoReserveTrigger": {
"maxReserveEnergy": 95
}
},
"canRModePauseAbuseSparkInterrupt"
],
"resetsObstacles": [
"R-Mode"
],
"flashSuitChecked": true,
"blueSuitChecked": true,
"note": [
"Power Off: Farm using Coverns or trapped Atomics. Use any conveyor belt to shinecharge and then use the next Covern spawn to interrupt.",
"Power On: Kill the Bulls for energy. Run against a conveyor belt direction to shinecharge, and then use the spikes to pause abuse and interrupt."
]
},
{
"id": 18,
"link": [
1,
2
],
"name": "Base",
"requires": [
"h_destroyBombWalls",
"f_DefeatedPhantoon",
{
"or": [
"canTrivialMidAirMorph",
"h_useSpringBall",
"h_bombThings",
{
"and": [
"Morph",
"canUseEnemies"
]
}
]
}
],
"flashSuitChecked": true,
"blueSuitChecked": true,
"note": "By normal means, the path can't be passed unless the Workrobot is activated (so Phantoon dead)"
},
{
"id": 37,
"link": [
1,
2
],
"name": "Blue Suit",
"requires": [
"f_DefeatedPhantoon",
{
"haveBlueSuit": {}
},
"Morph"
],
"flashSuitChecked": true,
"blueSuitChecked": true,
"devNote": [
"FIXME: This could be possible with artificial morph, Spring, and at least one laser projectile.",
"But PLMs will already be overloaded, so the only way out is if the item is Morph."
]
},
{
"id": 19,
"link": [
1,
2
],
"name": "Blue Speed Jump",
"requires": [
"f_DefeatedPhantoon",
"canCarefulJump",
{
"or": [
"canDodgeWhileShooting",
{
"enemyKill": {
"enemies": [
[
"Bull",
"Bull"
]
]
}
},
{
"enemyDamage": {
"enemy": "Bull",
"type": "contact",
"hits": 1
}
}
]
},
{
"getBlueSpeed": {
"usedTiles": 18,
"openEnd": 1
}
},
"h_blueJump",
{
"or": [
"canTrivialMidAirMorph",
"h_useSpringBall",
"h_bombThings"
]
}
],
"flashSuitChecked": true,
"blueSuitChecked": true,
"note": [
"Run on the conveyor to build Speed for breaking the bomb block.",
"Push the right side Worker Robot onto the conveyor",
"Jump low into the wall so Samus' head touches the block.",
"Speed can be used to clear the Bulls."
],
"devNote": "Space Jumping from left conveyor feels a little harder."
},
{
"id": 20,
"link": [
1,
2
],
"name": "Robot Clip",
"requires": [
"canMidAirMorph",
"h_destroyBombWalls",
"canKago"
],
"flashSuitChecked": true,
"blueSuitChecked": true,
"note": [
"Kago through the Workrobot by jumping, pressing down, then morphing and moving right just before hitting the robot.",
"The bomb blocks can be broken with a bomb, Power Bomb, or using Screw Attack.",
"If using bombs, be careful when breaking the bottom bomb block - if morphed, you will be pushed into it and stuck.",
"To do this, place a bomb at the bottom, then a bomb at the peak boost height and unmorph before landing. Alternatively use a short jump morph.",
"If the morph tunnel is open, kagoing through the robot will force Samus into it."
],
"devNote": [
"If Phantoon is alive, 'Base' can be used instead.",
"Note that this strat is useless in vanilla, as the item only spawns if Phantoon has been killed."
]
},
{
"id": 21,
"link": [
1,
2
],
"name": "Robot Clip Run-In-Place",
"requires": [
{
"notable": "Robot Clip Run-In-Place"
},
"canMidAirMorph",
{
"getBlueSpeed": {
"usedTiles": 15,
"openEnd": 1
}
},
"canSlowShortCharge",
"canKago"
],
"flashSuitChecked": true,
"blueSuitChecked": true,
"note": [
"Kago into the worker robot and start running away from the wall until the bomb blocks are broken with SpeedBooster.",
"The short charge taps are extremely precise because gaining too much run speed and Samus will exit the robot."
],
"devNote": [
"If Phantoon is dead, 'Blue Speed Jump' can be used instead.",
"Note that this strat is useless in vanilla, as the item only spawns if Phantoon has been killed."
]
},
{
"id": 38,
"link": [
1,
2
],
"name": "Robot Clip, Blue Suit",
"requires": [
"canMidAirMorph",
"canKago",
{
"haveBlueSuit": {}
}
],
"flashSuitChecked": true,
"blueSuitChecked": true,
"note": "Kagoing into the worker robot will break the bomb block and push Samus into the morph tunnel.",
"devNote": "Note that this strat is useless in vanilla, as the item only spawns if Phantoon has been killed."
},
{
"id": 22,
"link": [
1,
2
],
"name": "Robot Clip, Use Flash Suit",
"requires": [
"canMidAirMorph",
"canKago",
{
"useFlashSuit": {}
},
{
"shinespark": {
"frames": 1,
"excessFrames": 1
}
}
],
"flashSuitChecked": true,
"blueSuitChecked": true,
"note": [
"Kago into the worker robot and shinespark into the wall in order to break the bomb block.",
"Either spark diagonally against the wall or horizontally while not crouched."
],
"devNote": "Note that this strat is useless in vanilla, as the item only spawns if Phantoon has been killed."
},
{
"id": 23,
"link": [
2,
1
],
"name": "Base",
"requires": [
"f_DefeatedPhantoon",
{
"or": [
"canTrivialMidAirMorph",
"h_useSpringBall",
"h_bombThings"
]
}
],
"flashSuitChecked": true,
"blueSuitChecked": true,
"note": "By normal means, the path can't be passed unless the Workrobot is activated (so Phantoon dead)",
"devNote": "This doesn't require breaking the bomb blocks on the premise that you can't get here without breaking them."
},
{
"id": 24,
"link": [
2,
1
],
"name": "Crystal Flash Clip",
"requires": [
{
"obstaclesNotCleared": [
"R-Mode"
]
},
{
"notable": "Crystal Flash Clip"
},
{
"or": [
"canTrivialMidAirMorph",
"h_useSpringBall",
"h_bombThings"
]
},
"h_CrystalFlash",
"canCeilingClip"
],
"flashSuitChecked": true,
"blueSuitChecked": true,
"note": [
"Crystal flash to force a standup then spin jump up then morph to bypass the dead robot. Use Coverns to damage down if necessary.",
"Note that if the Covern spawns on Samus while crystal flashing, it will deal large amounts of damage.",
"To avoid this, it is recommended to kill the Covern and leave its drop, then quickly get in the morph tunnel and CF."
],
"devNote": [
"If Phantoon is alive, 'Base' can be used instead.",
"Note that this strat is useless in vanilla, as the item only spawns if Phantoon has been killed."
]
},
{
"id": 25,
"link": [
2,
1
],
"name": "R-Mode Standup Clip",
"requires": [
{
"notable": "R-Mode Standup Clip"
},
{
"obstaclesCleared": [
"R-Mode"
]
},
"canRModeStandupClip",
"canCeilingClip",
{
"or": [
{
"and": [
{
"disableEquipment": "ETank"
},
{
"or": [
"canBePatient",
{
"resourceAvailable": [
{
"type": "Energy",
"count": 80
}
]
}
]
}
]
},
"canBeExtremelyPatient"
]
},
{
"partialRefill": {
"type": "ReserveEnergy",
"limit": 20
}
},
{
"or": [
"canTrivialMidAirMorph",
"h_useSpringBall",
"h_bombThings"
]
},
{
"autoReserveTrigger": {}
}
],
"resetsObstacles": [
"R-Mode"
],
"flashSuitChecked": true,
"blueSuitChecked": true,
"note": [
"In R-Mode, kill the Coverns until there is Energy in Samus's Reserves. Get into the Morph tunnel and go to the far left.",
"Wait for Coverns to damage Samus down until Reserves trigger, forcing a stand up and enabling her to escape.",
"Note that it is required to break the bomb block above the Morph tunnel as well, in order to clip out."
],
"devNote": [
"If Phantoon is alive, 'Base' can be used instead.",
"Note that this strat is useless in vanilla, as the item only spawns if Phantoon has been killed."
]
}
],
"notables": [
{
"id": 1,
"name": "Robot Clip Run-In-Place",
"note": [
"Kago into the worker robot and start running away from the wall until the bomb blocks are broken with SpeedBooster.",
"The short charge taps are extremely precise because gaining too much run speed and Samus will exit the robot."
]
},
{
"id": 2,
"name": "Crystal Flash Clip",
"note": [
"Crystal flash to force a standup then spin jump up then morph to bypass the dead robot. Use Coverns to damage down if necessary.",
"Note that if the Covern spawns on Samus while crystal flashing, it will deal large amounts of damage.",
"To avoid this, it is recommended to kill the Covern and leave its drop, then quickly get in the morph tunnel and CF."
]
},
{
"id": 3,
"name": "R-Mode Standup Clip",
"note": [
"In R-Mode, kill the Coverns until there is Energy in Samus's Reserves. Get into the Morph tunnel and go to the far left.",
"Wait for Coverns to damage Samus down until Reserves trigger, forcing a stand up and enabling her to escape.",
"Note that it is required to break the bomb block above the Morph tunnel as well, in order to clip out."
]
}
],
"nextStratId": 41,
"nextNotableId": 4
}