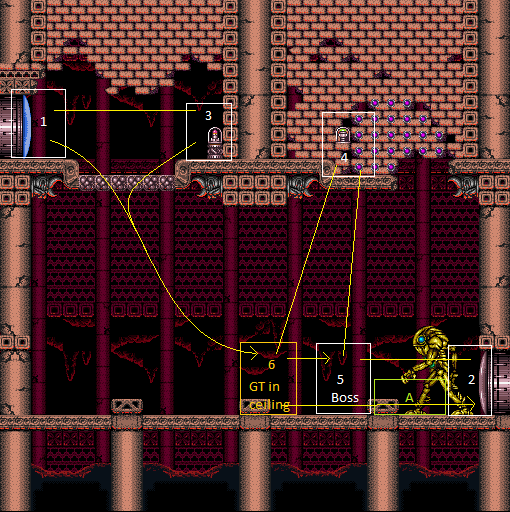
Golden Torizo's Room: R-Mode Forced Standup Clip
Room ID: 150

|
Use a Crystal Flash to refill reserve energy. If Golden Torizo is alive, perform the Crystal Flash in the left corner of the room; otherwise it can be done near the door. Then use heat damage to trigger an R-mode forced standup near the crumble blocks with upward momentum, in order to clip up through them. Several different combinations of items and techniques can make this possible: 1) Space Jump, with a mid-air morph (not required but makes it easier), 2) HiJump and a mid-air Spring Ball jump, most easily by equipping both HiJump and SpringBall during the pause, 3) A walljump into Spring Ball jump, equipping Spring Ball soon after the wall jump into order to gain horizontal speed before the mid-air jump. 4) HiJump and Speedbooster, running and jumping into a mid-air morph, In every case, precise timing is needed to be in the correct location when reserves trigger, just below the crumbles but without bonking them. Having less upward momentum can provide more lenience for timing the forced standup clip, though if Samus' momentum is not enough to make it onto the ledge then a crumble jump may also be required. Entrance condition: {
"comeInWithRMode": {}
}Requires: {
"notable": "R-Mode Forced Standup Clip"
}
"canRModeStandupClip"
{
"or": [
{
"or": [
"f_DefeatedGoldenTorizo",
{
"obstaclesCleared": [
"f_DefeatedGoldenTorizo"
]
}
]
},
{
"heatFrames": 100
}
]
}
"h_heatedCrystalFlash"
{
"or": [
{
"and": [
"SpaceJump",
"can4HighMidAirMorph"
]
},
{
"and": [
"HiJump",
"canSpringBallJumpMidAir"
]
},
{
"and": [
"HiJump",
"canSpeedyJump",
"canMidAirMorph",
"canCrumbleJump"
]
},
{
"and": [
"h_trickySpringwall",
"canCrumbleJump"
]
}
]
}
{
"resourceCapacity": [
{
"type": "RegularEnergy",
"count": 99
}
]
}
{
"autoReserveTrigger": {}
}
{
"heatFrames": 100
}Clears obstacles: door_2 Dev note: FIXME: A variant of this strat could go to the item node instead of the door, possibly with slightly different heat frames at the end. FIXME: As an alternative to doing a Crystal Flash, Golden Torizo could be used as a farm, with canRiskPermanentLossOfAccess. |

