Green Brinstar Main Shaft: Bottom Ice Clip (Extreme+)
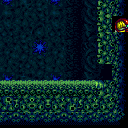

Break the bomb block at the bottom right of the main shaft. Bring a Zeela down to the bottom of the room. Morph inside the tunnel, take a Zeela hit, then jump, aim down, and shoot to freeze the Zeela as it starts to move up and while Samus is close to landing. Jump and aim down to get on top of the Zeela. If the Zeela is precisely positioned exactly 12 pixels above the ground, you can press up to make Samus stand; Otherwise, if you have X-ray, then the Zeela should be frozen lower, and you can morph and unmorph and use X-ray to force Samus to stand up; in this case there is a 6-pixel window over which it works, with the Zeela being between 4 and 9 pixels above the ground. In either case, after standing up on top of the Zeela, jump and aim down to break the crumble block. Then, before the crumble respawns, morph and use Spring Ball (if available) to jump back up and into the tunnel; without Spring Ball, a quick mid-air morph also works but is more difficult.
Strats ()
From: 13
Below Power Bomb Blocks - Main Junction
To: 9
Right Etecoon Shaft - Top Left Door
Enter R-Mode using any door. Crystal Flash or farm the upper section enemies. Use 'Bottom Ice Clip' strat to regain access to the Etecoons Shaft, then wait on top of the crumble block to get the Zeela to follow you in. Shinecharge on top of the Etecoon Shaft and get hit by the Zeela to interrupt. Requires: {"obstaclesCleared": ["R-Mode"]},
{"notable": "Bottom Ice Clip"},
{"or": [
"h_CrystalFlashForReserveEnergy",
{"and": [
{"obstaclesCleared": ["A"]},
"h_RModeCanRefillReserves",
{"resourceMissingAtMost": [{"type": "Missile", "count": 0}]},
{"resourceMissingAtMost": [{"type": "Super", "count": 0}]},
{"partialRefill": {"type": "ReserveEnergy", "limit": 20}}
]}
]},
"h_bombThings",
"h_additionalBomb",
"canTrickyJump",
"h_XRayMorphIceClip",
{"or": [
"h_useSpringBall",
{"and": [
"can4HighMidAirMorph",
"canInsaneJump"
]}
]},
"canBeVeryPatient",
{"or": [
{"canShineCharge": {"usedTiles": 17, "openEnd": 1}},
{"and": [
"h_frozenEnemyRunway",
{"canShineCharge": {"usedTiles": 18, "openEnd": 1}}
]}
]},
{"autoReserveTrigger": {}},
"canRModeSparkInterrupt"Resets obstacles: R-Mode |
From: 13
Below Power Bomb Blocks - Main Junction
To: 14
Right Etecoon Shaft - Wall Jump Checkpoint
Break the bomb block at the bottom right of the main shaft. Bring a Zeela down to the bottom of the room. Morph inside the tunnel, take a Zeela hit, then jump, aim down, and shoot to freeze the Zeela as it starts to move up and while Samus is close to landing. Jump and aim down to get on top of the Zeela. If the Zeela is precisely positioned exactly 12 pixels above the ground, you can press up to make Samus stand; Otherwise, if you have X-ray, then the Zeela should be frozen lower, and you can morph and unmorph and use X-ray to force Samus to stand up; in this case there is a 6-pixel window over which it works, with the Zeela being between 4 and 9 pixels above the ground. In either case, after standing up on top of the Zeela, jump and aim down to break the crumble block. Then, before the crumble respawns, morph and use Spring Ball (if available) to jump back up and into the tunnel; without Spring Ball, a quick mid-air morph also works but is more difficult. Note that it is possible to remain morphed partially on top of the crumble block to break it and let the Zeela move to the right shaft. Requires: {"notable": "Bottom Ice Clip"},
{"or": [
"h_bombThings",
{"haveBlueSuit": {}}
]},
{"noBlueSuit": {}},
"h_bombThings",
{"enemyDamage": {"enemy": "Zeela", "type": "contact", "hits": 1}},
"canTrickyJump",
{"or": [
"h_XRayMorphIceClip",
{"and": [
"h_highPixelIceClip",
"canInsaneJump",
"canBeVeryPatient"
]}
]},
{"or": [
"h_useSpringBall",
{"and": [
"can4HighMidAirMorph",
"canInsaneJump"
]}
]},
{"or": [
"canBePatient",
{"obstaclesNotCleared": ["A"]}
]}Clears obstacles: B Dev note: The mid-air morph is tighter than a normal can4HighMidAirMorph and you may only get one chance at it before having to reset the room. FIXME: canBeVeryPatient requirement is for difficulty (assumed large number of attempts required); a more specific tech could be used if one existed. FIXME: It might be possible to use two Zeelas to wall ice clip and X-ray climb to the door transition(s) above. FIXME: It is possible to use a blue suit to break the first block. It might be possible to do the whole strat with a blue suit. |
From: 14
Right Etecoon Shaft - Wall Jump Checkpoint
To: 9
Right Etecoon Shaft - Top Left Door


After performing the Zeela ice clip, remain morphed on top of the crumble block to let the Zeela follow Samus into the morph tunnel. It is possible to then quickly roll to the right and use a Power Bomb against the bomb block to avoid killing the Zeela, if necessary. Requires: {"notable": "Bottom Ice Clip"},
{"obstaclesCleared": ["B"]},
"canTrickyUseFrozenEnemies",
"canBeVeryPatient" |
From: 14
Right Etecoon Shaft - Wall Jump Checkpoint
To: 9
Right Etecoon Shaft - Top Left Door


After performing the Zeela ice clip, remain morphed on top of the crumble block to let the Zeela follow Samus into the morph tunnel. It is possible to then quickly roll to the right and use a Power Bomb against the bomb block to avoid killing the Zeela, if necessary. Lure the Zeela up to the top door to be used for a G-mode setup. Requires: {"notable": "Bottom Ice Clip"},
{"obstaclesCleared": ["B"]},
"canTrickyGMode",
"canBePatient",
{"or": [
"canConsecutiveWallJump",
"SpaceJump",
"canLongIBJ",
{"and": [
"canTrickyUseFrozenEnemies",
"canBeVeryPatient"
]}
]}Exit condition: "leaveWithDamage": {
"enemy": "Zeela"
}Unlocks doors: {"types": ["ammo"], "requires": []} |
From: 14
Right Etecoon Shaft - Wall Jump Checkpoint
To: 10
Right Etecoon Shaft - Bottom Left Door


After performing the Zeela ice clip, remain morphed on top of the crumble block to let the Zeela follow Samus into the morph tunnel. It is possible to then quickly roll to the right and use a Power Bomb against the bomb block to avoid killing the Zeela, if necessary. Lure the Zeela around the room or use a Super while it is on the side of an overhang to get it to the bottom door to be used for a G-mode setup. Requires: {"notable": "Bottom Ice Clip"},
{"obstaclesCleared": ["B"]},
"canTrickyGMode",
"canBePatient",
{"or": [
{"ammo": {"type": "Super", "count": 1}},
{"and": [
"canBeVeryPatient",
{"or": [
"canConsecutiveWallJump",
"SpaceJump",
"canLongIBJ"
]}
]},
{"and": [
"canBeExtremelyPatient",
"canTrickyUseFrozenEnemies"
]}
]}Exit condition: "leaveWithDamage": {
"enemy": "Zeela"
}Unlocks doors: {"types": ["ammo"], "requires": []} |