canSpecialBeamAttack (Implicit)
A Special Beam Attack (SBA) is activated by equipping Charge and exactly one other beam and selecting Power Bombs. After charging the beam, a power bomb will be consumed, and a beam specific attack will occur.
Dev note: Maybe a disableEquipment requirement should be added here at some point
Strats ()
From: 1
Top Right Door
To: 2
Bottom Door
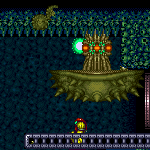
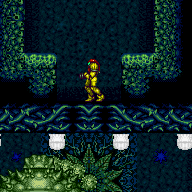
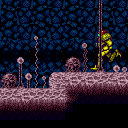
Use the Plasma Special Beam Attack to kill Spore Spawn from above. Stand in the middle of the second lowest platform above Spore Spawn, facing left and crouched. Then quickly use X-Ray to kill Spore Spawn in 1 cycle. Jumping against the ledge above then rotating to the left after landing will put Samus into a good position. Requires: {
"notable": "Plasma SBA Kill from Above"
}
"Plasma"
"canSpecialBeamAttack"
{
"ammo": {
"type": "PowerBomb",
"count": 1
}
}
"canXRayWaitForIFrames"Clears obstacles: f_DefeatedSporeSpawn Sets flags: f_DefeatedSporeSpawn |
From: 1
Top Right Door
To: 2
Bottom Door
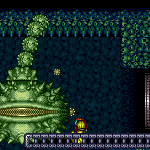
Use the Plasma Special Beam Attack to kill Spore Spawn from above. Spore Spawn will move out of range after the first hit and it will take 9 cycles to come back into range. Stand on the left side of the lowest part of the upper area, facing left for the first hit. 9 cycles later, shoot again from the same spot while crouching to kill Spore Spawn. Requires: {
"notable": "Plasma SBA Kill from Above"
}
"Plasma"
"canSpecialBeamAttack"
{
"ammo": {
"type": "PowerBomb",
"count": 2
}
}
"canBePatient"Clears obstacles: f_DefeatedSporeSpawn Sets flags: f_DefeatedSporeSpawn Dev note: 2 Power Bombs total. |
|

Stand on the right half of Spore Spawn's pit. When Spore Spawn begins it's third left rotation begin to charge the SBA attack. Perform a full height jump just as the SBA attack is about to fire. Requires: {
"notable": "Wave SBA Kill from Above"
}
"Wave"
"canSpecialBeamAttack"
{
"ammo": {
"type": "PowerBomb",
"count": 1
}
}Clears obstacles: f_DefeatedSporeSpawn Sets flags: f_DefeatedSporeSpawn Dev note: 1 Power Bomb total. |
From: 13
Central Junction
To: 5
Left Side - Door Blocked by Crumble Blocks
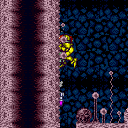
Freeze the Zeb low in the pipe. Crouch and shoot works for that, or shooting as Samus is approaching it. Jump on the left side of the pipe and walk right until you get blocked by the frozen Zeb. Start the ice SBA facing right. The bottom particle will instantly kill the Zeb. Turn around towards the left. At the right moment, jump to prevent the tail particle of the clockwise rotation to freeze the Zeb inside the pipe. As Samus starts falling down again, push left to freeze the rising Zeb with the leading particle of the rotation. While preserving the remaining 2 particles, spinjump over the frozen Zeb to quickly get to the floor above Samus. Run left until Samus hits the wall. While in the standing pose and holding jump, press right to do a buffered turnaround spinjump. Holding L+R during the jump can help to stop at the correct position after landing. Wait until one of the remaining particles flies off and freezes the Zeb at the correct height. Move towards the right side of the floor below the Zeb pipe. While running left, un- and then re-equip ice to synchronize with the Zeb. At the left side, jump up and shoot up to freeze the Zeb one last time, then walljump up and do the clip. Note: If the Zeb drops something, the frozen position at the end will be 1 pixel lower. This doesn't matter, both pixels work. Requires: {
"notable": "Zeb Ice Clip"
}
"canSpecialBeamAttack"
{
"ammo": {
"type": "PowerBomb",
"count": 1
}
}
"canTrickyWallJump"
"h_preciseIceClip"
{
"disableEquipment": "Ice"
}Dev note: Disabling Ice is not a hard requirement, some other timing method could be used. |
|


Requires: "Charge"
"Plasma"
"canSpecialBeamAttack"
{
"ammo": {
"type": "PowerBomb",
"count": 1
}
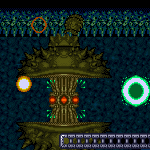
}Clears obstacles: A Dev note: This also raises the elevator, but using this method to get up is a bit obscure and would use the notable from 2->3. |
From: 2
Right Door
To: 3
Top Junction
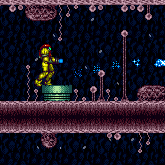
The elevator can be raised by clipping a shot into the floor, shot while falling with the right amount of vertical speed. This can be done with a Missile, Super, or charged Spazer or Plasma shot, a well positioned angle Spazer shot while crouched, or an or Ice SBA. Requires: {
"notable": "Shot Clip to Ride the Elevator"
}
{
"or": [
{
"ammo": {
"type": "Missile",
"count": 1
}
},
{
"ammo": {
"type": "Super",
"count": 1
}
},
"Spazer",
{
"and": [
"Charge",
"Plasma"
]
},
{
"and": [
"Charge",
"Ice",
"canSpecialBeamAttack",
{
"ammo": {
"type": "PowerBomb",
"count": 1
}
}
]
}
]
}Clears obstacles: B Dev note: FIXME: Do we need leniency or another tech for this? |
|
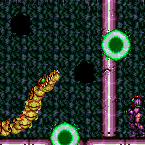
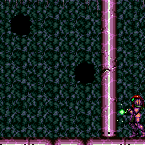
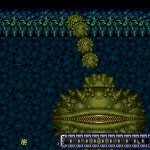
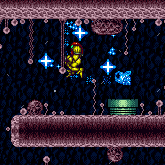
Stand near the dividing wall and unleash the Plasma Special Beam Attack! Requires: {
"notable": "Back-Side Plasma Shield Fight"
}
"h_navigateUnderwater"
"canSpecialBeamAttack"
"Plasma"
{
"ammo": {
"type": "PowerBomb",
"count": 5
}
}
{
"or": [
"canBeLucky",
{
"ammo": {
"type": "PowerBomb",
"count": 2
}
}
]
}
{
"or": [
"Gravity",
"canTrickyDodgeEnemies",
{
"enemyDamage": {
"enemy": "Botwoon 1",
"type": "acid",
"hits": 2
}
}
]
}Clears obstacles: f_DefeatedBotwoon Sets flags: f_DefeatedBotwoon |
|


Wait for Botwoon to spawn then use a Plasma Special Beam Attack. Use XRay to slow time and watch for a particle to overlap Botwoons head, then proceed to Microwave. Requires: {
"notable": "Back-Side Plasma Shield Microwave"
}
"h_navigateUnderwater"
"canSpecialBeamAttack"
"Plasma"
"canXRayWaitForIFrames"
{
"ammo": {
"type": "PowerBomb",
"count": 1
}
}
{
"or": [
"canTrickyDodgeEnemies",
{
"ammo": {
"type": "PowerBomb",
"count": 2
}
}
]
}
{
"or": [
"canBeLucky",
{
"ammo": {
"type": "PowerBomb",
"count": 1
}
}
]
}Clears obstacles: f_DefeatedBotwoon Sets flags: f_DefeatedBotwoon Dev note: Killing in 1 SBA takes some luck. Microwaving effeciently takes some dexterity. This strat only applies to those who don't know the magic pixel strat is possible. |
From: 2
Right Door
To: 2
Right Door
If Shaktool's camera is fixed it is possible to regain mobility by using a Snail (Yard): a Super or any SBA can trigger a Yard to attack. Requires: {
"enemyDamage": {
"enemy": "Yard",
"type": "contact",
"hits": 1
}
}
"h_ShaktoolCameraFix"
{
"or": [
{
"ammo": {
"type": "Super",
"count": 1
}
},
{
"and": [
"canTrickyGMode",
"canSpecialBeamAttack",
{
"ammo": {
"type": "PowerBomb",
"count": 1
}
}
]
}
]
} |