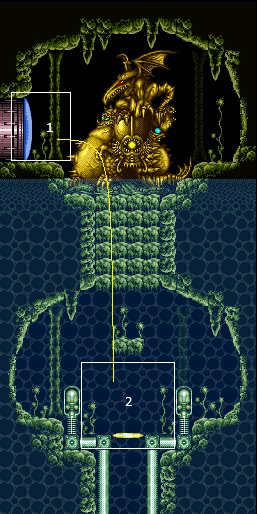
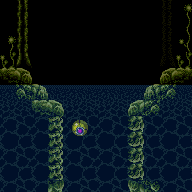
Statues Room
Room ID: 27
|
Exit condition: {
"leaveWithRunway": {
"length": 3,
"openEnd": 1
}
} |
|
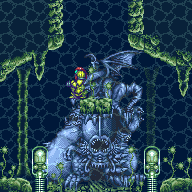
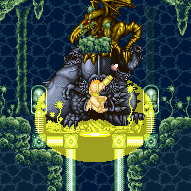
Represents the statues sinking and opening up the path to Tourian Requires: "f_DefeatedKraid" "f_DefeatedPhantoon" "f_DefeatedDraygon" "f_DefeatedRidley" Sets flags: f_TourianOpen |
|
Requires: "h_CrystalFlash" |
|
Requires: "f_TourianOpen" |
|


Entrance condition: {
"comeInShinecharged": {}
}Requires: {
"shineChargeFrames": 100
}
"f_TourianOpen"
"Gravity"
"canShinechargeMovementComplex"Exit condition: {
"leaveShinecharged": {}
} |
|


Entrance condition: {
"comeInShinecharged": {}
}Requires: {
"shineChargeFrames": 120
}
"f_TourianOpen"
"canSuitlessMaridia"
"canShinechargeMovementComplex"Exit condition: {
"leaveShinecharged": {}
} |
|
Entrance condition: {
"comeInWithGMode": {
"mode": "any",
"morphed": false
}
}Requires: "f_TourianOpen" Exit condition: {
"leaveWithGMode": {
"morphed": false
}
} |
|


Requires: "f_TourianOpen"
"Gravity"
{
"or": [
"HiJump",
"SpaceJump",
"canIBJ",
"canSpringBallJumpMidAir",
"canWallJump",
"canGravityJump"
]
} |
|
Requires: "f_TourianOpen" "canSuitlessMaridia" "HiJump" "canSpringBallJumpMidAir" |
|

Walljump up the elevator room walls without Gravity suit. Space Jump helps once the waterline is reached. Requires: {
"notable": "Underwater Walljump"
}
"f_TourianOpen"
"canUnderwaterWallJump" |
|
From a crouch jump, perform a double Spring Ball jump, using a precisely timed bomb boost to propel Samus upward just long enough to get the second mid-air Spring Ball jump. Requires: "f_TourianOpen" "canUnderwaterBombIntoSpringBallJump" |
|


Requires: "f_TourianOpen"
"h_storedSpark"
{
"or": [
{
"shinespark": {
"frames": 14,
"excessFrames": 8
}
},
{
"and": [
"HiJump",
{
"shinespark": {
"frames": 11,
"excessFrames": 8
}
}
]
}
]
} |
|


Jump to the right side and diagonal spark left to escape the water. To spark as quickly as possible, buffer a spin jump by holding left (or right) and jump while riding the elevator. Entrance condition: {
"comeInShinecharged": {}
}Requires: {
"shineChargeFrames": 35
}
"f_TourianOpen"
"h_navigateUnderwater"
"canShinechargeMovement"
{
"shinespark": {
"frames": 21,
"excessFrames": 8
}
} |
|


Jump to either side and vertically spark out. To spark as quickly as possible, buffer a spin jump by holding left (or right) and jump while riding the elevator. Entrance condition: {
"comeInShinecharged": {}
}Requires: {
"shineChargeFrames": 20
}
"f_TourianOpen"
"h_navigateUnderwater"
"canShinechargeMovement"
{
"shinespark": {
"frames": 24,
"excessFrames": 9
}
} |
From: 2
Elevator
To: 1
Left Door
Entrance condition: {
"comeInShinecharged": {}
}Requires: {
"shineChargeFrames": 120
}
"f_TourianOpen"
"Gravity"
"HiJump"
"canWallJump"
"canShinechargeMovementComplex"Exit condition: {
"leaveShinecharged": {}
}Unlocks doors: {"types":["super"],"requires":[]}
{"types":["missiles","powerbomb"],"requires":["never"]} |
From: 2
Elevator
To: 1
Left Door
Entrance condition: {
"comeInShinecharged": {}
}Requires: {
"shineChargeFrames": 95
}
"f_TourianOpen"
"Gravity"
"HiJump"
"canWallJump"
"canShinechargeMovementComplex"
{
"shinespark": {
"frames": 9,
"excessFrames": 0
}
}Exit condition: {
"leaveWithSpark": {}
}Unlocks doors: {"types":["super"],"requires":[]}
{"types":["missiles","powerbomb"],"requires":["never"]} |
|
Entrance condition: {
"comeInShinecharged": {}
}Requires: {
"shineChargeFrames": 105
}
"f_TourianOpen"
"Gravity"
"HiJump"
"canShinechargeMovementComplex"
{
"shinespark": {
"frames": 7,
"excessFrames": 0
}
}Exit condition: {
"leaveWithSpark": {}
}Unlocks doors: {"types":["super"],"requires":[]}
{"types":["missiles","powerbomb"],"requires":["never"]} |
|
Entrance condition: {
"comeInShinecharged": {}
}Requires: {
"shineChargeFrames": 120
}
"f_TourianOpen"
"Gravity"
"canWallJump"
"canShinechargeMovementComplex"
{
"shinespark": {
"frames": 8,
"excessFrames": 0
}
}Exit condition: {
"leaveWithSpark": {}
}Unlocks doors: {"types":["super"],"requires":[]}
{"types":["missiles","powerbomb"],"requires":["never"]} |
|
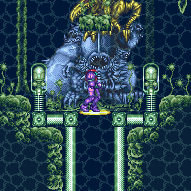
Represents the statues sinking and opening up the path to Tourian, but coming from below. Requires: "f_DefeatedKraid" "f_DefeatedPhantoon" "f_DefeatedDraygon" "f_DefeatedRidley" Sets flags: f_TourianOpen Dev note: If Tourian is locked, coming in from below results in glitched graphics. You can reach the elevator to go back down again or sit through the unlock to get up which in turn can result in persisting glitched graphics. |
|
Requires: "h_CrystalFlash" |
|
Entrance condition: {
"comeInWithGMode": {
"mode": "any",
"morphed": false
}
}Exit condition: {
"leaveWithGMode": {
"morphed": false
}
} |
|
In order to align and place a Power Bomb at the correct pixel, perform a suitless stationary spin jump and hit the ceiling before starting to morph. Requires: {
"or": [
"canInsaneJump",
{
"and": [
"canDisableEquipment",
"canStationarySpinJump"
]
}
]
}
"h_elevatorCrystalFlash"Exit condition: {
"leaveNormally": {}
} |
{
"$schema": "../../../schema/m3-room.schema.json",
"id": 27,
"name": "Statues Room",
"area": "Crateria",
"subarea": "West",
"roomAddress": "0x7A66A",
"roomEnvironments": [
{
"heated": false
}
],
"mapTileMask": [
[
1
],
[
1
],
[
1
],
[
1
],
[
1
]
],
"nodes": [
{
"id": 1,
"name": "Left Door",
"nodeType": "door",
"nodeSubType": "gray",
"nodeAddress": "0x0019216",
"doorOrientation": "left",
"doorEnvironments": [
{
"physics": "air"
}
],
"locks": [
{
"name": "Statues Room Gray Lock (to Statues Hallway)",
"lockType": "cutscene",
"unlockStrats": [
{
"name": "Base",
"requires": [],
"flashSuitChecked": true,
"blueSuitChecked": true
}
]
}
],
"mapTileMask": [
[
2
],
[
1
],
[
1
],
[
1
],
[
1
]
]
},
{
"id": 2,
"name": "Elevator",
"nodeType": "door",
"nodeSubType": "elevator",
"nodeAddress": "0x0019222",
"doorOrientation": "down",
"useImplicitCarryGModeBackThrough": false,
"useImplicitCarryGModeMorphBackThrough": false,
"mapTileMask": [
[
1
],
[
2
],
[
2
],
[
2
],
[
2
]
]
}
],
"enemies": [],
"strats": [
{
"link": [
1,
1
],
"name": "Base (Unlock Door)",
"requires": [],
"unlocksDoors": [
{
"types": [
"ammo"
],
"requires": []
}
],
"flashSuitChecked": true,
"blueSuitChecked": true
},
{
"link": [
1,
1
],
"name": "Base (Come In Normally)",
"entranceCondition": {
"comeInNormally": {}
},
"requires": [],
"flashSuitChecked": true,
"blueSuitChecked": true
},
{
"link": [
1,
1
],
"name": "Base (Come In With Mockball)",
"entranceCondition": {
"comeInWithMockball": {
"adjacentMinTiles": 0,
"remoteAndLandingMinTiles": [
[
0,
0
]
],
"speedBooster": "any"
}
},
"requires": [],
"flashSuitChecked": true,
"blueSuitChecked": true
},
{
"link": [
2,
2
],
"name": "Base (Unlock Door)",
"requires": [],
"unlocksDoors": [
{
"types": [
"ammo"
],
"requires": []
}
],
"flashSuitChecked": true,
"blueSuitChecked": true
},
{
"link": [
2,
2
],
"name": "Base (Come In Normally)",
"entranceCondition": {
"comeInNormally": {}
},
"requires": [],
"flashSuitChecked": true,
"blueSuitChecked": true
},
{
"link": [
2,
2
],
"name": "Base (Come In With Grapple Jump)",
"entranceCondition": {
"comeInWithGrappleJump": {
"position": "any"
}
},
"requires": [],
"flashSuitChecked": true,
"blueSuitChecked": true
},
{
"id": 1,
"link": [
1,
1
],
"name": "Leave with Runway",
"requires": [],
"exitCondition": {
"leaveWithRunway": {
"length": 3,
"openEnd": 1
}
},
"flashSuitChecked": true,
"blueSuitChecked": true
},
{
"id": 25,
"link": [
1,
1
],
"name": "Statues Cutscene",
"requires": [
"f_DefeatedKraid",
"f_DefeatedPhantoon",
"f_DefeatedDraygon",
"f_DefeatedRidley"
],
"setsFlags": [
"f_TourianOpen"
],
"flashSuitChecked": true,
"blueSuitChecked": true,
"note": "Represents the statues sinking and opening up the path to Tourian"
},
{
"id": 2,
"link": [
1,
1
],
"name": "Crystal Flash",
"requires": [
"h_CrystalFlash"
],
"flashSuitChecked": true,
"blueSuitChecked": true
},
{
"id": 18,
"link": [
1,
2
],
"name": "Base",
"requires": [
"f_TourianOpen"
],
"flashSuitChecked": true,
"blueSuitChecked": true
},
{
"id": 3,
"link": [
1,
2
],
"name": "Carry Shinecharge (Gravity)",
"entranceCondition": {
"comeInShinecharged": {}
},
"requires": [
{
"shineChargeFrames": 100
},
"f_TourianOpen",
"Gravity",
"canShinechargeMovementComplex"
],
"exitCondition": {
"leaveShinecharged": {}
},
"flashSuitChecked": true,
"blueSuitChecked": true
},
{
"id": 4,
"link": [
1,
2
],
"name": "Carry Shinecharge (Suitless)",
"entranceCondition": {
"comeInShinecharged": {}
},
"requires": [
{
"shineChargeFrames": 120
},
"f_TourianOpen",
"canSuitlessMaridia",
"canShinechargeMovementComplex"
],
"exitCondition": {
"leaveShinecharged": {}
},
"flashSuitChecked": true,
"blueSuitChecked": true
},
{
"id": 5,
"link": [
1,
2
],
"name": "Carry G-Mode Down the Elevator",
"entranceCondition": {
"comeInWithGMode": {
"mode": "any",
"morphed": false
}
},
"requires": [
"f_TourianOpen"
],
"exitCondition": {
"leaveWithGMode": {
"morphed": false
}
},
"flashSuitChecked": true,
"blueSuitChecked": true
},
{
"id": 20,
"link": [
2,
1
],
"name": "Gravity",
"requires": [
"f_TourianOpen",
"Gravity",
{
"or": [
"HiJump",
"SpaceJump",
"canIBJ",
"canSpringBallJumpMidAir",
"canWallJump",
"canGravityJump"
]
}
],
"flashSuitChecked": true,
"blueSuitChecked": true
},
{
"id": 21,
"link": [
2,
1
],
"name": "Suitless Base",
"requires": [
"f_TourianOpen",
"canSuitlessMaridia",
"HiJump",
"canSpringBallJumpMidAir"
],
"flashSuitChecked": true,
"blueSuitChecked": true
},
{
"id": 22,
"link": [
2,
1
],
"name": "Underwater Walljump",
"requires": [
{
"notable": "Underwater Walljump"
},
"f_TourianOpen",
"canUnderwaterWallJump"
],
"flashSuitChecked": true,
"blueSuitChecked": true,
"note": "Walljump up the elevator room walls without Gravity suit. Space Jump helps once the waterline is reached."
},
{
"id": 23,
"link": [
2,
1
],
"name": "Underwater Bomb into Spring Ball Jump",
"requires": [
"f_TourianOpen",
"canUnderwaterBombIntoSpringBallJump"
],
"flashSuitChecked": true,
"blueSuitChecked": true,
"note": [
"From a crouch jump, perform a double Spring Ball jump, using a precisely timed bomb boost",
"to propel Samus upward just long enough to get the second mid-air Spring Ball jump."
]
},
{
"id": 24,
"link": [
2,
1
],
"name": "Use Stored Spark",
"requires": [
"f_TourianOpen",
"h_storedSpark",
{
"or": [
{
"shinespark": {
"frames": 14,
"excessFrames": 8
}
},
{
"and": [
"HiJump",
{
"shinespark": {
"frames": 11,
"excessFrames": 8
}
}
]
}
]
}
],
"flashSuitChecked": true,
"blueSuitChecked": true
},
{
"id": 14,
"link": [
2,
1
],
"name": "Diagonal Shinespark",
"entranceCondition": {
"comeInShinecharged": {}
},
"requires": [
{
"shineChargeFrames": 35
},
"f_TourianOpen",
"h_navigateUnderwater",
"canShinechargeMovement",
{
"shinespark": {
"frames": 21,
"excessFrames": 8
}
}
],
"flashSuitChecked": true,
"blueSuitChecked": true,
"note": [
"Jump to the right side and diagonal spark left to escape the water.",
"To spark as quickly as possible, buffer a spin jump by holding left (or right) and jump while riding the elevator."
]
},
{
"id": 15,
"link": [
2,
1
],
"name": "Vertical Shinespark",
"entranceCondition": {
"comeInShinecharged": {}
},
"requires": [
{
"shineChargeFrames": 20
},
"f_TourianOpen",
"h_navigateUnderwater",
"canShinechargeMovement",
{
"shinespark": {
"frames": 24,
"excessFrames": 9
}
}
],
"flashSuitChecked": true,
"blueSuitChecked": true,
"note": [
"Jump to either side and vertically spark out.",
"To spark as quickly as possible, buffer a spin jump by holding left (or right) and jump while riding the elevator."
]
},
{
"id": 7,
"link": [
2,
1
],
"name": "Carry Shinecharge (Gravity HiJump Wall Jump)",
"entranceCondition": {
"comeInShinecharged": {}
},
"requires": [
{
"shineChargeFrames": 120
},
"f_TourianOpen",
"Gravity",
"HiJump",
"canWallJump",
"canShinechargeMovementComplex"
],
"exitCondition": {
"leaveShinecharged": {}
},
"unlocksDoors": [
{
"types": [
"super"
],
"requires": []
},
{
"types": [
"missiles",
"powerbomb"
],
"requires": [
"never"
]
}
],
"flashSuitChecked": true,
"blueSuitChecked": true
},
{
"id": 8,
"link": [
2,
1
],
"name": "Leave With Spark (Gravity HiJump Wall Jump)",
"entranceCondition": {
"comeInShinecharged": {}
},
"requires": [
{
"shineChargeFrames": 95
},
"f_TourianOpen",
"Gravity",
"HiJump",
"canWallJump",
"canShinechargeMovementComplex",
{
"shinespark": {
"frames": 9,
"excessFrames": 0
}
}
],
"exitCondition": {
"leaveWithSpark": {}
},
"unlocksDoors": [
{
"types": [
"super"
],
"requires": []
},
{
"types": [
"missiles",
"powerbomb"
],
"requires": [
"never"
]
}
],
"flashSuitChecked": true,
"blueSuitChecked": true
},
{
"id": 9,
"link": [
2,
1
],
"name": "Leave With Spark (Gravity HiJump)",
"entranceCondition": {
"comeInShinecharged": {}
},
"requires": [
{
"shineChargeFrames": 105
},
"f_TourianOpen",
"Gravity",
"HiJump",
"canShinechargeMovementComplex",
{
"shinespark": {
"frames": 7,
"excessFrames": 0
}
}
],
"exitCondition": {
"leaveWithSpark": {}
},
"unlocksDoors": [
{
"types": [
"super"
],
"requires": []
},
{
"types": [
"missiles",
"powerbomb"
],
"requires": [
"never"
]
}
],
"flashSuitChecked": true,
"blueSuitChecked": true
},
{
"id": 10,
"link": [
2,
1
],
"name": "Leave With Spark (Gravity Wall Jump)",
"entranceCondition": {
"comeInShinecharged": {}
},
"requires": [
{
"shineChargeFrames": 120
},
"f_TourianOpen",
"Gravity",
"canWallJump",
"canShinechargeMovementComplex",
{
"shinespark": {
"frames": 8,
"excessFrames": 0
}
}
],
"exitCondition": {
"leaveWithSpark": {}
},
"unlocksDoors": [
{
"types": [
"super"
],
"requires": []
},
{
"types": [
"missiles",
"powerbomb"
],
"requires": [
"never"
]
}
],
"flashSuitChecked": true,
"blueSuitChecked": true
},
{
"id": 26,
"link": [
2,
2
],
"name": "Statues Cutscene",
"requires": [
"f_DefeatedKraid",
"f_DefeatedPhantoon",
"f_DefeatedDraygon",
"f_DefeatedRidley"
],
"setsFlags": [
"f_TourianOpen"
],
"flashSuitChecked": true,
"blueSuitChecked": true,
"note": "Represents the statues sinking and opening up the path to Tourian, but coming from below.",
"devNote": [
"If Tourian is locked, coming in from below results in glitched graphics.",
"You can reach the elevator to go back down again or sit through the unlock to get up which in turn can result in persisting glitched graphics."
]
},
{
"id": 11,
"link": [
2,
2
],
"name": "Crystal Flash",
"requires": [
"h_CrystalFlash"
],
"flashSuitChecked": true,
"blueSuitChecked": true
},
{
"id": 12,
"link": [
2,
2
],
"name": "Carry G-Mode Back Down the Elevator",
"entranceCondition": {
"comeInWithGMode": {
"mode": "any",
"morphed": false
}
},
"requires": [],
"exitCondition": {
"leaveWithGMode": {
"morphed": false
}
},
"flashSuitChecked": true,
"blueSuitChecked": true
},
{
"id": 13,
"link": [
2,
2
],
"name": "Elevator Crystal Flash for Flash Suit",
"requires": [
{
"or": [
"canInsaneJump",
{
"and": [
"canDisableEquipment",
"canStationarySpinJump"
]
}
]
},
"h_elevatorCrystalFlash"
],
"exitCondition": {
"leaveNormally": {}
},
"flashSuitChecked": true,
"blueSuitChecked": true,
"note": "In order to align and place a Power Bomb at the correct pixel, perform a suitless stationary spin jump and hit the ceiling before starting to morph."
}
],
"notables": [
{
"id": 1,
"name": "Underwater Walljump",
"note": "Walljump up the elevator room walls without Gravity suit. Space Jump helps once the waterline is reached."
}
],
"nextStratId": 28,
"nextNotableId": 2
}