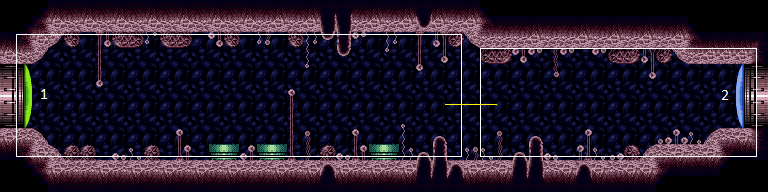
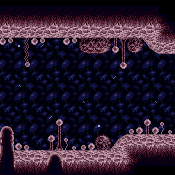
Spore Spawn Farming Room
Room ID: 64
|
Requires: {
"simpleCycleFrames": 85
}
{
"cycleFrames": 20
}Farm cycle drops: 1 Zeb |
|
Jump back and forth between the left two bug pipes to farm them simultaneously. Requires: "canDodgeWhileShooting"
{
"cycleFrames": 105
}Farm cycle drops: 2 Zeb Dev note: We use `cycleFrames` here rather than `simpleCycleFrames` because it requires non-trivial movement to maintain the double farm pattern. |
|
Exit condition: {
"leaveWithRunway": {
"length": 12,
"openEnd": 0,
"steepUpTiles": 2
}
} |
|
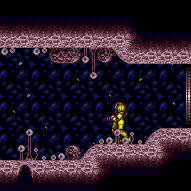
Stand to the right of the right-most bug pipe, and run to the right to gain a shortcharge. Run back to the left, jump over the bug pipes with one jump, and exit through the left door. Requires: {
"canShineCharge": {
"usedTiles": 21,
"steepUpTiles": 2,
"openEnd": 0
}
}
"canShinechargeMovementComplex"
{
"shineChargeFrames": 165
}Exit condition: {
"leaveShinecharged": {}
} |
|
Stand to the right of the right-most bug pipe, and run to the right to gain a shortcharge. Run back to the left, Space Jump over the bug pipes, and exit through the left door. Requires: {
"canShineCharge": {
"usedTiles": 21,
"steepUpTiles": 2,
"openEnd": 0
}
}
"SpaceJump"
"canShinechargeMovementComplex"
{
"shineChargeFrames": 155
}Exit condition: {
"leaveShinecharged": {}
} |
|
Stand to the right of the right-most bug pipe, and run to the right to gain a shortcharge. Run back to the left, jump over the bug pipes, and shinespark through the left door. Requires: {
"canShineCharge": {
"usedTiles": 21,
"steepUpTiles": 2,
"openEnd": 0
}
}
{
"or": [
{
"shinespark": {
"frames": 29,
"excessFrames": 0
}
},
{
"and": [
"h_speedJump",
{
"shinespark": {
"frames": 15,
"excessFrames": 0
}
}
]
}
]
}Exit condition: {
"leaveWithSpark": {}
} |
|
Requires: "SpaceJump" Exit condition: {
"leaveSpinning": {
"remoteRunway": {
"length": 20,
"openEnd": 1
}
}
}Dev note: A variation with 1 more runway tile could be added for if the door at node 2 is unlocked, and the same for the other remote runway strats. |
|
Exit condition: {
"leaveWithMockball": {
"remoteRunway": {
"length": 20,
"openEnd": 1
},
"landingRunway": {
"length": 10,
"openEnd": 1
},
"minExtraRunSpeed": "$1.6"
}
} |
|
Exit condition: {
"leaveSpaceJumping": {
"remoteRunway": {
"length": 20,
"openEnd": 1
}
}
} |
|
Requires: {
"getBlueSpeed": {
"usedTiles": 20,
"openEnd": 1
}
}
"canChainTemporaryBlue"Exit condition: {
"leaveWithTemporaryBlue": {}
} |
From: 1
Left Door
To: 1
Left Door
Entrance condition: {
"comeInShinecharging": {
"length": 11,
"openEnd": 0,
"steepDownTiles": 2
},
"comesInHeated": "no"
}Requires: "h_CrystalSpark" |
|
Exit condition: {
"leaveWithGModeSetup": {}
} |
|
Entrance condition: {
"comeInWithRMode": {}
}Requires: {
"refill": [
"Energy"
]
}
{
"canShineCharge": {
"usedTiles": 21,
"steepUpTiles": 2,
"openEnd": 0
}
}
{
"autoReserveTrigger": {
"maxReserveEnergy": 95
}
}
"canRModeSparkInterrupt" |
|
|
|
|
From: 2
Right Door
To: 1
Left Door


Entrance condition: {
"comeInWithGrappleTeleport": {
"blockPositions": [
[
3,
12
],
[
3,
13
]
]
}
}Bypasses door shell: true |
From: 2
Right Door
To: 1
Left Door
Entrance condition: {
"comeInWithGrappleTeleport": {
"blockPositions": [
[
3,
12
]
]
}
}Exit condition: {
"leaveWithGrappleTeleport": {
"blockPositions": [
[
3,
12
]
]
}
}Bypasses door shell: true |
From: 2
Right Door
To: 1
Left Door
Entrance condition: {
"comeInWithGrappleTeleport": {
"blockPositions": [
[
3,
13
]
]
}
}Exit condition: {
"leaveWithGrappleTeleport": {
"blockPositions": [
[
3,
13
]
]
}
}Bypasses door shell: true |
|
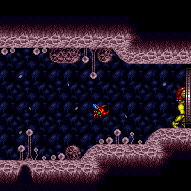
Build up to full run speed and speedball towards the left door. With a little luck, Samus will accelerate through the slope tiles and pass under the door. Entrance condition: {
"comeInGettingBlueSpeed": {
"length": 20,
"openEnd": 0,
"minExtraRunSpeed": "$7.0"
}
}Requires: {
"notable": "Roll Under Door"
}
"canSpeedball"Exit condition: {
"leaveWithMockball": {
"remoteRunway": {
"length": 45,
"openEnd": 1
},
"landingRunway": {
"length": 7,
"openEnd": 1
},
"minExtraRunSpeed": "$7.0"
}
}Bypasses door shell: true |
|
Exit condition: {
"leaveWithRunway": {
"length": 22,
"openEnd": 0,
"steepUpTiles": 2
}
} |
From: 2
Right Door
To: 2
Right Door
Exit condition: {
"leaveWithGModeSetup": {}
} |
|


After shinecharging, lure a Zeb and use it to slopespark on the first slope right of the pipe. Requires: {
"or": [
{
"canShineCharge": {
"usedTiles": 20,
"steepDownTiles": 2,
"openEnd": 0
}
},
{
"and": [
{
"doorUnlockedAtNode": 2
},
{
"canShineCharge": {
"usedTiles": 21,
"steepDownTiles": 2,
"openEnd": 0
}
}
]
}
]
}
{
"shineChargeFrames": 150
}
{
"enemyDamage": {
"enemy": "Zeb",
"type": "contact",
"hits": 1
}
}
"canSlopeSpark"
{
"shinespark": {
"frames": 4,
"excessFrames": 4
}
}Dev note: No leniency is given as this is a farm room and the Zebs do little damage, even suitless. |
From: 2
Right Door
To: 2
Right Door


After shinecharging, lure a Zeb and use it to slopespark on the first slope right of the pipe. Requires: "canUseFlashSuitInitialSpark"
{
"canShineCharge": {
"usedTiles": 21,
"steepDownTiles": 2,
"openEnd": 0
}
}
{
"shineChargeFrames": 150
}
{
"enemyDamage": {
"enemy": "Zeb",
"type": "contact",
"hits": 1
}
}
"canSlopeSpark"
{
"shinespark": {
"frames": 12,
"excessFrames": 0
}
}Exit condition: {
"leaveWithSpark": {
"position": "bottom"
}
}Dev note: No leniency is given as this is a farm room and the Zebs do little damage, even suitless. |
|


Entrance condition: {
"comeInWithRMode": {}
}Requires: {
"refill": [
"Energy"
]
}
{
"canShineCharge": {
"usedTiles": 21,
"steepUpTiles": 2,
"openEnd": 0
}
}
{
"autoReserveTrigger": {
"maxReserveEnergy": 95
}
}
"canRModeSparkInterrupt" |
|
Requires: {
"or": [
{
"canShineCharge": {
"usedTiles": 20,
"steepDownTiles": 2,
"openEnd": 0
}
},
{
"and": [
{
"doorUnlockedAtNode": 2
},
{
"canShineCharge": {
"usedTiles": 21,
"steepDownTiles": 2,
"openEnd": 0
}
}
]
}
]
}
{
"shineChargeFrames": 170
}
{
"enemyDamage": {
"enemy": "Zeb",
"type": "contact",
"hits": 1
}
}
"canSlopeXMode"
{
"shinespark": {
"frames": 0
}
}
{
"gainBlueSuit": {}
}Dev note: No leniency is given as this is a farm room and the Zebs do little damage, even suitless. |
|
Requires: {
"canShineCharge": {
"usedTiles": 21,
"steepUpTiles": 2,
"openEnd": 0
}
}
"h_CrystalSpark" |
From: 2
Right Door
To: 2
Right Door
Entrance condition: {
"comeInShinecharging": {
"length": 21,
"openEnd": 0,
"steepDownTiles": 2
},
"comesInHeated": "no"
}Requires: "h_CrystalSpark" |
{
"$schema": "../../../schema/m3-room.schema.json",
"id": 64,
"name": "Spore Spawn Farming Room",
"area": "Brinstar",
"subarea": "Pink",
"roomAddress": "0x7A0A4",
"roomEnvironments": [
{
"heated": false
}
],
"mapTileMask": [
[
1,
1,
1
]
],
"nodes": [
{
"id": 1,
"name": "Left Door",
"nodeType": "door",
"nodeSubType": "green",
"nodeAddress": "0x0018f82",
"doorOrientation": "left",
"doorEnvironments": [
{
"physics": "air"
}
],
"mapTileMask": [
[
2,
2,
1
]
]
},
{
"id": 2,
"name": "Right Door",
"nodeType": "door",
"nodeSubType": "blue",
"nodeAddress": "0x0018f76",
"doorOrientation": "right",
"doorEnvironments": [
{
"physics": "air"
}
],
"mapTileMask": [
[
1,
1,
2
]
]
}
],
"enemies": [
{
"id": "e1",
"groupName": "Spore Spawn Farming Room Zeelas",
"enemyName": "Zeela",
"quantity": 2,
"homeNodes": [
1
]
},
{
"id": "e2",
"groupName": "Spore Spawn Farming Room Left Zebs",
"enemyName": "Zeb",
"quantity": 2,
"homeNodes": [
1
]
},
{
"id": "e3",
"groupName": "Spore Spawn Farming Room Right Zeb",
"enemyName": "Zeb",
"quantity": 1,
"homeNodes": [
1
]
}
],
"strats": [
{
"link": [
1,
1
],
"name": "Base (Unlock Door)",
"requires": [],
"unlocksDoors": [
{
"types": [
"ammo"
],
"requires": []
}
],
"flashSuitChecked": true,
"blueSuitChecked": true
},
{
"link": [
1,
1
],
"name": "Base (Come In Normally)",
"entranceCondition": {
"comeInNormally": {}
},
"requires": [],
"flashSuitChecked": true,
"blueSuitChecked": true
},
{
"link": [
1,
1
],
"name": "Base (Come In With Mockball)",
"entranceCondition": {
"comeInWithMockball": {
"adjacentMinTiles": 0,
"remoteAndLandingMinTiles": [
[
0,
0
]
],
"speedBooster": "any"
}
},
"requires": [],
"flashSuitChecked": true,
"blueSuitChecked": true
},
{
"link": [
2,
2
],
"name": "Base (Unlock Door)",
"requires": [],
"unlocksDoors": [
{
"types": [
"ammo"
],
"requires": []
}
],
"flashSuitChecked": true,
"blueSuitChecked": true
},
{
"link": [
2,
2
],
"name": "Base (Come In Normally)",
"entranceCondition": {
"comeInNormally": {}
},
"requires": [],
"flashSuitChecked": true,
"blueSuitChecked": true
},
{
"link": [
2,
2
],
"name": "Base (Come In With Mockball)",
"entranceCondition": {
"comeInWithMockball": {
"adjacentMinTiles": 0,
"remoteAndLandingMinTiles": [
[
0,
0
]
],
"speedBooster": "any"
}
},
"requires": [],
"flashSuitChecked": true,
"blueSuitChecked": true
},
{
"id": 1,
"link": [
1,
1
],
"name": "Zeb Farm",
"requires": [
{
"simpleCycleFrames": 85
},
{
"cycleFrames": 20
}
],
"farmCycleDrops": [
{
"enemy": "Zeb",
"count": 1
}
],
"flashSuitChecked": true,
"blueSuitChecked": true
},
{
"id": 19,
"link": [
1,
1
],
"name": "Double Zeb Farm",
"requires": [
"canDodgeWhileShooting",
{
"cycleFrames": 105
}
],
"farmCycleDrops": [
{
"enemy": "Zeb",
"count": 2
}
],
"flashSuitChecked": true,
"blueSuitChecked": true,
"note": [
"Jump back and forth between the left two bug pipes to farm them simultaneously."
],
"devNote": [
"We use `cycleFrames` here rather than `simpleCycleFrames` because it requires non-trivial movement to maintain the double farm pattern."
]
},
{
"id": 2,
"link": [
1,
1
],
"name": "Leave With Runway",
"requires": [],
"exitCondition": {
"leaveWithRunway": {
"length": 12,
"openEnd": 0,
"steepUpTiles": 2
}
},
"flashSuitChecked": true,
"blueSuitChecked": true
},
{
"id": 3,
"link": [
1,
1
],
"name": "Leave Shinecharged",
"requires": [
{
"canShineCharge": {
"usedTiles": 21,
"steepUpTiles": 2,
"openEnd": 0
}
},
"canShinechargeMovementComplex",
{
"shineChargeFrames": 165
}
],
"exitCondition": {
"leaveShinecharged": {}
},
"flashSuitChecked": true,
"blueSuitChecked": true,
"note": [
"Stand to the right of the right-most bug pipe, and run to the right to gain a shortcharge.",
"Run back to the left, jump over the bug pipes with one jump, and exit through the left door."
]
},
{
"id": 4,
"link": [
1,
1
],
"name": "Leave Shinecharged (Space Jump)",
"requires": [
{
"canShineCharge": {
"usedTiles": 21,
"steepUpTiles": 2,
"openEnd": 0
}
},
"SpaceJump",
"canShinechargeMovementComplex",
{
"shineChargeFrames": 155
}
],
"exitCondition": {
"leaveShinecharged": {}
},
"flashSuitChecked": true,
"blueSuitChecked": true,
"note": [
"Stand to the right of the right-most bug pipe, and run to the right to gain a shortcharge.",
"Run back to the left, Space Jump over the bug pipes, and exit through the left door."
]
},
{
"id": 5,
"link": [
1,
1
],
"name": "Leave With Shinespark",
"requires": [
{
"canShineCharge": {
"usedTiles": 21,
"steepUpTiles": 2,
"openEnd": 0
}
},
{
"or": [
{
"shinespark": {
"frames": 29,
"excessFrames": 0
}
},
{
"and": [
"h_speedJump",
{
"shinespark": {
"frames": 15,
"excessFrames": 0
}
}
]
}
]
}
],
"exitCondition": {
"leaveWithSpark": {}
},
"flashSuitChecked": true,
"blueSuitChecked": true,
"note": [
"Stand to the right of the right-most bug pipe, and run to the right to gain a shortcharge.",
"Run back to the left, jump over the bug pipes, and shinespark through the left door."
]
},
{
"id": 6,
"link": [
1,
1
],
"name": "Leave Spinning (Space Jump)",
"requires": [
"SpaceJump"
],
"exitCondition": {
"leaveSpinning": {
"remoteRunway": {
"length": 20,
"openEnd": 1
}
}
},
"flashSuitChecked": true,
"blueSuitChecked": true,
"devNote": "A variation with 1 more runway tile could be added for if the door at node 2 is unlocked, and the same for the other remote runway strats."
},
{
"id": 7,
"link": [
1,
1
],
"name": "Leave With Mockball",
"requires": [],
"exitCondition": {
"leaveWithMockball": {
"remoteRunway": {
"length": 20,
"openEnd": 1
},
"landingRunway": {
"length": 10,
"openEnd": 1
},
"minExtraRunSpeed": "$1.6"
}
},
"flashSuitChecked": true,
"blueSuitChecked": true
},
{
"id": 8,
"link": [
1,
1
],
"name": "Leave Space Jumping",
"requires": [],
"exitCondition": {
"leaveSpaceJumping": {
"remoteRunway": {
"length": 20,
"openEnd": 1
}
}
},
"flashSuitChecked": true,
"blueSuitChecked": true
},
{
"id": 9,
"link": [
1,
1
],
"name": "Leave With Temporary Blue",
"requires": [
{
"getBlueSpeed": {
"usedTiles": 20,
"openEnd": 1
}
},
"canChainTemporaryBlue"
],
"exitCondition": {
"leaveWithTemporaryBlue": {}
},
"flashSuitChecked": true,
"blueSuitChecked": true
},
{
"id": 25,
"link": [
1,
1
],
"name": "Come in Shinecharging, Crystal Spark",
"entranceCondition": {
"comeInShinecharging": {
"length": 11,
"openEnd": 0,
"steepDownTiles": 2
},
"comesInHeated": "no"
},
"requires": [
"h_CrystalSpark"
],
"flashSuitChecked": true,
"blueSuitChecked": true
},
{
"id": 10,
"link": [
1,
1
],
"name": "G-Mode Setup - Get Hit By Zeb",
"requires": [],
"exitCondition": {
"leaveWithGModeSetup": {}
},
"flashSuitChecked": true,
"blueSuitChecked": true
},
{
"id": 22,
"link": [
1,
1
],
"name": "R-Mode Spark Interrupt",
"entranceCondition": {
"comeInWithRMode": {}
},
"requires": [
{
"refill": [
"Energy"
]
},
{
"canShineCharge": {
"usedTiles": 21,
"steepUpTiles": 2,
"openEnd": 0
}
},
{
"autoReserveTrigger": {
"maxReserveEnergy": 95
}
},
"canRModeSparkInterrupt"
],
"flashSuitChecked": true,
"blueSuitChecked": true
},
{
"id": 11,
"link": [
1,
2
],
"name": "Base",
"requires": [],
"flashSuitChecked": true,
"blueSuitChecked": true
},
{
"id": 12,
"link": [
2,
1
],
"name": "Base",
"requires": [],
"flashSuitChecked": true,
"blueSuitChecked": true
},
{
"id": 13,
"link": [
2,
1
],
"name": "Grapple Teleport Door Lock Skip",
"entranceCondition": {
"comeInWithGrappleTeleport": {
"blockPositions": [
[
3,
12
],
[
3,
13
]
]
}
},
"requires": [],
"bypassesDoorShell": "yes",
"flashSuitChecked": true,
"blueSuitChecked": true
},
{
"id": 14,
"link": [
2,
1
],
"name": "Carry Grapple Teleport (Top Position)",
"entranceCondition": {
"comeInWithGrappleTeleport": {
"blockPositions": [
[
3,
12
]
]
}
},
"requires": [],
"exitCondition": {
"leaveWithGrappleTeleport": {
"blockPositions": [
[
3,
12
]
]
}
},
"bypassesDoorShell": "yes",
"flashSuitChecked": true,
"blueSuitChecked": true
},
{
"id": 15,
"link": [
2,
1
],
"name": "Carry Grapple Teleport (Bottom Position)",
"entranceCondition": {
"comeInWithGrappleTeleport": {
"blockPositions": [
[
3,
13
]
]
}
},
"requires": [],
"exitCondition": {
"leaveWithGrappleTeleport": {
"blockPositions": [
[
3,
13
]
]
}
},
"bypassesDoorShell": "yes",
"flashSuitChecked": true,
"blueSuitChecked": true
},
{
"id": 18,
"link": [
2,
1
],
"name": "Roll Under Door",
"entranceCondition": {
"comeInGettingBlueSpeed": {
"length": 20,
"openEnd": 0,
"minExtraRunSpeed": "$7.0"
}
},
"requires": [
{
"notable": "Roll Under Door"
},
"canSpeedball"
],
"exitCondition": {
"leaveWithMockball": {
"remoteRunway": {
"length": 45,
"openEnd": 1
},
"landingRunway": {
"length": 7,
"openEnd": 1
},
"minExtraRunSpeed": "$7.0"
}
},
"bypassesDoorShell": "yes",
"flashSuitChecked": true,
"blueSuitChecked": true,
"note": [
"Build up to full run speed and speedball towards the left door.",
"With a little luck, Samus will accelerate through the slope tiles and pass under the door."
]
},
{
"id": 16,
"link": [
2,
2
],
"name": "Leave With Runway",
"requires": [],
"exitCondition": {
"leaveWithRunway": {
"length": 22,
"openEnd": 0,
"steepUpTiles": 2
}
},
"flashSuitChecked": true,
"blueSuitChecked": true
},
{
"id": 17,
"link": [
2,
2
],
"name": "G-Mode Setup - Get Hit By Zeb",
"requires": [],
"exitCondition": {
"leaveWithGModeSetup": {}
},
"flashSuitChecked": true,
"blueSuitChecked": true
},
{
"id": 20,
"link": [
2,
2
],
"name": "Gain Flash Suit (Slopespark)",
"requires": [
{
"or": [
{
"canShineCharge": {
"usedTiles": 20,
"steepDownTiles": 2,
"openEnd": 0
}
},
{
"and": [
{
"doorUnlockedAtNode": 2
},
{
"canShineCharge": {
"usedTiles": 21,
"steepDownTiles": 2,
"openEnd": 0
}
}
]
}
]
},
{
"shineChargeFrames": 150
},
{
"enemyDamage": {
"enemy": "Zeb",
"type": "contact",
"hits": 1
}
},
"canSlopeSpark",
{
"shinespark": {
"frames": 4,
"excessFrames": 4
}
}
],
"flashSuitChecked": true,
"blueSuitChecked": true,
"note": [
"After shinecharging, lure a Zeb and use it to slopespark on the first slope right of the pipe."
],
"devNote": [
"No leniency is given as this is a farm room and the Zebs do little damage, even suitless."
]
},
{
"id": 21,
"link": [
2,
2
],
"name": "Gain Flash Suit (Slopespark) - Leave With Shinespark",
"requires": [
"canUseFlashSuitInitialSpark",
{
"canShineCharge": {
"usedTiles": 21,
"steepDownTiles": 2,
"openEnd": 0
}
},
{
"shineChargeFrames": 150
},
{
"enemyDamage": {
"enemy": "Zeb",
"type": "contact",
"hits": 1
}
},
"canSlopeSpark",
{
"shinespark": {
"frames": 12,
"excessFrames": 0
}
}
],
"exitCondition": {
"leaveWithSpark": {
"position": "bottom"
}
},
"flashSuitChecked": true,
"blueSuitChecked": true,
"note": [
"After shinecharging, lure a Zeb and use it to slopespark on the first slope right of the pipe."
],
"devNote": [
"No leniency is given as this is a farm room and the Zebs do little damage, even suitless."
]
},
{
"id": 23,
"link": [
2,
2
],
"name": "R-Mode Spark Interrupt",
"entranceCondition": {
"comeInWithRMode": {}
},
"requires": [
{
"refill": [
"Energy"
]
},
{
"canShineCharge": {
"usedTiles": 21,
"steepUpTiles": 2,
"openEnd": 0
}
},
{
"autoReserveTrigger": {
"maxReserveEnergy": 95
}
},
"canRModeSparkInterrupt"
],
"flashSuitChecked": true,
"blueSuitChecked": true
},
{
"id": 27,
"link": [
2,
2
],
"name": "Gain Blue Suit (Slope X-Mode)",
"requires": [
{
"or": [
{
"canShineCharge": {
"usedTiles": 20,
"steepDownTiles": 2,
"openEnd": 0
}
},
{
"and": [
{
"doorUnlockedAtNode": 2
},
{
"canShineCharge": {
"usedTiles": 21,
"steepDownTiles": 2,
"openEnd": 0
}
}
]
}
]
},
{
"shineChargeFrames": 170
},
{
"enemyDamage": {
"enemy": "Zeb",
"type": "contact",
"hits": 1
}
},
"canSlopeXMode",
{
"shinespark": {
"frames": 0
}
},
{
"gainBlueSuit": {}
}
],
"flashSuitChecked": true,
"blueSuitChecked": true,
"devNote": [
"No leniency is given as this is a farm room and the Zebs do little damage, even suitless."
]
},
{
"id": 24,
"link": [
2,
2
],
"name": "Crystal Spark",
"requires": [
{
"canShineCharge": {
"usedTiles": 21,
"steepUpTiles": 2,
"openEnd": 0
}
},
"h_CrystalSpark"
],
"flashSuitChecked": true,
"blueSuitChecked": true
},
{
"id": 26,
"link": [
2,
2
],
"name": "Come in Shinecharging, Crystal Spark",
"entranceCondition": {
"comeInShinecharging": {
"length": 21,
"openEnd": 0,
"steepDownTiles": 2
},
"comesInHeated": "no"
},
"requires": [
"h_CrystalSpark"
],
"flashSuitChecked": true,
"blueSuitChecked": true
}
],
"notables": [
{
"id": 1,
"name": "Roll Under Door",
"note": [
"Build up to full run speed and speedball towards the left door.",
"With a little luck, Samus will accelerate through the slope tiles and pass under the door."
]
}
],
"nextStratId": 28,
"nextNotableId": 2
}