Green Brinstar Main Shaft: R-Mode Spark Interrupt
Room ID: 44

From: 12
Above Power Bomb Blocks - Main Junction
To: 12
Above Power Bomb Blocks - Main Junction

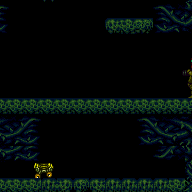
Enter R-Mode using any door. Crystal Flash (away from the Power Bomb blocks!) or farm the upper section enemies, except for one. Tight 1-screen shortcharge between the bottom doors. Both shells need to be opened. If R-Mode is entered below the Power Bomb blocks, you'll need to use a clip to get to the upper section without destroying the barrier. Requires: {
"obstaclesCleared": [
"R-Mode"
]
}
{
"obstaclesNotCleared": [
"A"
]
}
{
"or": [
"h_CrystalFlashForReserveEnergy",
{
"and": [
{
"disableEquipment": "ETank"
},
{
"or": [
{
"resourceAvailable": [
{
"type": "Energy",
"count": 85
}
]
},
{
"and": [
{
"enemyKill": {
"enemies": [
[
"Ripper 2 (red)"
],
[
"Ripper 2 (red)"
]
],
"excludedWeapons": [
"Super"
]
}
},
{
"resourceAvailable": [
{
"type": "Energy",
"count": 40
}
]
}
]
}
]
},
{
"resourceMissingAtMost": [
{
"type": "Missile",
"count": 0
}
]
},
{
"resourceMissingAtMost": [
{
"type": "Super",
"count": 0
}
]
},
{
"partialRefill": {
"type": "ReserveEnergy",
"limit": 1
}
}
]
}
]
}
{
"or": [
{
"canShineCharge": {
"usedTiles": 12,
"openEnd": 0
}
},
{
"and": [
{
"doorUnlockedAtNode": 5
},
{
"canShineCharge": {
"usedTiles": 13,
"openEnd": 0
}
}
]
},
{
"and": [
{
"doorUnlockedAtNode": 6
},
{
"canShineCharge": {
"usedTiles": 13,
"openEnd": 0
}
}
]
},
{
"and": [
{
"doorUnlockedAtNode": 5
},
{
"doorUnlockedAtNode": 6
},
{
"canShineCharge": {
"usedTiles": 14,
"openEnd": 0
}
}
]
}
]
}
{
"autoReserveTrigger": {}
}
"canRModeSparkInterrupt"Resets obstacles: R-Mode Unlocks doors: {"nodeId":5,"types":["ammo"],"requires":[]}
{"nodeId":6,"types":["ammo"],"requires":[]} |