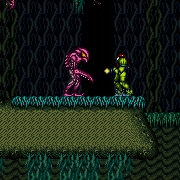
Plasma Room
Room ID: 219
|
Exit condition: {
"leaveWithRunway": {
"length": 3,
"openEnd": 1
}
} |
|
Requires: {
"obstaclesCleared": [
"A"
]
}
"SpaceJump"Exit condition: {
"leaveSpinning": {
"remoteRunway": {
"length": 8,
"openEnd": 2
}
}
} |
|
Requires: {
"obstaclesCleared": [
"A"
]
}Exit condition: {
"leaveWithMockball": {
"remoteRunway": {
"length": 8,
"openEnd": 2
},
"landingRunway": {
"length": 3,
"openEnd": 1
}
}
} |
|
Requires: {
"obstaclesCleared": [
"A"
]
}Exit condition: {
"leaveWithSpringBallBounce": {
"remoteRunway": {
"length": 8,
"openEnd": 2
},
"landingRunway": {
"length": 3,
"openEnd": 1
},
"movementType": "uncontrolled"
}
} |
|
Requires: {
"obstaclesCleared": [
"A"
]
}Exit condition: {
"leaveSpaceJumping": {
"remoteRunway": {
"length": 8,
"openEnd": 2
}
}
} |
|

Requires: {
"obstaclesCleared": [
"C"
]
}
{
"canShineCharge": {
"usedTiles": 20,
"openEnd": 2
}
}
"canChainTemporaryBlue"
"canXRayTurnaround"
"HiJump"
"canTrickySpringBallJump"Exit condition: {
"leaveWithTemporaryBlue": {}
} |
|
Requires: {
"or": [
"Plasma",
"ScrewAttack",
{
"haveBlueSuit": {}
}
]
}Clears obstacles: A |
|

Requires: "canPseudoScrew"
{
"or": [
{
"enemyDamage": {
"enemy": "Pink Space Pirate (standing)",
"type": "contact",
"hits": 1
}
},
"h_pauseAbuseMinimalReserveRefill"
]
}Clears obstacles: A |
From: 1
Top Left Door
To: 1
Top Left Door


Use a precisely positioned pseudo-screw to contact a Pirate for exactly one frame, to hit it without taking damage in return. A regular second pseudo-screw can then be used to kill the Pirate. Requires: {
"notable": "Damage-Avoiding Pseudo-Screw"
}
"canPseudoScrew"
"canInsaneJump"Clears obstacles: A |
|
Requires: {
"resetRoom": {
"nodes": [
1
]
}
}
{
"or": [
"canDash",
{
"cycleFrames": 100
}
]
}
{
"or": [
{
"and": [
"HiJump",
"SpaceJump",
{
"cycleFrames": 930
}
]
},
{
"and": [
"HiJump",
"canTrickyWallJump",
{
"cycleFrames": 960
}
]
},
{
"and": [
"SpaceJump",
{
"cycleFrames": 1220
}
]
},
{
"and": [
"canSpringwall",
{
"cycleFrames": 1035
},
"h_doubleEquipmentScreenCycleFrames"
]
},
{
"and": [
"HiJump",
"canSpringBallJumpMidAir",
{
"cycleFrames": 910
},
"h_doubleEquipmentScreenCycleFrames"
]
},
{
"and": [
"canDoubleBombJump",
{
"or": [
"canWallJump",
"h_crouchJumpDownGrab"
]
},
{
"cycleFrames": 1410
}
]
},
{
"and": [
"canDoubleBombJump",
{
"cycleFrames": 1560
}
]
}
]
}
{
"or": [
"ScrewAttack",
{
"haveBlueSuit": {}
},
"Plasma"
]
}Resets obstacles: A, B, C Farm cycle drops: 4 Pink Space Pirate (standing), 2 Pink Space Pirate (wall) Dev note: FIXME: Add option to kill the Pirates with speed echoes, and possibly to get back up with a shinespark. |
|
Requires: {
"resetRoom": {
"nodes": [
1
]
}
}
{
"or": [
"canDash",
{
"cycleFrames": 120
}
]
}
{
"or": [
{
"and": [
"Plasma",
{
"cycleFrames": 210
}
]
},
{
"and": [
{
"or": [
"ScrewAttack",
{
"haveBlueSuit": {}
}
]
},
{
"cycleFrames": 255
}
]
}
]
}Resets obstacles: A, B, C Farm cycle drops: 1 Pink Space Pirate (standing) |
|
Requires: "h_CrystalFlash" |
|

Crystal Flash behind the pirate while it is turning its head. It will turn around during the Crystal Flash and shoot Samus with lasers. Quickly remorph once Samus regains mobility to prevent taking a third laser hit. Entrance condition: {
"comeInWithRMode": {}
}Requires: "canRModeCrystalFlashInterrupt"
{
"ammo": {
"type": "Missile",
"count": 10
}
}
{
"or": [
"canTrickyDodgeEnemies",
{
"enemyDamage": {
"enemy": "Pink Space Pirate (standing)",
"type": "laser",
"hits": 1
}
}
]
}Clears obstacles: door_1 Dev note: Works with 0 or 1 E-Tank. FIXME: There may be a use for using a lower pirate instead, or for doing this while killing the pirates another way. |
From: 1
Top Left Door
To: 1
Top Left Door

On entry, the pirate will place a stationary, invisible laser. Cross the chasm while trying to avoid allowing it to place more lasers, with a bomb boost or spring fling. Move to the top of the platform only while the pirate is turning its head. Just before it is about to rotate its head again, Crystal Flash in a spot that is free of lasers in order to be able to gain some Reserve Energy before getting hit. Entrance condition: {
"comeInWithGMode": {
"mode": "direct",
"morphed": true
}
}Requires: "h_artificialMorphRModeCrystalFlashInterrupt"
"canComplexGMode"
{
"ammo": {
"type": "Missile",
"count": 10
}
}
{
"or": [
"h_artificialMorphSpringFling",
{
"and": [
"h_artificialMorphBombHorizontally",
"h_additionalBomb"
]
}
]
}Clears obstacles: door_1 |
|


Kill most of the pirates: leave the standing pirate on the ledge above the runway. Shinecharge and jump into its beam path to interrupt. Entrance condition: {
"comeInWithRMode": {}
}Requires: {
"or": [
{
"and": [
"h_CrystalFlashForReserveEnergy",
{
"or": [
{
"and": [
"canUseIFrames",
{
"or": [
{
"enemyDamage": {
"enemy": "Pink Space Pirate (standing)",
"type": "laser",
"hits": 2
}
},
"h_pauseAbuseMinimalReserveRefill"
]
}
]
},
"ScrewAttack",
"Plasma",
{
"getBlueSpeed": {
"usedTiles": 19,
"openEnd": 0
}
}
]
}
]
},
{
"and": [
{
"or": [
"ScrewAttack",
"Plasma",
{
"and": [
"canUseSpeedEchoes",
{
"getBlueSpeed": {
"usedTiles": 19,
"openEnd": 0
}
}
]
}
]
},
"h_RModeCanRefillReserves",
{
"partialRefill": {
"type": "ReserveEnergy",
"limit": 20
}
}
]
}
]
}
{
"canShineCharge": {
"usedTiles": 21,
"openEnd": 0
}
}
{
"or": [
"HiJump",
"canWallJump",
"canSpeedyJump",
"canSpringBallJumpMidAir"
]
}
{
"autoReserveTrigger": {
"maxReserveEnergy": 95
}
}
"canRModeSparkInterrupt"Clears obstacles: A, C, door_1 |
|
|
|
Requires: {
"obstaclesCleared": [
"C"
]
}
"canShinechargeMovement"
{
"canShineCharge": {
"usedTiles": 21,
"openEnd": 0
}
}
{
"or": [
{
"and": [
{
"or": [
{
"and": [
{
"or": [
{
  "obstaclesCleared": [
    "A"
  ]
},
"canDodgeWhileShooting"
]
},
{
"or": [
"HiJump",
"canWallJump"
]
}
]
},
{
"and": [
"canShinechargeMovementComplex",
{
"or": [
"canSpeedyJump",
"canSpringBallJumpMidAir"
]
}
]
}
]
},
{
"shinespark": {
"frames": 28,
"excessFrames": 8
}
}
]
},
{
"and": [
{
"or": [
{
"and": [
"canShinechargeMovementComplex",
"canWallJump"
]
},
{
"and": [
"canShinechargeMovementTricky",
{
"or": [
"canSpeedyJump",
"canSpringBallJumpMidAir"
]
}
]
}
]
},
{
"shinespark": {
"frames": 20,
"excessFrames": 8
}
}
]
},
{
"and": [
"HiJump",
"canShinechargeMovementComplex",
{
"shinespark": {
"frames": 16,
"excessFrames": 8
}
}
]
},
{
"and": [
"HiJump",
"canSpeedyJump",
"canShinechargeMovementTricky",
{
"shinespark": {
"frames": 12,
"excessFrames": 8
}
}
]
}
]
} |
|
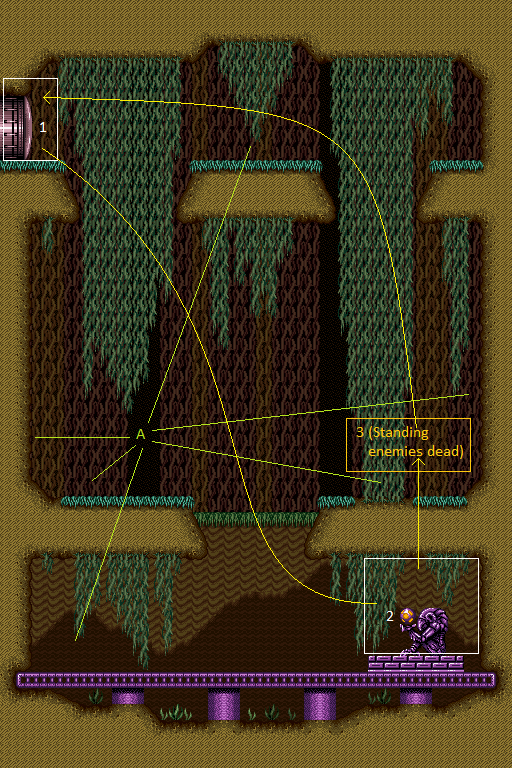
Using the bottom of the room, shortcharge to use the echoes created by shinesparking to kill all of the Standing Pirates. Turn around and diagonal spark the ceiling to kill the pirates. Building a spark towards the left allows for enough run speed to jump to the middle level. Then vertical shinespark out which kills the top pirate. Requires: {
"obstaclesCleared": [
"C"
]
}
"canShinechargeMovementComplex"
"canUseSpeedEchoes"
{
"canShineCharge": {
"usedTiles": 21,
"openEnd": 0
}
}
{
"or": [
{
"and": [
{
"or": [
"HiJump",
"canWallJump",
"canSpeedyJump",
"canTrickySpringBallJump",
"SpaceJump"
]
},
{
"shinespark": {
"frames": 28,
"excessFrames": 8
}
}
]
},
{
"and": [
{
"or": [
"canWallJump",
{
"and": [
"canShinechargeMovementTricky",
{
"or": [
"canSpeedyJump",
"canTrickySpringBallJump",
"SpaceJump"
]
}
]
}
]
},
{
"shinespark": {
"frames": 20,
"excessFrames": 8
}
}
]
},
{
"and": [
"HiJump",
{
"shinespark": {
"frames": 16,
"excessFrames": 8
}
}
]
},
{
"and": [
"HiJump",
"canSpeedyJump",
"canShinechargeMovementTricky",
{
"shinespark": {
"frames": 11,
"excessFrames": 8
}
}
]
}
]
}Clears obstacles: A |
|
Requires: {
"or": [
"Plasma",
"ScrewAttack",
{
"haveBlueSuit": {}
}
]
}Clears obstacles: C |
|
Requires: "canPseudoScrew"
{
"or": [
{
"enemyDamage": {
"enemy": "Pink Space Pirate (standing)",
"type": "contact",
"hits": 1
}
},
"h_pauseAbuseMinimalReserveRefill"
]
}Clears obstacles: C |
|

Use a precisely positioned pseudo-screw to contact a Pirate for exactly one frame, to hit it without taking damage in return. A regular second pseudo-screw can then be used to kill the Pirate. Requires: {
"notable": "Damage-Avoiding Pseudo-Screw"
}
"canPseudoScrew"
"canInsaneJump"Clears obstacles: C |
|
Either lead the pirate to the left wall or take a hit to gain i-frames to use the full runway to charge a spark To lead a pirate, have it shoot in the direction you want it to go. Then jump overhead and crouch on the other side. Or, jump and aim down while on the sloped tiles just above to lower the camera and wait for the pirate to move to the correct spot. Requires: {
"or": [
"Morph",
"canCarefulJump",
"canCameraManip"
]
}
{
"or": [
{
"getBlueSpeed": {
"usedTiles": 19,
"openEnd": 0
}
},
{
"and": [
{
"enemyDamage": {
"enemy": "Pink Space Pirate (standing)",
"type": "contact",
"hits": 2
}
},
"canUseIFrames",
{
"canShineCharge": {
"usedTiles": 21,
"openEnd": 0
}
},
{
"or": [
{
"and": [
"canMidairShinespark",
"canUseSpeedEchoes",
{
"shinespark": {
"frames": 1,
"excessFrames": 1
}
}
]
},
{
"and": [
"canHorizontalShinespark",
{
"shinespark": {
"frames": 25,
"excessFrames": 20
}
}
]
}
]
}
]
}
]
}Clears obstacles: C Dev note: A leniency laser hit is included for the i-frames method. |
|
Using the bottom of the room, shortcharge to use the echoes created by shinesparking to kill the two central standing Pirates. Requires: {
"obstaclesCleared": [
"C"
]
}
"canShinechargeMovementComplex"
"canUseSpeedEchoes"
{
"canShineCharge": {
"usedTiles": 21,
"openEnd": 0
}
}
{
"shinespark": {
"frames": 2,
"excessFrames": 2
}
}Clears obstacles: B |
|
Requires: "h_CrystalFlash" |
|
Requires: {
"obstaclesCleared": [
"C"
]
}
{
"canShineCharge": {
"usedTiles": 21,
"openEnd": 0
}
}
"h_CrystalSpark" |
|
Requires: {
"or": [
"canWallJump",
"h_crouchJumpDownGrab",
"HiJump",
"SpaceJump",
"canSpringBallJumpMidAir",
"canSpringBallBombJump"
]
} |
|
Requires: "canIBJ"
{
"or": [
{
"and": [
"canJumpIntoIBJ",
"canDodgeWhileShooting"
]
},
{
"obstaclesCleared": [
"C"
]
}
]
} |
|
If the bottom Pirate is still alive, lure it to the left to open up the runway for a speedy jump. Requires: "canSpeedyJump"
{
"or": [
{
"obstaclesCleared": [
"C"
]
},
"canTrickyDodgeEnemies"
]
} |
|
After using the Pirate as a platform, it can be killed from above. Requires: {
"obstaclesNotCleared": [
"C"
]
}
"canTrickyUseFrozenEnemies"
"Plasma"Clears obstacles: C |
|
Requires: "canUnmorphBombBoost" "canDownGrab" |
|
Requires: "SpaceJump" |
|
Either kill the wall Pirate or lead it to jump across the room; dodge the standing Pirate if it is still alive. Requires: "HiJump"
"canPreciseWallJump"
{
"or": [
"canDodgeWhileShooting",
{
"obstaclesCleared": [
"B"
]
}
]
} |
From: 3
Central Junction
To: 1
Top Left Door

If the right-side standing Pirate is still alive, let it walk towards the wall as far as possible from below. The available running space is just enough to jump up and wall jump the ledge by the door. Requires: "HiJump"
"canSpeedyJump"
"canWallJump"
{
"or": [
"canTrickyJump",
{
"obstaclesCleared": [
"B"
]
}
]
}Dev note: This is also possible without going below and manipulating the camera, by standing on the slope and carefully jumping up and back. |
|


Requires: {
"obstaclesCleared": [
"B"
]
}
{
"or": [
"canLongIBJ",
{
"and": [
"HiJump",
"canJumpIntoIBJ"
]
}
]
} |
|
Let the wall pirate jump to the other side of the room. Shooting the standing pirate (with anything) will prevent it from attacking. Requires: "canDodgeWhileShooting"
"canJumpIntoIBJ"
{
"or": [
"canLongIBJ",
"HiJump"
]
} |
|
Requires: "h_storedSpark"
{
"or": [
{
"shinespark": {
"frames": 20,
"excessFrames": 2
}
},
{
"and": [
"HiJump",
{
"shinespark": {
"frames": 17,
"excessFrames": 3
}
}
]
}
]
}Dev note: This can be done with less Energy, but it is likely the upper pirate will shoot Samus. |
|
It's possible to climb up with just ice by freezing the wall space pirates (who can be frozen and killed without Plasma). Clearing the gray door lock would require killing the frozen pirate after using it to climb. To do this most easily, freeze the Pirate as high as possible on the left wall. Bait the pirate to jump across the room early so that it stays high on the wall, or bring it on camera by jumping below the platform if the wall pirate gets too low. After reaching the top, it can help to reset the camera by moving to the right on the center platform and then back left. Requires: "canTrickyUseFrozenEnemies"
"canDodgeWhileShooting"
"canPreciseWallJump"
{
"or": [
{
"obstaclesCleared": [
"B"
]
},
"canTrickyDodgeEnemies"
]
}
"canCameraManip" |
|
Either kill the wall Pirate or lead it to jump across the room; dodge the standing Pirate. This is the same size of ledge as Worst Room in the Game. Requires: "canInsaneWallJump" "canConsecutiveWallJump" |
|
Requires: "canSpringwall"
{
"or": [
"canDodgeWhileShooting",
{
"obstaclesCleared": [
"B"
]
}
]
} |
|

Requires: "HiJump"
"canSpringBallJumpMidAir"
{
"or": [
"canDodgeWhileShooting",
{
"obstaclesCleared": [
"B"
]
}
]
} |
|
|
|
Requires: {
"or": [
"Plasma",
"ScrewAttack",
{
"haveBlueSuit": {}
}
]
}Clears obstacles: B |
From: 3
Central Junction
To: 3
Central Junction

Requires: "canPseudoScrew"
{
"or": [
{
"enemyDamage": {
"enemy": "Pink Space Pirate (standing)",
"type": "contact",
"hits": 3
}
},
{
"and": [
"canTrickyJump",
{
"enemyDamage": {
"enemy": "Pink Space Pirate (standing)",
"type": "contact",
"hits": 2
}
}
]
},
{
"and": [
"h_pauseAbuseMinimalReserveRefill",
"h_pauseAbuseMinimalReserveRefill"
]
}
]
}Clears obstacles: B |
From: 3
Central Junction
To: 3
Central Junction

Use a precisely positioned pseudo-screw to contact a Pirate for exactly one frame, to hit it without taking damage in return. A regular second pseudo-screw can then be used to kill the Pirate. Repeat this with the second standing central Pirate. Requires: {
"notable": "Damage-Avoiding Pseudo-Screw"
}
"canPseudoScrew"
"canInsaneJump"
"canBeVeryPatient"Clears obstacles: B Dev note: FIXME: The `canBeVeryPatient` is for difficulty placement but should be replaced with a more appropriate tech. This is not because killing the central Pirates is any more difficult than the top or bottom ones; but because killing all four without taking damage is difficult. Without canBeVeryPatient, a total of 2 hits would be expected to kill all four Pirates. |
{
"$schema": "../../../schema/m3-room.schema.json",
"id": 219,
"name": "Plasma Room",
"area": "Maridia",
"subarea": "Inner",
"subsubarea": "Yellow",
"roomAddress": "0x7D2AA",
"roomEnvironments": [
{
"heated": false
}
],
"mapTileMask": [
[
1,
1
],
[
1,
1
],
[
1,
1
]
],
"nodes": [
{
"id": 1,
"name": "Top Left Door",
"nodeType": "door",
"nodeSubType": "gray",
"nodeAddress": "0x001a558",
"doorOrientation": "left",
"doorEnvironments": [
{
"physics": "air"
}
],
"locks": [
{
"name": "Plasma Gray Lock (to Plasma Tutorial)",
"lockType": "killEnemies",
"unlockStrats": [
{
"name": "Base",
"requires": [
{
"or": [
{
"obstaclesCleared": [
"A",
"B",
"C"
]
},
"f_ClearedPlasmaRoom"
]
}
],
"flashSuitChecked": true,
"blueSuitChecked": true
}
],
"yields": [
"f_ZebesAwake",
"f_ClearedPlasmaRoom"
]
}
],
"mapTileMask": [
[
2,
2
],
[
1,
1
],
[
1,
1
]
]
},
{
"id": 2,
"name": "Item",
"nodeType": "item",
"nodeSubType": "chozo",
"nodeItem": "Plasma",
"nodeAddress": "0x7C559",
"mapTileMask": [
[
1,
1
],
[
2,
2
],
[
2,
2
]
],
"locks": [
{
"name": "Dummy Item Lock",
"lockType": "gameFlag",
"unlockStrats": [
{
"name": "Base (Collect Item)",
"notable": false,
"requires": [],
"flashSuitChecked": true,
"blueSuitChecked": true
}
]
}
]
},
{
"id": 3,
"name": "Central Junction",
"nodeType": "junction",
"nodeSubType": "junction",
"mapTileMask": [
[
1,
1
],
[
2,
2
],
[
1,
1
]
]
}
],
"obstacles": [
{
"id": "A",
"name": "Top Pink Pirate",
"obstacleType": "enemies",
"note": "The Pink Pirate standing at the top center of the room."
},
{
"id": "B",
"name": "Central Pink Pirates",
"obstacleType": "enemies",
"note": [
"The two standing Pink Pirates in the center of the room, and the wall Pirates.",
"Note that the wall pirates do not have special immunities and can be killed with Power Beam."
]
},
{
"id": "C",
"name": "Bottom Pink Pirate",
"obstacleType": "enemies",
"note": "The lowest Pink Pirate, on the runway near the item."
},
{
"id": "door_1",
"name": "door_1"
}
],
"enemies": [
{
"id": "e1",
"groupName": "Plasma Room Top Standing Pirate",
"enemyName": "Pink Space Pirate (standing)",
"quantity": 1,
"homeNodes": [
1
]
},
{
"id": "e2",
"groupName": "Plasma Room Bottom Standing Pirates",
"enemyName": "Pink Space Pirate (standing)",
"quantity": 3,
"homeNodes": [
2
]
},
{
"id": "e3",
"groupName": "Plasma Room Wall Pirates",
"enemyName": "Pink Space Pirate (wall)",
"quantity": 2,
"homeNodes": [
2
]
}
],
"strats": [
{
"link": [
1,
1
],
"name": "Base (Unlock Door)",
"requires": [],
"unlocksDoors": [
{
"types": [
"ammo"
],
"requires": []
}
],
"flashSuitChecked": true,
"blueSuitChecked": true
},
{
"link": [
1,
1
],
"name": "Base (Come In Normally)",
"entranceCondition": {
"comeInNormally": {}
},
"requires": [],
"flashSuitChecked": true,
"blueSuitChecked": true,
"clearsObstacles": [
"door_1"
]
},
{
"link": [
1,
1
],
"name": "Base (Come In With Mockball)",
"entranceCondition": {
"comeInWithMockball": {
"adjacentMinTiles": 0,
"remoteAndLandingMinTiles": [
[
0,
0
]
],
"speedBooster": "any"
}
},
"requires": [],
"flashSuitChecked": true,
"blueSuitChecked": true,
"clearsObstacles": [
"door_1"
]
},
{
"name": "Base",
"requires": [
{
"or": [
{
"obstaclesCleared": [
"A",
"B",
"C"
]
},
"f_ClearedPlasmaRoom"
]
}
],
"flashSuitChecked": true,
"blueSuitChecked": true,
"link": [
1,
1
],
"setsFlags": [
"f_ZebesAwake",
"f_ClearedPlasmaRoom"
]
},
{
"name": "Base (Collect Item)",
"notable": false,
"requires": [],
"flashSuitChecked": true,
"blueSuitChecked": true,
"link": [
2,
2
],
"collectsItems": [
2
],
"resetsObstacles": [
"door_1"
]
},
{
"id": 1,
"link": [
1,
1
],
"name": "Leave with Runway",
"requires": [],
"exitCondition": {
"leaveWithRunway": {
"length": 3,
"openEnd": 1
}
},
"flashSuitChecked": true,
"blueSuitChecked": true
},
{
"id": 2,
"link": [
1,
1
],
"name": "Leave Spinning (Space Jump)",
"requires": [
{
  "obstaclesCleared": [
    "A"
  ]
},
"SpaceJump"
],
"exitCondition": {
"leaveSpinning": {
"remoteRunway": {
"length": 8,
"openEnd": 2
}
}
},
"flashSuitChecked": true,
"blueSuitChecked": true
},
{
"id": 3,
"link": [
1,
1
],
"name": "Leave With Mockball",
"requires": [
{
  "obstaclesCleared": [
    "A"
  ]
}
],
"exitCondition": {
"leaveWithMockball": {
"remoteRunway": {
"length": 8,
"openEnd": 2
},
"landingRunway": {
"length": 3,
"openEnd": 1
}
}
},
"flashSuitChecked": true,
"blueSuitChecked": true
},
{
"id": 4,
"link": [
1,
1
],
"name": "Leave With Spring Ball Bounce",
"requires": [
{
"obstaclesCleared": [
"A"
]
}
],
"exitCondition": {
"leaveWithSpringBallBounce": {
"remoteRunway": {
"length": 8,
"openEnd": 2
},
"landingRunway": {
"length": 3,
"openEnd": 1
},
"movementType": "uncontrolled"
}
},
"flashSuitChecked": true,
"blueSuitChecked": true
},
{
"id": 5,
"link": [
1,
1
],
"name": "Leave Space Jumping",
"requires": [
{
"obstaclesCleared": [
"A"
]
}
],
"exitCondition": {
"leaveSpaceJumping": {
"remoteRunway": {
"length": 8,
"openEnd": 2
}
}
},
"flashSuitChecked": true,
"blueSuitChecked": true
},
{
"id": 6,
"link": [
1,
1
],
"name": "Leave With Temporary Blue",
"requires": [
{
"obstaclesCleared": [
"C"
]
},
{
"canShineCharge": {
"usedTiles": 20,
"openEnd": 2
}
},
"canChainTemporaryBlue",
"canXRayTurnaround",
"HiJump",
"canTrickySpringBallJump"
],
"exitCondition": {
"leaveWithTemporaryBlue": {}
},
"flashSuitChecked": true,
"blueSuitChecked": true
},
{
"id": 37,
"link": [
1,
1
],
"name": "Simple Top Pirate Kill",
"requires": [
{
  "or": [
    "Plasma",
    "ScrewAttack",
    {
      "haveBlueSuit": {}
    }
  ]
}
],
"clearsObstacles": [
"A"
],
"flashSuitChecked": true,
"blueSuitChecked": true
},
{
"id": 38,
"link": [
1,
1
],
"name": "Pseudo Screw Top Pirate Kill",
"requires": [
"canPseudoScrew",
{
"or": [
{
"enemyDamage": {
"enemy": "Pink Space Pirate (standing)",
"type": "contact",
"hits": 1
}
},
"h_pauseAbuseMinimalReserveRefill"
]
}
],
"clearsObstacles": [
"A"
],
"flashSuitChecked": true,
"blueSuitChecked": true
},
{
"id": 39,
"link": [
1,
1
],
"name": "Damage-Avoiding Pseudo-Screw Top Pirate Kill",
"requires": [
{
"notable": "Damage-Avoiding Pseudo-Screw"
},
"canPseudoScrew",
"canInsaneJump"
],
"clearsObstacles": [
"A"
],
"flashSuitChecked": true,
"blueSuitChecked": true,
"note": [
"Use a precisely positioned pseudo-screw to contact a Pirate for exactly one frame,",
"to hit it without taking damage in return.",
"A regular second pseudo-screw can then be used to kill the Pirate."
]
},
{
"id": 7,
"link": [
1,
1
],
"name": "Pirate Farm (All Pirates)",
"requires": [
{
"resetRoom": {
"nodes": [
1
]
}
},
{
"or": [
"canDash",
{
"cycleFrames": 100
}
]
},
{
"or": [
{
"and": [
"HiJump",
"SpaceJump",
{
"cycleFrames": 930
}
]
},
{
"and": [
"HiJump",
"canTrickyWallJump",
{
"cycleFrames": 960
}
]
},
{
"and": [
"SpaceJump",
{
"cycleFrames": 1220
}
]
},
{
"and": [
"canSpringwall",
{
"cycleFrames": 1035
},
"h_doubleEquipmentScreenCycleFrames"
]
},
{
"and": [
"HiJump",
"canSpringBallJumpMidAir",
{
"cycleFrames": 910
},
"h_doubleEquipmentScreenCycleFrames"
]
},
{
"and": [
"canDoubleBombJump",
{
"or": [
"canWallJump",
"h_crouchJumpDownGrab"
]
},
{
"cycleFrames": 1410
}
]
},
{
"and": [
"canDoubleBombJump",
{
"cycleFrames": 1560
}
]
}
]
},
{
"or": [
"ScrewAttack",
{
"haveBlueSuit": {}
},
"Plasma"
]
}
],
"resetsObstacles": [
"A",
"B",
"C"
],
"farmCycleDrops": [
{
"enemy": "Pink Space Pirate (standing)",
"count": 4
},
{
"enemy": "Pink Space Pirate (wall)",
"count": 2
}
],
"flashSuitChecked": true,
"blueSuitChecked": true,
"devNote": [
"FIXME: Add option to kill the Pirates with speed echoes, and possibly to get back up with a shinespark."
]
},
{
"id": 33,
"link": [
1,
1
],
"name": "Pirate Farm (Single Pirate)",
"requires": [
{
"resetRoom": {
"nodes": [
1
]
}
},
{
"or": [
"canDash",
{
"cycleFrames": 120
}
]
},
{
"or": [
{
"and": [
"Plasma",
{
"cycleFrames": 210
}
]
},
{
"and": [
{
"or": [
"ScrewAttack",
{
"haveBlueSuit": {}
}
]
},
{
"cycleFrames": 255
}
]
}
]
}
],
"resetsObstacles": [
"A",
"B",
"C"
],
"farmCycleDrops": [
{
"enemy": "Pink Space Pirate (standing)",
"count": 1
}
],
"flashSuitChecked": true,
"blueSuitChecked": true
},
{
"id": 8,
"link": [
1,
1
],
"name": "Crystal Flash",
"requires": [
"h_CrystalFlash"
],
"flashSuitChecked": true,
"blueSuitChecked": true
},
{
"id": 34,
"link": [
1,
1
],
"name": "R-Mode Crystal Flash Interrupt",
"entranceCondition": {
"comeInWithRMode": {}
},
"requires": [
"canRModeCrystalFlashInterrupt",
{
"ammo": {
"type": "Missile",
"count": 10
}
},
{
"or": [
"canTrickyDodgeEnemies",
{
"enemyDamage": {
"enemy": "Pink Space Pirate (standing)",
"type": "laser",
"hits": 1
}
}
]
}
],
"flashSuitChecked": true,
"blueSuitChecked": true,
"note": [
"Crystal Flash behind the pirate while it is turning its head. It will turn around during the Crystal Flash and shoot Samus with lasers.",
"Quickly remorph once Samus regains mobility to prevent taking a third laser hit."
],
"devNote": [
"Works with 0 or 1 E-Tank.",
"FIXME: There may be a use for using a lower pirate instead, or for doing this while killing the pirates another way."
],
"clearsObstacles": [
"door_1"
]
},
{
"id": 35,
"link": [
1,
1
],
"name": "Direct G-Mode Morph, Crystal Flash Interrupt",
"entranceCondition": {
"comeInWithGMode": {
"mode": "direct",
"morphed": true
}
},
"requires": [
"h_artificialMorphRModeCrystalFlashInterrupt",
"canComplexGMode",
{
"ammo": {
"type": "Missile",
"count": 10
}
},
{
"or": [
"h_artificialMorphSpringFling",
{
"and": [
"h_artificialMorphBombHorizontally",
"h_additionalBomb"
]
}
]
}
],
"flashSuitChecked": true,
"blueSuitChecked": true,
"note": [
"On entry, the pirate will place a stationary, invisible laser.",
"Cross the chasm while trying to avoid allowing it to place more lasers, with a bomb boost or spring fling.",
"Move to the top of the platform only while the pirate is turning its head.",
"Just before it is about to rotate its head again, Crystal Flash in a spot that is free of lasers in order to be able to gain some Reserve Energy before getting hit."
],
"clearsObstacles": [
"door_1"
]
},
{
"id": 36,
"link": [
1,
2
],
"name": "R-Mode Spark Interrupt",
"entranceCondition": {
"comeInWithRMode": {}
},
"requires": [
{
"or": [
{
"and": [
"h_CrystalFlashForReserveEnergy",
{
"or": [
{
"and": [
"canUseIFrames",
{
"or": [
{
"enemyDamage": {
"enemy": "Pink Space Pirate (standing)",
"type": "laser",
"hits": 2
}
},
"h_pauseAbuseMinimalReserveRefill"
]
}
]
},
"ScrewAttack",
"Plasma",
{
"getBlueSpeed": {
"usedTiles": 19,
"openEnd": 0
}
}
]
}
]
},
{
"and": [
{
"or": [
"ScrewAttack",
"Plasma",
{
"and": [
"canUseSpeedEchoes",
{
"getBlueSpeed": {
"usedTiles": 19,
"openEnd": 0
}
}
]
}
]
},
"h_RModeCanRefillReserves",
{
"partialRefill": {
"type": "ReserveEnergy",
"limit": 20
}
}
]
}
]
},
{
"canShineCharge": {
"usedTiles": 21,
"openEnd": 0
}
},
{
"or": [
"HiJump",
"canWallJump",
"canSpeedyJump",
"canSpringBallJumpMidAir"
]
},
{
"autoReserveTrigger": {
"maxReserveEnergy": 95
}
},
"canRModeSparkInterrupt"
],
"clearsObstacles": [
"A",
"C",
"door_1"
],
"flashSuitChecked": true,
"blueSuitChecked": true,
"note": [
"Kill most of the pirates: leave the standing pirate on the ledge above the runway. Shinecharge and",
"jump into its beam path to interrupt."
]
},
{
"id": 9,
"link": [
1,
3
],
"name": "Base",
"requires": [],
"flashSuitChecked": true,
"blueSuitChecked": true
},
{
"id": 25,
"link": [
2,
1
],
"name": "Shinespark",
"requires": [
{
"obstaclesCleared": [
"C"
]
},
"canShinechargeMovement",
{
"canShineCharge": {
"usedTiles": 21,
"openEnd": 0
}
},
{
"or": [
{
"and": [
{
"or": [
{
"and": [
{
"or": [
{
"obstaclesCleared": [
"A"
]
},
"canDodgeWhileShooting"
]
},
{
"or": [
"HiJump",
"canWallJump"
]
}
]
},
{
"and": [
"canShinechargeMovementComplex",
{
"or": [
"canSpeedyJump",
"canSpringBallJumpMidAir"
]
}
]
}
]
},
{
"shinespark": {
"frames": 28,
"excessFrames": 8
}
}
]
},
{
"and": [
{
"or": [
{
"and": [
"canShinechargeMovementComplex",
"canWallJump"
]
},
{
"and": [
"canShinechargeMovementTricky",
{
"or": [
"canSpeedyJump",
"canSpringBallJumpMidAir"
]
}
]
}
]
},
{
"shinespark": {
"frames": 20,
"excessFrames": 8
}
}
]
},
{
"and": [
"HiJump",
"canShinechargeMovementComplex",
{
"shinespark": {
"frames": 16,
"excessFrames": 8
}
}
]
},
{
"and": [
"HiJump",
"canSpeedyJump",
"canShinechargeMovementTricky",
{
"shinespark": {
"frames": 12,
"excessFrames": 8
}
}
]
}
]
}
],
"flashSuitChecked": true,
"blueSuitChecked": true
},
{
"id": 17,
"link": [
2,
1
],
"name": "Shinespark Kill Top Pirate",
"requires": [
{
"obstaclesCleared": [
"C"
]
},
"canShinechargeMovementComplex",
"canUseSpeedEchoes",
{
"canShineCharge": {
"usedTiles": 21,
"openEnd": 0
}
},
{
"or": [
{
"and": [
{
"or": [
"HiJump",
"canWallJump",
"canSpeedyJump",
"canTrickySpringBallJump",
"SpaceJump"
]
},
{
"shinespark": {
"frames": 28,
"excessFrames": 8
}
}
]
},
{
"and": [
{
"or": [
"canWallJump",
{
"and": [
"canShinechargeMovementTricky",
{
"or": [
"canSpeedyJump",
"canTrickySpringBallJump",
"SpaceJump"
]
}
]
}
]
},
{
"shinespark": {
"frames": 20,
"excessFrames": 8
}
}
]
},
{
"and": [
"HiJump",
{
"shinespark": {
"frames": 16,
"excessFrames": 8
}
}
]
},
{
"and": [
"HiJump",
"canSpeedyJump",
"canShinechargeMovementTricky",
{
"shinespark": {
"frames": 11,
"excessFrames": 8
}
}
]
}
]
}
],
"clearsObstacles": [
"A"
],
"flashSuitChecked": true,
"blueSuitChecked": true,
"note": [
"Using the bottom of the room, shortcharge to use the echoes created by shinesparking to kill all of the Standing Pirates.",
"Turn around and diagonal spark the ceiling to kill the pirates.",
"Building a spark towards the left allows for enough run speed to jump to the middle level.",
"Then vertical shinespark out which kills the top pirate."
]
},
{
"id": 40,
"link": [
2,
2
],
"name": "Simple Bottom Pirate Kill",
"requires": [
{
  "or": [
    "Plasma",
    "ScrewAttack",
    {
      "haveBlueSuit": {}
    }
  ]
}
],
"clearsObstacles": [
"C"
],
"flashSuitChecked": true,
"blueSuitChecked": true
},
{
"id": 41,
"link": [
2,
2
],
"name": "Pseudo Screw Bottom Pirate Kill",
"requires": [
"canPseudoScrew",
{
"or": [
{
"enemyDamage": {
"enemy": "Pink Space Pirate (standing)",
"type": "contact",
"hits": 1
}
},
"h_pauseAbuseMinimalReserveRefill"
]
}
],
"clearsObstacles": [
"C"
],
"flashSuitChecked": true,
"blueSuitChecked": true
},
{
"id": 42,
"link": [
2,
2
],
"name": "Damage-Avoiding Pseudo-Screw Bottom Pirate Kill",
"requires": [
{
"notable": "Damage-Avoiding Pseudo-Screw"
},
"canPseudoScrew",
"canInsaneJump"
],
"clearsObstacles": [
"C"
],
"flashSuitChecked": true,
"blueSuitChecked": true,
"note": [
"Use a precisely positioned pseudo-screw to contact a Pirate for exactly one frame,",
"to hit it without taking damage in return.",
"A regular second pseudo-screw can then be used to kill the Pirate."
]
},
{
"id": 43,
"link": [
2,
2
],
"name": "Blue Speed Bottom Pirate Kill",
"requires": [
{
"or": [
"Morph",
"canCarefulJump",
"canCameraManip"
]
},
{
"or": [
{
"getBlueSpeed": {
"usedTiles": 19,
"openEnd": 0
}
},
{
"and": [
{
"enemyDamage": {
"enemy": "Pink Space Pirate (standing)",
"type": "contact",
"hits": 2
}
},
"canUseIFrames",
{
"canShineCharge": {
"usedTiles": 21,
"openEnd": 0
}
},
{
"or": [
{
"and": [
"canMidairShinespark",
"canUseSpeedEchoes",
{
"shinespark": {
"frames": 1,
"excessFrames": 1
}
}
]
},
{
"and": [
"canHorizontalShinespark",
{
"shinespark": {
"frames": 25,
"excessFrames": 20
}
}
]
}
]
}
]
}
]
}
],
"clearsObstacles": [
"C"
],
"flashSuitChecked": true,
"blueSuitChecked": true,
"failures": [
{
"name": "Miss Shortcharge",
"cost": [
{
"enemyDamage": {
"enemy": "Pink Space Pirate (standing)",
"type": "laser",
"hits": 1
}
}
]
}
],
"note": [
"Either lead the pirate to the left wall or take a hit to gain i-frames to use the full runway to charge a spark",
"To lead a pirate, have it shoot in the direction you want it to go. Then jump overhead and crouch on the other side.",
"Or, jump and aim down while on the sloped tiles just above to lower the camera and wait for the pirate to move to the correct spot."
],
"devNote": [
"A leniency laser hit is included for the i-frames method."
]
},
{
"id": 44,
"link": [
2,
2
],
"name": "Shinespark Echoes Central Pirates Kill",
"requires": [
{
"obstaclesCleared": [
"C"
]
},
"canShinechargeMovementComplex",
"canUseSpeedEchoes",
{
"canShineCharge": {
"usedTiles": 21,
"openEnd": 0
}
},
{
"shinespark": {
"frames": 2,
"excessFrames": 2
}
}
],
"clearsObstacles": [
"B"
],
"flashSuitChecked": true,
"blueSuitChecked": true,
"note": [
"Using the bottom of the room, shortcharge to use the echoes created by shinesparking to kill the two central standing Pirates."
]
},
{
"id": 45,
"link": [
2,
2
],
"name": "Crystal Flash",
"requires": [
"h_CrystalFlash"
],
"flashSuitChecked": true,
"blueSuitChecked": true
},
{
"id": 46,
"link": [
2,
2
],
"name": "In-Room Crystal Spark",
"requires": [
{
"obstaclesCleared": [
"C"
]
},
{
"canShineCharge": {
"usedTiles": 21,
"openEnd": 0
}
},
"h_CrystalSpark"
],
"flashSuitChecked": true,
"blueSuitChecked": true
},
{
"id": 21,
"link": [
2,
3
],
"name": "Base",
"requires": [
{
  "or": [
    "canWallJump",
    "h_crouchJumpDownGrab",
    "HiJump",
    "SpaceJump",
    "canSpringBallJumpMidAir",
    "canSpringBallBombJump"
  ]
}
],
"flashSuitChecked": true,
"blueSuitChecked": true
},
{
"id": 47,
"link": [
2,
3
],
"name": "IBJ",
"requires": [
"canIBJ",
{
"or": [
{
"and": [
"canJumpIntoIBJ",
"canDodgeWhileShooting"
]
},
{
"obstaclesCleared": [
"C"
]
}
]
}
],
"flashSuitChecked": true,
"blueSuitChecked": true
},
{
"id": 48,
"link": [
2,
3
],
"name": "Speedy Jump",
"requires": [
"canSpeedyJump",
{
"or": [
{
"obstaclesCleared": [
"C"
]
},
"canTrickyDodgeEnemies"
]
}
],
"flashSuitChecked": true,
"blueSuitChecked": true,
"note": [
"If the bottom Pirate is still alive, lure it to the left to open up the runway for a speedy jump."
]
},
{
"id": 49,
"link": [
2,
3
],
"name": "Frozen Pirate",
"requires": [
{
"obstaclesNotCleared": [
"C"
]
},
"canTrickyUseFrozenEnemies",
"Plasma"
],
"clearsObstacles": [
"C"
],
"flashSuitChecked": true,
"blueSuitChecked": true,
"note": [
"After using the Pirate as a platform, it can be killed from above."
]
},
{
"id": 50,
"link": [
2,
3
],
"name": "Unmorph Bomb Boost",
"requires": [
"canUnmorphBombBoost",
"canDownGrab"
],
"flashSuitChecked": true,
"blueSuitChecked": true
},
{
"id": 10,
"link": [
3,
1
],
"name": "Base",
"requires": [
"SpaceJump"
],
"flashSuitChecked": true,
"blueSuitChecked": true
},
{
"id": 12,
"link": [
3,
1
],
"name": "HiJump Wall Jump",
"requires": [
"HiJump",
"canPreciseWallJump",
{
"or": [
"canDodgeWhileShooting",
{
"obstaclesCleared": [
"B"
]
}
]
}
],
"flashSuitChecked": true,
"blueSuitChecked": true,
"note": "Either kill the wall Pirate or lead it to jump across the room; dodge the standing Pirate if it is still alive."
},
{
"id": 13,
"link": [
3,
1
],
"name": "Speedy HiJump Wall Jump (Avoid Pirate)",
"requires": [
"HiJump",
"canSpeedyJump",
"canWallJump",
{
"or": [
"canTrickyJump",
{
"obstaclesCleared": [
"B"
]
}
]
}
],
"flashSuitChecked": true,
"blueSuitChecked": true,
"note": [
"If the right-side standing Pirate is still alive, let it walk towards the wall as far as possible from below.",
"The available running space is just enough to jump up and wall jump the ledge by the door."
],
"devNote": "This is also possible without going below and manipulating the camera, by standing on the slope and carefully jumping up and back."
},
{
"id": 15,
"link": [
3,
1
],
"name": "IBJ",
"requires": [
{
"obstaclesCleared": [
"B"
]
},
{
"or": [
"canLongIBJ",
{
"and": [
"HiJump",
"canJumpIntoIBJ"
]
}
]
}
],
"flashSuitChecked": true,
"blueSuitChecked": true
},
{
"id": 16,
"link": [
3,
1
],
"name": "Jump into IBJ over the Pirate",
"requires": [
"canDodgeWhileShooting",
"canJumpIntoIBJ",
{
"or": [
"canLongIBJ",
"HiJump"
]
}
],
"flashSuitChecked": true,
"blueSuitChecked": true,
"failures": [
{
"name": "Fail Bomb Jump",
"cost": [
{
"enemyDamage": {
"enemy": "Pink Space Pirate (standing)",
"type": "laser",
"hits": 1
}
}
]
}
],
"note": "Let the wall pirate jump to the other side of the room. Shooting the standing pirate (with anything) will prevent it from attacking."
},
{
"id": 31,
"link": [
3,
1
],
"name": "Use Stored Spark",
"requires": [
"h_storedSpark",
{
"or": [
{
"shinespark": {
"frames": 20,
"excessFrames": 2
}
},
{
"and": [
"HiJump",
{
"shinespark": {
"frames": 17,
"excessFrames": 3
}
}
]
}
]
}
],
"flashSuitChecked": true,
"blueSuitChecked": true,
"devNote": "This can be done with less Energy, but it is likely the upper pirate will shoot Samus."
},
{
"id": 26,
"link": [
3,
1
],
"name": "Frozen Wall Pirate Escape",
"requires": [
"canTrickyUseFrozenEnemies",
"canDodgeWhileShooting",
"canPreciseWallJump",
{
"or": [
{
"obstaclesCleared": [
"B"
]
},
"canTrickyDodgeEnemies"
]
},
"canCameraManip"
],
"flashSuitChecked": true,
"blueSuitChecked": true,
"note": [
"It's possible to climb up with just ice by freezing the wall space pirates (who can be frozen and killed without Plasma).",
"Clearing the gray door lock would require killing the frozen pirate after using it to climb.",
"To do this most easily, freeze the Pirate as high as possible on the left wall.",
"Bait the pirate to jump across the room early so that it stays high on the wall, or bring it on camera by jumping below the platform if the wall pirate gets too low.",
"After reaching the top, it can help to reset the camera by moving to the right on the center platform and then back left."
]
},
{
"id": 28,
"link": [
3,
1
],
"name": "HiJumpless Wall Jump",
"requires": [
"canInsaneWallJump",
"canConsecutiveWallJump"
],
"flashSuitChecked": true,
"blueSuitChecked": true,
"note": "Either kill the wall Pirate or lead it to jump across the room; dodge the standing Pirate.",
"detailNote": [
"This is the same size of ledge as Worst Room in the Game."
]
},
{
"id": 29,
"link": [
3,
1
],
"name": "Wall Jump Spring Ball Jump",
"requires": [
"canSpringwall",
{
"or": [
"canDodgeWhileShooting",
{
"obstaclesCleared": [
"B"
]
}
]
}
],
"flashSuitChecked": true,
"blueSuitChecked": true
},
{
"id": 30,
"link": [
3,
1
],
"name": "HiJump Spring Ball Jump",
"requires": [
"HiJump",
"canSpringBallJumpMidAir",
{
"or": [
"canDodgeWhileShooting",
{
"obstaclesCleared": [
"B"
]
}
]
}
],
"flashSuitChecked": true,
"blueSuitChecked": true
},
{
"id": 51,
"link": [
3,
2
],
"name": "Base",
"requires": [],
"flashSuitChecked": true,
"blueSuitChecked": true
},
{
"id": 52,
"link": [
3,
3
],
"name": "Simple Central Pirates Kill",
"requires": [
{
  "or": [
    "Plasma",
    "ScrewAttack",
    {
      "haveBlueSuit": {}
    }
  ]
}
],
"clearsObstacles": [
"B"
],
"flashSuitChecked": true,
"blueSuitChecked": true
},
{
"id": 53,
"link": [
3,
3
],
"name": "Pseudo Screw Central Pirates Kill",
"requires": [
"canPseudoScrew",
{
"or": [
{
"enemyDamage": {
"enemy": "Pink Space Pirate (standing)",
"type": "contact",
"hits": 3
}
},
{
"and": [
"canTrickyJump",
{
"enemyDamage": {
"enemy": "Pink Space Pirate (standing)",
"type": "contact",
"hits": 2
}
}
]
},
{
"and": [
"h_pauseAbuseMinimalReserveRefill",
"h_pauseAbuseMinimalReserveRefill"
]
}
]
}
],
"clearsObstacles": [
"B"
],
"flashSuitChecked": true,
"blueSuitChecked": true
},
{
"id": 54,
"link": [
3,
3
],
"name": "Damage-Avoiding Pseudo-Screw Central Pirates",
"requires": [
{
"notable": "Damage-Avoiding Pseudo-Screw"
},
"canPseudoScrew",
"canInsaneJump",
"canBeVeryPatient"
],
"clearsObstacles": [
"B"
],
"flashSuitChecked": true,
"blueSuitChecked": true,
"note": [
"Use a precisely positioned pseudo-screw to contact a Pirate for exactly one frame,",
"to hit it without taking damage in return.",
"A regular second pseudo-screw can then be used to kill the Pirate.",
"Repeat this with the second standing central Pirate."
],
"devNote": [
"FIXME: The `canBeVeryPatient` is for difficulty placement but should be replaced with a more appropriate tech.",
"This is not because killing the central Pirates is any more difficult than the top or bottom ones;",
"but because killing all four without taking damage is difficult.",
"Without canBeVeryPatient, a total of 2 hits would be expected to kill all four Pirates."
]
}
],
"notables": [
{
"id": 1,
"name": "Damage-Avoiding Pseudo-Screw",
"note": [
"Use a precisely positioned pseudo-screw to contact a Pirate for exactly one frame,",
"to hit it without taking damage in return.",
"A regular second pseudo-screw can then be used to kill the Pirate."
]
}
],
"nextStratId": 55,
"nextNotableId": 2
}