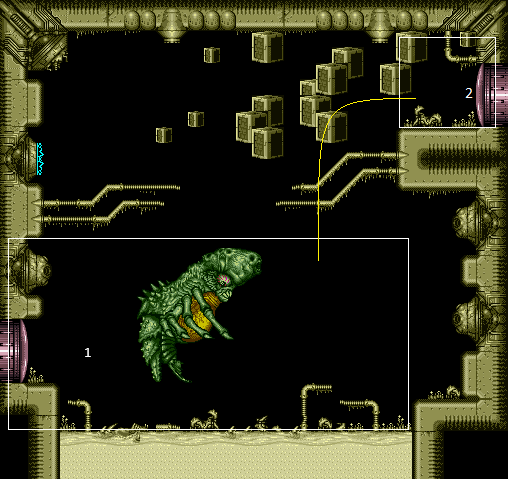
Draygon's Room: R-Mode Pause Abuse Spark Interrupt (Gain Blue Suit)
Room ID: 193
From: 2
Right Door
To: 1
Left Door
Crystal Flash after entering. Damage down until ready to interrupt. Shinecharge, and start jumping toward the turret. As you jump, pause and set reserves to manual. At this point, visibility will be completely obscured. Re pause as soon as possible while jumping up into the turret. When the energy counter changes to 00, immediately press Right+Jump to damage boost, then release jump early to begin shinespark windup. Set reserves to auto, then as soon as possible, pause and unpause again - visibility will return to normal. Using the turret to gain a flash suit (spikesuit) can help reduce the amount of blind execution, or when using the top turret. If Draygon is alive, the Shinespark windup may be interrupt by the goop phase grab instead of through triggering Reserves. Entrance condition: {
"comeInWithRMode": {}
}Requires: {
"or": [
{
"and": [
{
"or": [
"f_DefeatedDraygon",
{
"obstaclesCleared": [
"f_DefeatedDraygon"
]
}
]
},
{
"or": [
"canWallJump",
"SpaceJump",
"h_breakOneDraygonTurret"
]
}
]
},
"h_breakThreeDraygonTurrets"
]
}
"Gravity"
"h_CrystalFlashForReserveEnergy"
{
"canShineCharge": {
"usedTiles": 22,
"openEnd": 0
}
}
"canOffScreenMovement"
"canHorizontalDamageBoost"
{
"autoReserveTrigger": {}
}
"canRModePauseAbuseSparkInterrupt"Clears obstacles: door_2 |