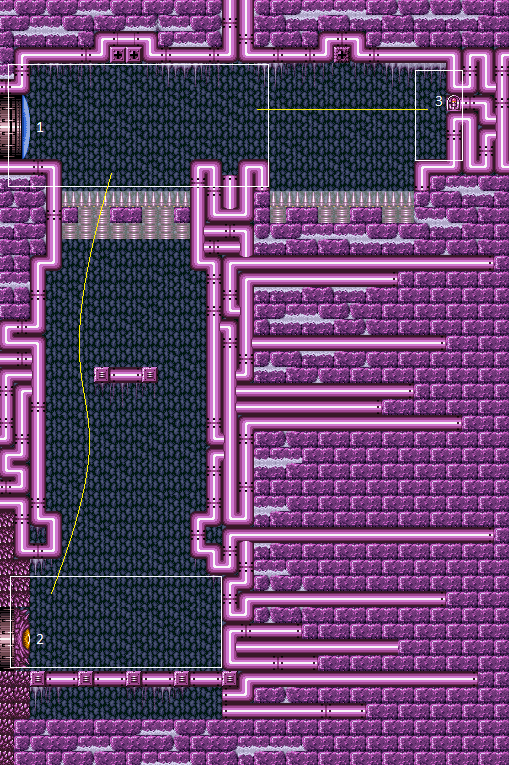
The Precious Room
Room ID: 192
|
Exit condition: {
"leaveWithRunway": {
"length": 3,
"openEnd": 1
}
} |
|
Exit condition: {
"leaveWithGrappleSwing": {
"blocks": [
{
"position": [
7,
3
],
"note": "Closest Grapple block to the door"
}
]
}
} |
|
Requires: "h_CrystalFlash" |
|
|
From: 1
Top Left Door
To: 2
Bottom Left Door
Entrance condition: {
"comeInShinecharging": {
"length": 0,
"openEnd": 1
}
}Requires: "canChainTemporaryBlue" "canXRayTurnaround" Exit condition: {
"leaveWithTemporaryBlue": {}
}Unlocks doors: {"types":["ammo"],"requires":[]} |
|


Requires: {
"or": [
"h_navigateUnderwater",
"Grapple",
"SpaceJump"
]
} |
|


Requires: "Gravity"
{
"or": [
"SpaceJump",
"canIBJ",
"canSpringBallJumpMidAir",
"HiJump"
]
} |
|
Requires: "canGravityJump" |
|
Requires: "Gravity" "canTrickyWallJump" |
From: 2
Bottom Left Door
To: 1
Top Left Door


Entrance condition: {
"comeInShinecharged": {}
}Requires: "Gravity"
{
"or": [
{
"and": [
{
"shineChargeFrames": 20
},
{
"shinespark": {
"frames": 40,
"excessFrames": 8
}
}
]
},
{
"and": [
{
"shineChargeFrames": 30
},
"canMidairShinespark",
{
"shinespark": {
"frames": 33,
"excessFrames": 8
}
}
]
}
]
} |
From: 2
Bottom Left Door
To: 1
Top Left Door


Entrance condition: {
"comeInShinecharged": {}
}Requires: {
"shineChargeFrames": 40
}
"canSuitlessMaridia"
{
"or": [
{
"shinespark": {
"frames": 40,
"excessFrames": 8
}
},
{
"and": [
"canMidairShinespark",
{
"shinespark": {
"frames": 37,
"excessFrames": 8
}
}
]
}
]
} |
|
Climb up 2 screens. Entrance condition: {
"comeInWithDoorStuckSetup": {}
}Requires: "canLongXRayClimb" |
From: 2
Bottom Left Door
To: 1
Top Left Door
Enter with G-mode direct, back up to between 1 and 6 pixels from the door transition, and activate X-ray to get very deep stuck in the door. Climb up 2 screens, and perform a turnaround buffered spin-jump away from the door to trigger the transition, bypassing any lock on the door. Entrance condition: {
"comeInWithGMode": {
"mode": "direct",
"morphed": false
}
}Requires: "canGModeXRayClimb" "canLongXRayClimb" Bypasses door shell: true |
|

Requires: "canSuitlessMaridia" "HiJump" "canSpringBallJumpMidAir" |
From: 2
Bottom Left Door
To: 1
Top Left Door


Only requires a runway of approximately 0.5 tiles in the adjacent room. SpringBall jump once on the way up, then use a Bomb to buy just enough time for a second SpringBall jump. Entrance condition: {
"comeInJumping": {
"speedBooster": "no",
"minTiles": 1
}
}Requires: "canCrossRoomJumpIntoWater" "canUnderwaterBombIntoSpringBallJump" "canDoubleSpringBallJumpMidAir" |
From: 2
Bottom Left Door
To: 1
Top Left Door
Requires a runway of 2 tiles in the adjacent room. Entrance condition: {
"comeInJumping": {
"speedBooster": "any",
"minTiles": 2
}
}Requires: "HiJump" "canCrossRoomJumpIntoWater" "canBufferedMomentumConservingTurnaround" |
From: 2
Bottom Left Door
To: 1
Top Left Door
Requires a runway of 1 tile in the adjacent room. A momentum conserving turnaround is easier than a midair wiggle. Entrance condition: {
"comeInJumping": {
"speedBooster": "any",
"minTiles": 0.4375
}
}Requires: "HiJump"
"canCrossRoomJumpIntoWater"
{
"or": [
"canMomentumConservingTurnaround",
"canMidairWiggle"
]
} |
From: 2
Bottom Left Door
To: 1
Top Left Door
Requires a runway of at least 7 tiles (with no open end) in the adjacent room. A momentum conserving turnaround is easier than a midair wiggle. Entrance condition: {
"comeInJumping": {
"speedBooster": "yes",
"minTiles": 6.4375
}
}Requires: "canCrossRoomJumpIntoWater"
"canTrickyDashJump"
{
"or": [
"canMomentumConservingTurnaround",
"canMidairWiggle"
]
} |
From: 2
Bottom Left Door
To: 1
Top Left Door
The lenient version requires a runway of at about 10 tiles in the adjacent room. A momentum conserving turnaround is easier than climbing the right side of the room. Entrance condition: {
"comeInJumping": {
"speedBooster": "yes",
"minTiles": 10
}
}Requires: "canCrossRoomJumpIntoWater"
{
"or": [
"canMomentumConservingTurnaround",
"canMidairWiggle"
]
} |
From: 2
Bottom Left Door
To: 1
Top Left Door
Entrance condition: {
"comeInWithSpringBallBounce": {
"speedBooster": "yes",
"movementType": "any",
"remoteAndLandingMinTiles": [
[
17,
1
]
]
}
}Requires: "canCrossRoomJumpIntoWater" |
From: 2
Bottom Left Door
To: 1
Top Left Door
Entrance condition: {
"comeInWithSpringBallBounce": {
"speedBooster": "yes",
"movementType": "any",
"remoteAndLandingMinTiles": [
[
9,
1
]
]
}
}Requires: "canTrickyJump" "canCrossRoomJumpIntoWater" |
From: 2
Bottom Left Door
To: 1
Top Left Door
Entrance condition: {
"comeInWithSpringBallBounce": {
"speedBooster": "yes",
"movementType": "any",
"remoteAndLandingMinTiles": [
[
6.4375,
1
]
]
}
}Requires: "canTrickyDashJump" "canCrossRoomJumpIntoWater" |
From: 2
Bottom Left Door
To: 1
Top Left Door

Gaining blue speed with a precise amount of run speed (extra run speed of $2.0 or $2.1), and bounce through the transition. After the transition, unmorph, hold an angle button, aim down, and pause near the peak of Samus' jump. Buffer a morph out of the pause to continue chaining temporary blue. Use a spring ball jump to escape the water. Entrance condition: {
"comeInWithBlueSpringBallBounce": {
"movementType": "any",
"minExtraRunSpeed": "$2.0",
"maxExtraRunSpeed": "$2.1"
}
}Requires: "canTrickyDashJump" "canCrossRoomJumpIntoWater" "canPauseRemorphTemporaryBlue" "canXRayTurnaround" "canTrickySpringBallJump" Exit condition: {
"leaveWithTemporaryBlue": {}
}Unlocks doors: {"types":["ammo"],"requires":[]} |
|
Entrance condition: {
"comeInSpaceJumping": {
"speedBooster": "yes",
"minTiles": 10
}
}Requires: "canMidairWiggle" "canCrossRoomJumpIntoWater" |
From: 2
Bottom Left Door
To: 1
Top Left Door
Turn around and break spin to move vertically while near the height of the floating platform. Entrance condition: {
"comeInSpaceJumping": {
"speedBooster": "yes",
"minTiles": 6.4375
}
}Requires: "canMidairWiggle" "canTrickyDashJump" "canCrossRoomJumpIntoWater" |
From: 2
Bottom Left Door
To: 1
Top Left Door
Gain run speed using a platform below the door in the other room. Jump through the door, carrying upward momentum into this room; if necessary, use a momentum-conserving morph or momentum-conserving turnaround through the transition. Entrance condition: {
"comeInWithSidePlatform": {
"platforms": [
{
"minHeight": 2,
"maxHeight": 2,
"minTiles": 27.4375,
"speedBooster": "yes",
"obstructions": [
[
1,
0
]
],
"note": [
"This applies to Dust Torizo Room."
]
},
{
"minHeight": 3,
"maxHeight": 3,
"minTiles": 39.4375,
"speedBooster": "yes",
"obstructions": [
[
3,
2
]
],
"note": [
"This applies to Metal Pirates Room."
]
},
{
"minHeight": 2,
"maxHeight": 2,
"minTiles": 20.4375,
"speedBooster": "yes",
"obstructions": [
[
3,
0
]
],
"requires": [
"canTrickyDashJump",
"canMomentumConservingMorph"
],
"note": [
"This applies to Metroid Room 1 and Statues Hallway.",
"Jump with an extra run speed of $4.0 or $4.1."
]
},
{
"minHeight": 2,
"maxHeight": 2,
"minTiles": 45,
"speedBooster": "yes",
"obstructions": [
[
3,
0
]
],
"requires": [
{
"or": [
"canMomentumConservingMorph",
{
"and": [
"canInsaneJump",
"canMomentumConservingTurnaround"
]
}
]
}
],
"note": [
"This applies to Statues Hallway."
]
},
{
"minHeight": 3,
"maxHeight": 3,
"minTiles": 37.4375,
"speedBooster": "yes",
"obstructions": [
[
3,
0
]
],
"requires": [
"canMomentumConservingMorph"
],
"note": [
"This applies to Flyway."
]
},
{
"minHeight": 2,
"maxHeight": 2,
"minTiles": 45,
"speedBooster": "yes",
"obstructions": [
[
4,
0
]
],
"requires": [
"canMomentumConservingMorph"
],
"note": [
"This applies to Baby Kraid Room."
]
}
]
}
}Requires: "canCrossRoomJumpIntoWater" Dev note: With HiJump, it is possible to get up relatively easily with only a single tile of doorway runway; so we don't consider side platform strats involving HiJump. |
From: 2
Bottom Left Door
To: 1
Top Left Door

Entrance condition: {
"comeInWithSidePlatform": {
"platforms": [
{
"minHeight": 1,
"maxHeight": 1,
"minTiles": 7.4375,
"speedBooster": "yes",
"obstructions": [
[
1,
0
]
],
"requires": [
"canTrickyDashJump"
],
"note": [
"This applies to Warehouse Entrance.",
"Jump with an extra run speed of $2.0 or $2.1."
]
}
]
}
}Requires: "canCrossRoomJumpIntoWater" "canSpringBallJumpMidAir" |
|


Requires: "h_storedSpark"
{
"or": [
{
"shinespark": {
"frames": 37,
"excessFrames": 9
}
},
{
"and": [
"HiJump",
{
"shinespark": {
"frames": 33,
"excessFrames": 8
}
}
]
},
{
"and": [
"Gravity",
{
"shinespark": {
"frames": 32,
"excessFrames": 8
}
}
]
}
]
} |
From: 2
Bottom Left Door
To: 1
Top Left Door
Cross room jump onto the top middle platform before sparking. Requires a runway of 1 tile in the adjacent room. Entrance condition: {
"comeInJumping": {
"speedBooster": "any",
"minTiles": 0.4375
}
}Requires: "canCrossRoomJumpIntoWater"
{
"useFlashSuit": {}
}
{
"shinespark": {
"frames": 16,
"excessFrames": 9
}
}Dev note: Assumes Samus lands, then jumps again before sparking. There is no HiJump variant, as that can jump out of the water. |
From: 2
Bottom Left Door
To: 1
Top Left Door


Underwater wall jump to the top middle platform before sparking to save Energy. Requires: "canTrickyCarryFlashSuit"
"canLongUnderwaterWallJump"
"h_storedSpark"
{
"shinespark": {
"frames": 12,
"excessFrames": 8
}
} |
|


Entrance condition: {
"comeInWithGMode": {
"mode": "any",
"morphed": true
}
}Requires: {
"or": [
{
"and": [
"Gravity",
"h_artificialMorphIBJ"
]
},
"h_artificialMorphDoubleSpringBallJump"
]
} |
|

This is for entering from Mt. Everest. Samus must be carefully positioned in order to make it up to the top of the room. One method is to press against the pipes jutting out on either side of the room, turn around while morphed, then arm pump in between grapple jumps in order to move one tile toward the center of the room. Entrance condition: {
"comeInWithGrappleSwing": {
"blocks": [
{
"position": [
-1,
5
],
"environment": "water",
"note": "Mt. Everest"
}
]
}
}Requires: "HiJump" "canPreciseGrappleJump" Dev note: This can also work well enough with other setup rooms such as Colosseum, but given that this strat assumes having HiJump, it would be easier to just cross-room jump in those cases. |
|
Samus must be carefully positioned in order to make it up to the top of the room. One method is to press against the pipes jutting out on either side of the room, turn around while morphed, then arm pump in between grapple jumps in order to move one tile toward the center of the room. Entrance condition: {
"comeInWithGrappleSwing": {
"blocks": [
{
"position": [
-1,
5
],
"environment": "water",
"note": "Mt. Everest"
},
{
"position": [
8,
3
],
"note": "Grapple Beam Room"
},
{
"position": [
7,
3
],
"note": "Colosseum"
},
{
"position": [
6,
4
],
"note": "Grapple Tutorial Room 2"
},
{
"position": [
6,
2
],
"note": "Lava Grapple Tunnel"
},
{
"position": [
5,
2
],
"note": "The Moat, Double Chamber, Wrecked Ship Energy Tank Room"
},
{
"position": [
2.375,
4.5625
],
"note": "Post Crocomire Farming Room"
}
]
}
}Requires: "canTrickyGrappleJump" |
|
Entrance condition: {
"comeInWithGrappleTeleport": {
"blockPositions": [
[
12,
12
],
[
12,
13
]
]
}
} |
|
Exit condition: {
"leaveWithRunway": {
"length": 13,
"openEnd": 0
}
} |
|
Requires: "h_CrystalFlash" |
From: 2
Bottom Left Door
To: 2
Bottom Left Door
With a runway of 5 tiles (open end) in the other room, the ideal timing for the stutter is to release forward for 5 frames, and repress forward on the last possible frame before the transition. Other timings can work, but will gain the shinecharge further from the door, leaving fewer shinecharge frames remaining. After gaining the shinecharge, continue holding forward in order to make Samus stand. Then turnaround spin jump back toward the door, and continue spin jumping to reach the transition with a shinecharge. Entrance condition: {
"comeInStutterShinecharging": {
"minTiles": 5
}
}Requires: "canPreciseStutterWaterShineCharge"
"canShinechargeMovementTricky"
"canInsaneJump"
{
"shineChargeFrames": 130
}
{
"or": [
"canBeVeryPatient",
{
"shineChargeFrames": 15
}
]
}Exit condition: {
"leaveShinecharged": {}
}Unlocks doors: {"types":["super"],"requires":[]}
{"types":["missiles","powerbomb"],"requires":["never"]} |
From: 2
Bottom Left Door
To: 2
Bottom Left Door
With only a runway of 4 tiles (open end) in the other room, the ideal timing for the stutter is to release forward for 4 frames, and repress forward on the last possible frame before the transition. It also works well to release forward for 3 frames and repress on the last possible frame. Other timings can also work, but may gain the shinecharge further from the door, leaving fewer shinecharge frames remaining. After gaining the shinecharge, continue holding forward in order to make Samus stand. Then turnaround spin jump back toward the door, and continue spin jumping to reach the transition with a shinecharge. Entrance condition: {
"comeInStutterShinecharging": {
"minTiles": 4
}
}Requires: "canPreciseStutterWaterShineCharge"
"canShinechargeMovementTricky"
"canInsaneJump"
{
"shineChargeFrames": 140
}
{
"or": [
"canBeVeryPatient",
{
"shineChargeFrames": 10
}
]
}Exit condition: {
"leaveShinecharged": {}
}Unlocks doors: {"types":["super"],"requires":[]}
{"types":["missiles","powerbomb"],"requires":["never"]} |
From: 2
Bottom Left Door
To: 2
Bottom Left Door
With only a runway of 3 tiles (open end) in the other room, the ideal timing for the stutter is to release forward for 3 or 4 frames, and repress forward on the last possible frame before the transition. Other timings can work, but will gain the shinecharge further from the door, leaving fewer shinecharge frames remaining. After gaining the shinecharge, continue holding forward in order to make Samus stand. Then turnaround spin jump back toward the door, and continue spin jumping to reach the transition with a shinecharge. Alternatively, with greater difficulty but saving some shinecharge frames, after performing the turnaround spin jump, briefly moonwalk back, then retain momentum by boomeranging forward (switching from pressing backward to pressing forward on the next frame), and arm pump to reach the door quickly. Entrance condition: {
"comeInStutterShinecharging": {
"minTiles": 3
}
}Requires: "canPreciseStutterWaterShineCharge"
"canShinechargeMovementTricky"
"canInsaneJump"
{
"shineChargeFrames": 145
}
{
"or": [
"canBeVeryPatient",
{
"shineChargeFrames": 10
}
]
}Exit condition: {
"leaveShinecharged": {}
}Unlocks doors: {"types":["super"],"requires":[]}
{"types":["missiles","powerbomb"],"requires":["never"]}Dev note: The same shinecharge frames could be achieved with a closed end runway (effective length of 2.4375), with a 3-frame stutter, but there doesn't appear to be any application. |
From: 2
Bottom Left Door
To: 2
Bottom Left Door
With only a runway of 2 tiles (open end) in the other room, the ideal timing for the stutter is to release forward for 3 frames, and repress forward on the last possible frame before the transition. Other timings can work, but will gain the shinecharge further from the door, leaving fewer shinecharge frames remaining. After gaining the shinecharge, continue holding forward in order to make Samus stand. Then turnaround spin jump back toward the door, and continue spin jumping to reach the transition with a shinecharge. Alternatively, with greater difficulty but saving some shinecharge frames, after performing the turnaround spin jump, briefly moonwalk back, then retain momentum by boomeranging forward (switching from pressing backward to pressing forward on the next frame), and arm pump to reach the door quickly. Entrance condition: {
"comeInStutterShinecharging": {
"minTiles": 2
}
}Requires: "canPreciseStutterWaterShineCharge"
"canShinechargeMovementTricky"
"canInsaneJump"
{
"shineChargeFrames": 150
}
{
"or": [
"canBeVeryPatient",
{
"shineChargeFrames": 15
}
]
}Exit condition: {
"leaveShinecharged": {}
}Unlocks doors: {"types":["super"],"requires":[]}
{"types":["missiles","powerbomb"],"requires":["never"]}Dev note: FIXME: The canBeVeryPatient requirement is for difficulty placement of the boomerang method; but the boomerang (or maybe specifically the moonwalk boomerang) should possibly be its own tech, and the same with rapid arm pumping. |
From: 2
Bottom Left Door
To: 2
Bottom Left Door
Entrance condition: {
"comeInShinecharging": {
"length": 12,
"openEnd": 0
},
"comesInHeated": "no"
}Requires: "Gravity" "h_CrystalSpark" |
From: 2
Bottom Left Door
To: 2
Bottom Left Door
With only a runway length of 3 tiles (closed end) in the other room, this requires a precise setup: release forward for 3 or 4 frames, then repress forward on the last possible frame before the transition; alternatively, release forward for 2 frames and repress forward on the second-to-last possible frame before the transition. If a longer runway is available (4 tiles), the timing windows are a bit more lenient: 1. Release forward for 3, 4, or 5 frames, repress forward on the last possible frame; 2. Release forward for 2 or 3 frames, repress forward on the 2nd-to-last possible frame; 3. Release forward for 1 or 2 frames, repress forward on the 3rd-to-last possible frame. Entrance condition: {
"comeInStutterShinecharging": {
"minTiles": 2.4375
},
"comesInHeated": "no"
}Requires: "canPreciseStutterWaterShineCharge" "h_underwaterCrystalSpark" Dev note: FIXME: This is possible with a 2-tile runway, but it's a lot worse. It would require more duplication and could be very tedious to set up for many attempts. |
From: 2
Bottom Left Door
To: 4
Bottom Right Shinecharged
Entrance condition: {
"comeInShinecharging": {
"length": 12,
"openEnd": 0
}
}Requires: "Gravity"
{
"shineChargeFrames": 0
} |
|
Entrance condition: {
"comeInShinecharging": {
"length": 4,
"openEnd": 0
}
}Requires: "canWaterShineCharge"
{
"shineChargeFrames": 0
} |
From: 2
Bottom Left Door
To: 4
Bottom Right Shinecharged
With only a runway length of 3 tiles (closed end) in the other room, this requires a precise setup: release forward for 3 or 4 frames, then repress forward on the last possible frame before the transition; alternatively, release forward for 2 frames and repress forward on the second-to-last possible frame before the transition. If a longer runway is available (4 tiles), the timing windows are a bit more lenient: 1. Release forward for 3, 4, or 5 frames, repress forward on the last possible frame; 2. Release forward for 2 or 3 frames, repress forward on the 2nd-to-last possible frame; 3. Release forward for 1 or 2 frames, repress forward on the 3rd-to-last possible frame. Entrance condition: {
"comeInStutterShinecharging": {
"minTiles": 2.4375
}
}Requires: "canPreciseStutterWaterShineCharge"
{
"shineChargeFrames": 0
} |
From: 2
Bottom Left Door
To: 4
Bottom Right Shinecharged
With only a runway of 2 tiles (open end) in the other room, this requires a double-frame-perfect setup: release forward for exactly 3 frames, and repress forward on the last possible frame before the transition. Entrance condition: {
"comeInStutterShinecharging": {
"minTiles": 2
}
}Requires: "canPreciseStutterWaterShineCharge"
"canInsaneJump"
{
"shineChargeFrames": 0
}Dev note: FIXME: canInsaneJump is for difficulty placement; replace with a more appropriate tech since no jump is involved. |
|
Requires: {
"or": [
"h_navigateUnderwater",
"Grapple",
"SpaceJump"
]
} |
From: 4
Bottom Right Shinecharged
To: 1
Top Left Door
Requires: {
"shineChargeFrames": 60
}
{
"or": [
{
"shinespark": {
"frames": 40,
"excessFrames": 8
}
},
{
"and": [
"canMidairShinespark",
{
"shinespark": {
"frames": 37,
"excessFrames": 8
}
}
]
},
{
"and": [
"Gravity",
"canMidairShinespark",
{
"shinespark": {
"frames": 33,
"excessFrames": 8
}
}
]
}
]
} |
From: 4
Bottom Right Shinecharged
To: 1
Top Left Door
To get out of the water at the top, do another gravity jump or spring ball jump, preferably while the water is high. Requires: "h_shinechargeMaxRunway"
{
"shineChargeFrames": 0
}
"canXRayTurnaround"
"canLongChainTemporaryBlue"
{
"or": [
"canGravityJump",
{
"and": [
"HiJump",
"canTrickySpringBallJump"
]
}
]
}Exit condition: {
"leaveWithTemporaryBlue": {}
}Unlocks doors: {"types":["ammo"],"requires":[]} |
From: 4
Bottom Right Shinecharged
To: 2
Bottom Left Door
Requires: {
"shineChargeFrames": 50
}
"canShinechargeMovementComplex"
{
"shinespark": {
"frames": 12,
"excessFrames": 0
}
}Exit condition: {
"leaveWithSpark": {}
}Unlocks doors: {"types":["missiles","super"],"requires":[]}
{"types":["powerbomb"],"requires":["never"]} |
From: 4
Bottom Right Shinecharged
To: 2
Bottom Left Door
Requires: "h_shinechargeMaxRunway"
{
"shineChargeFrames": 0
}
"canXRayTurnaround"
"canChainTemporaryBlue"Exit condition: {
"leaveWithTemporaryBlue": {}
}Unlocks doors: {"types":["ammo"],"requires":[]} |
{
"$schema": "../../../schema/m3-room.schema.json",
"id": 192,
"name": "The Precious Room",
"area": "Maridia",
"subarea": "Inner",
"subsubarea": "Pink",
"roomAddress": "0x7D78F",
"roomEnvironments": [
{
"heated": false
}
],
"mapTileMask": [
[
1,
1
],
[
1,
0
],
[
1,
0
]
],
"nodes": [
{
"id": 1,
"name": "Top Left Door",
"nodeType": "door",
"nodeSubType": "blue",
"nodeAddress": "0x001a834",
"doorOrientation": "left",
"doorEnvironments": [
{
"physics": "air"
}
],
"mapTileMask": [
[
2,
1
],
[
2,
0
],
[
1,
0
]
]
},
{
"id": 2,
"name": "Bottom Left Door",
"nodeType": "door",
"nodeSubType": "eye",
"nodeAddress": "0x001a840",
"doorOrientation": "left",
"doorEnvironments": [
{
"physics": "water"
}
],
"mapTileMask": [
[
1,
1
],
[
1,
0
],
[
2,
0
]
]
},
{
"id": 3,
"name": "Top Right Hidden Item",
"nodeType": "item",
"nodeSubType": "hidden",
"nodeItem": "Missile",
"nodeAddress": "0x7C74D",
"mapTileMask": [
[
1,
2
],
[
1,
0
],
[
1,
0
]
],
"locks": [
{
"name": "Dummy Item Lock",
"lockType": "gameFlag",
"unlockStrats": [
{
"name": "Base (Collect Item)",
"notable": false,
"requires": [],
"flashSuitChecked": true,
"blueSuitChecked": true
}
]
}
]
},
{
"id": 4,
"name": "Bottom Right Shinecharged",
"nodeType": "junction",
"nodeSubType": "junction",
"mapTileMask": [
[
1,
1
],
[
1,
0
],
[
2,
0
]
],
"note": "Gaining a shinecharge at the bottom-right of the room."
}
],
"enemies": [],
"strats": [
{
"link": [
1,
1
],
"name": "Base (Unlock Door)",
"requires": [],
"unlocksDoors": [
{
"types": [
"ammo"
],
"requires": []
}
],
"flashSuitChecked": true,
"blueSuitChecked": true
},
{
"link": [
1,
1
],
"name": "Base (Come In Normally)",
"entranceCondition": {
"comeInNormally": {}
},
"requires": [],
"flashSuitChecked": true,
"blueSuitChecked": true
},
{
"link": [
1,
1
],
"name": "Base (Come In With Mockball)",
"entranceCondition": {
"comeInWithMockball": {
"adjacentMinTiles": 0,
"remoteAndLandingMinTiles": [
[
0,
0
]
],
"speedBooster": "any"
}
},
"requires": [],
"flashSuitChecked": true,
"blueSuitChecked": true
},
{
"link": [
2,
2
],
"name": "Base (Unlock Door)",
"requires": [],
"unlocksDoors": [
{
"types": [
"ammo"
],
"requires": []
}
],
"flashSuitChecked": true,
"blueSuitChecked": true
},
{
"link": [
2,
2
],
"name": "Base (Come In Normally)",
"entranceCondition": {
"comeInNormally": {}
},
"requires": [],
"flashSuitChecked": true,
"blueSuitChecked": true
},
{
"link": [
2,
2
],
"name": "Base (Come In With Mockball)",
"entranceCondition": {
"comeInWithMockball": {
"adjacentMinTiles": 0,
"remoteAndLandingMinTiles": [
[
0,
0
]
],
"speedBooster": "any"
}
},
"requires": [],
"flashSuitChecked": true,
"blueSuitChecked": true
},
{
"name": "Base (Collect Item)",
"notable": false,
"requires": [],
"flashSuitChecked": true,
"blueSuitChecked": true,
"link": [
3,
3
],
"collectsItems": [
3
]
},
{
"id": 1,
"link": [
1,
1
],
"name": "Leave with Runway",
"requires": [],
"exitCondition": {
"leaveWithRunway": {
"length": 3,
"openEnd": 1
}
},
"flashSuitChecked": true,
"blueSuitChecked": true
},
{
"id": 36,
"link": [
1,
1
],
"name": "Leave With Grapple Swing",
"requires": [],
"exitCondition": {
"leaveWithGrappleSwing": {
"blocks": [
{
"position": [
7,
3
],
"note": "Closest Grapple block to the door"
}
]
}
},
"flashSuitChecked": true,
"blueSuitChecked": true
},
{
"id": 2,
"link": [
1,
1
],
"name": "Crystal Flash",
"requires": [
"h_CrystalFlash"
],
"flashSuitChecked": true,
"blueSuitChecked": true
},
{
"id": 3,
"link": [
1,
2
],
"name": "Base",
"requires": [],
"flashSuitChecked": true,
"blueSuitChecked": true
},
{
"id": 4,
"link": [
1,
2
],
"name": "Come In Shinecharging, Leave With Temporary Blue",
"entranceCondition": {
"comeInShinecharging": {
"length": 0,
"openEnd": 1
}
},
"requires": [
"canChainTemporaryBlue",
"canXRayTurnaround"
],
"exitCondition": {
"leaveWithTemporaryBlue": {}
},
"unlocksDoors": [
{
"types": [
"ammo"
],
"requires": []
}
],
"flashSuitChecked": true,
"blueSuitChecked": true
},
{
"id": 5,
"link": [
1,
3
],
"name": "Base",
"requires": [
{
  "or": [
    "h_navigateUnderwater",
    "Grapple",
    "SpaceJump"
  ]
}
],
"flashSuitChecked": true,
"blueSuitChecked": true
},
{
"id": 6,
"link": [
2,
1
],
"name": "Base",
"requires": [
"Gravity",
{
"or": [
"SpaceJump",
"canIBJ",
"canSpringBallJumpMidAir",
"HiJump"
]
}
],
"flashSuitChecked": true,
"blueSuitChecked": true
},
{
"id": 7,
"link": [
2,
1
],
"name": "Gravity Jump",
"requires": [
"canGravityJump"
],
"flashSuitChecked": true,
"blueSuitChecked": true
},
{
"id": 8,
"link": [
2,
1
],
"name": "Delayed Wall Jump",
"requires": [
"Gravity",
"canTrickyWallJump"
],
"flashSuitChecked": true,
"blueSuitChecked": true
},
{
"id": 10,
"link": [
2,
1
],
"name": "Come in Shinecharged, Shinespark (Gravity)",
"entranceCondition": {
"comeInShinecharged": {}
},
"requires": [
"Gravity",
{
"or": [
{
"and": [
{
"shineChargeFrames": 20
},
{
"shinespark": {
"frames": 40,
"excessFrames": 8
}
}
]
},
{
"and": [
{
"shineChargeFrames": 30
},
"canMidairShinespark",
{
"shinespark": {
"frames": 33,
"excessFrames": 8
}
}
]
}
]
}
],
"flashSuitChecked": true,
"blueSuitChecked": true
},
{
"id": 11,
"link": [
2,
1
],
"name": "Come In Shinecharged, Shinespark (Suitless)",
"entranceCondition": {
"comeInShinecharged": {}
},
"requires": [
{
"shineChargeFrames": 40
},
"canSuitlessMaridia",
{
"or": [
{
"shinespark": {
"frames": 40,
"excessFrames": 8
}
},
{
"and": [
"canMidairShinespark",
{
"shinespark": {
"frames": 37,
"excessFrames": 8
}
}
]
}
]
}
],
"flashSuitChecked": true,
"blueSuitChecked": true
},
{
"id": 12,
"link": [
2,
1
],
"name": "X-Ray Climb",
"entranceCondition": {
"comeInWithDoorStuckSetup": {}
},
"requires": [
"canLongXRayClimb"
],
"flashSuitChecked": true,
"blueSuitChecked": true,
"note": "Climb up 2 screens."
},
{
"id": 13,
"link": [
2,
1
],
"name": "Very Deep Stuck X-Ray Climb",
"entranceCondition": {
"comeInWithGMode": {
"mode": "direct",
"morphed": false
}
},
"requires": [
"canGModeXRayClimb",
"canLongXRayClimb"
],
"bypassesDoorShell": "yes",
"flashSuitChecked": true,
"blueSuitChecked": true,
"note": [
"Enter with G-mode direct, back up to between 1 and 6 pixels from the door transition, and activate X-ray to get very deep stuck in the door.",
"Climb up 2 screens, and perform a turnaround buffered spin-jump away from the door to trigger the transition, bypassing any lock on the door."
]
},
{
"id": 14,
"link": [
2,
1
],
"name": "Suitless Jump Assist",
"requires": [
"canSuitlessMaridia",
"HiJump",
"canSpringBallJumpMidAir"
],
"flashSuitChecked": true,
"blueSuitChecked": true
},
{
"id": 17,
"link": [
2,
1
],
"name": "Cross Room HiJumpless Double Spring Ball Jump with Bombs",
"entranceCondition": {
"comeInJumping": {
"speedBooster": "no",
"minTiles": 1
}
},
"requires": [
"canCrossRoomJumpIntoWater",
"canUnderwaterBombIntoSpringBallJump",
"canDoubleSpringBallJumpMidAir"
],
"flashSuitChecked": true,
"blueSuitChecked": true,
"note": [
"Only requires a runway of approximately 0.5 tiles in the adjacent room.",
"SpringBall jump once on the way up, then use a Bomb to buy just enough time for a second SpringBall jump."
]
},
{
"id": 51,
"link": [
2,
1
],
"name": "Cross Room Jump with HiJump (Lenient)",
"entranceCondition": {
"comeInJumping": {
"speedBooster": "any",
"minTiles": 2
}
},
"requires": [
"HiJump",
"canCrossRoomJumpIntoWater",
"canBufferedMomentumConservingTurnaround"
],
"flashSuitChecked": true,
"blueSuitChecked": true,
"note": [
"Requires a runway of 2 tiles in the adjacent room."
]
},
{
"id": 18,
"link": [
2,
1
],
"name": "Cross Room Jump with HiJump",
"entranceCondition": {
"comeInJumping": {
"speedBooster": "any",
"minTiles": 0.4375
}
},
"requires": [
"HiJump",
"canCrossRoomJumpIntoWater",
{
"or": [
"canMomentumConservingTurnaround",
"canMidairWiggle"
]
}
],
"flashSuitChecked": true,
"blueSuitChecked": true,
"note": [
"Requires a runway of 1 tile in the adjacent room.",
"A momentum conserving turnaround is easier than a midair wiggle."
]
},
{
"id": 19,
"link": [
2,
1
],
"name": "Cross Room Jump with Speed Booster",
"entranceCondition": {
"comeInJumping": {
"speedBooster": "yes",
"minTiles": 6.4375
}
},
"requires": [
"canCrossRoomJumpIntoWater",
"canTrickyDashJump",
{
"or": [
"canMomentumConservingTurnaround",
"canMidairWiggle"
]
}
],
"flashSuitChecked": true,
"blueSuitChecked": true,
"note": [
"Requires a runway of at least 7 tiles (with no open end) in the adjacent room.",
"A momentum conserving turnaround is easier than a midair wiggle."
]
},
{
"id": 20,
"link": [
2,
1
],
"name": "Cross Room Jump with Speed Booster (Lenient)",
"entranceCondition": {
"comeInJumping": {
"speedBooster": "yes",
"minTiles": 10
}
},
"requires": [
"canCrossRoomJumpIntoWater",
{
"or": [
"canMomentumConservingTurnaround",
"canMidairWiggle"
]
}
],
"flashSuitChecked": true,
"blueSuitChecked": true,
"note": [
"The lenient version requires a runway of at about 10 tiles in the adjacent room.",
"A momentum conserving turnaround is easier than climbing the right side of the room."
]
},
{
"id": 21,
"link": [
2,
1
],
"name": "Cross Room Spring Ball Bounce (Lenient)",
"entranceCondition": {
"comeInWithSpringBallBounce": {
"speedBooster": "yes",
"movementType": "any",
"remoteAndLandingMinTiles": [
[
17,
1
]
]
}
},
"requires": [
"canCrossRoomJumpIntoWater"
],
"flashSuitChecked": true,
"blueSuitChecked": true
},
{
"id": 22,
"link": [
2,
1
],
"name": "Cross Room Spring Ball Bounce",
"entranceCondition": {
"comeInWithSpringBallBounce": {
"speedBooster": "yes",
"movementType": "any",
"remoteAndLandingMinTiles": [
[
9,
1
]
]
}
},
"requires": [
"canTrickyJump",
"canCrossRoomJumpIntoWater"
],
"flashSuitChecked": true,
"blueSuitChecked": true
},
{
"id": 23,
"link": [
2,
1
],
"name": "Tricky Cross Room Spring Ball Bounce",
"entranceCondition": {
"comeInWithSpringBallBounce": {
"speedBooster": "yes",
"movementType": "any",
"remoteAndLandingMinTiles": [
[
6.4375,
1
]
]
}
},
"requires": [
"canTrickyDashJump",
"canCrossRoomJumpIntoWater"
],
"flashSuitChecked": true,
"blueSuitChecked": true
},
{
"id": 24,
"link": [
2,
1
],
"name": "Tricky Cross Room Spring Ball Bounce, Leave With Temporary Blue",
"entranceCondition": {
"comeInWithBlueSpringBallBounce": {
"movementType": "any",
"minExtraRunSpeed": "$2.0",
"maxExtraRunSpeed": "$2.1"
}
},
"requires": [
"canTrickyDashJump",
"canCrossRoomJumpIntoWater",
"canPauseRemorphTemporaryBlue",
"canXRayTurnaround",
"canTrickySpringBallJump"
],
"exitCondition": {
"leaveWithTemporaryBlue": {}
},
"unlocksDoors": [
{
"types": [
"ammo"
],
"requires": []
}
],
"flashSuitChecked": true,
"blueSuitChecked": true,
"note": [
"Gaining blue speed with a precise amount of run speed (extra run speed of $2.0 or $2.1), and bounce through the transition.",
"After the transition, unmorph, hold an angle button, aim down, and pause near the peak of Samus' jump.",
"Buffer a morph out of the pause to continue chaining temporary blue.",
"Use a spring ball jump to escape the water."
]
},
{
"id": 25,
"link": [
2,
1
],
"name": "Cross Room Space Jump",
"entranceCondition": {
"comeInSpaceJumping": {
"speedBooster": "yes",
"minTiles": 10
}
},
"requires": [
"canMidairWiggle",
"canCrossRoomJumpIntoWater"
],
"flashSuitChecked": true,
"blueSuitChecked": true
},
{
"id": 26,
"link": [
2,
1
],
"name": "Tricky Cross Room Space Jump",
"entranceCondition": {
"comeInSpaceJumping": {
"speedBooster": "yes",
"minTiles": 6.4375
}
},
"requires": [
"canMidairWiggle",
"canTrickyDashJump",
"canCrossRoomJumpIntoWater"
],
"flashSuitChecked": true,
"blueSuitChecked": true,
"note": "Turn around and break spin to move vertically while near the height of the floating platform."
},
{
"id": 39,
"link": [
2,
1
],
"name": "Side Platform Cross Room Jump",
"entranceCondition": {
"comeInWithSidePlatform": {
"platforms": [
{
"minHeight": 2,
"maxHeight": 2,
"minTiles": 27.4375,
"speedBooster": "yes",
"obstructions": [
[
1,
0
]
],
"note": [
"This applies to Dust Torizo Room."
]
},
{
"minHeight": 3,
"maxHeight": 3,
"minTiles": 39.4375,
"speedBooster": "yes",
"obstructions": [
[
3,
2
]
],
"note": [
"This applies to Metal Pirates Room."
]
},
{
"minHeight": 2,
"maxHeight": 2,
"minTiles": 20.4375,
"speedBooster": "yes",
"obstructions": [
[
3,
0
]
],
"requires": [
"canTrickyDashJump",
"canMomentumConservingMorph"
],
"note": [
"This applies to Metroid Room 1 and Statues Hallway.",
"Jump with an extra run speed of $4.0 or $4.1."
]
},
{
"minHeight": 2,
"maxHeight": 2,
"minTiles": 45,
"speedBooster": "yes",
"obstructions": [
[
3,
0
]
],
"requires": [
{
"or": [
"canMomentumConservingMorph",
{
"and": [
"canInsaneJump",
"canMomentumConservingTurnaround"
]
}
]
}
],
"note": [
"This applies to Statues Hallway."
]
},
{
"minHeight": 3,
"maxHeight": 3,
"minTiles": 37.4375,
"speedBooster": "yes",
"obstructions": [
[
3,
0
]
],
"requires": [
"canMomentumConservingMorph"
],
"note": [
"This applies to Flyway."
]
},
{
"minHeight": 2,
"maxHeight": 2,
"minTiles": 45,
"speedBooster": "yes",
"obstructions": [
[
4,
0
]
],
"requires": [
"canMomentumConservingMorph"
],
"note": [
"This applies to Baby Kraid Room."
]
}
]
}
},
"requires": [
"canCrossRoomJumpIntoWater"
],
"flashSuitChecked": true,
"blueSuitChecked": true,
"note": [
"Gain run speed using a platform below the door in the other room.",
"Jump through the door, carrying upward momentum into this room;",
"if necessary, use a momentum-conserving morph or momentum-conserving turnaround through the transition."
],
"devNote": [
"With HiJump, it is possible to get up relatively easily with only a single tile of doorway runway;",
"so we don't consider side platform strats involving HiJump."
]
},
{
"id": 40,
"link": [
2,
1
],
"name": "Side Platform Cross Room Jump, Spring Ball Jump",
"entranceCondition": {
"comeInWithSidePlatform": {
"platforms": [
{
"minHeight": 1,
"maxHeight": 1,
"minTiles": 7.4375,
"speedBooster": "yes",
"obstructions": [
[
1,
0
]
],
"requires": [
"canTrickyDashJump"
],
"note": [
"This applies to Warehouse Entrance.",
"Jump with an extra run speed of $2.0 or $2.1."
]
}
]
}
},
"requires": [
"canCrossRoomJumpIntoWater",
"canSpringBallJumpMidAir"
],
"flashSuitChecked": true,
"blueSuitChecked": true
},
{
"id": 33,
"link": [
2,
1
],
"name": "Use Stored Spark",
"requires": [
"h_storedSpark",
{
"or": [
{
"shinespark": {
"frames": 37,
"excessFrames": 9
}
},
{
"and": [
"HiJump",
{
"shinespark": {
"frames": 33,
"excessFrames": 8
}
}
]
},
{
"and": [
"Gravity",
{
"shinespark": {
"frames": 32,
"excessFrames": 8
}
}
]
}
]
}
],
"flashSuitChecked": true,
"blueSuitChecked": true
},
{
"id": 34,
"link": [
2,
1
],
"name": "Cross Room Jump, Use Flash Suit",
"entranceCondition": {
"comeInJumping": {
"speedBooster": "any",
"minTiles": 0.4375
}
},
"requires": [
"canCrossRoomJumpIntoWater",
{
"useFlashSuit": {}
},
{
"shinespark": {
"frames": 16,
"excessFrames": 9
}
}
],
"flashSuitChecked": true,
"blueSuitChecked": true,
"note": [
"Cross room jump onto the top middle platform before sparking.",
"Requires a runway of 1 tile in the adjacent room."
],
"devNote": [
"Assumes Samus lands, then jumps again before sparking.",
"There is no HiJump variant, as that can jump out of the water."
]
},
{
"id": 35,
"link": [
2,
1
],
"name": "Long Underwater Wall Jump, Use Stored Spark",
"requires": [
"canTrickyCarryFlashSuit",
"canLongUnderwaterWallJump",
"h_storedSpark",
{
"shinespark": {
"frames": 12,
"excessFrames": 8
}
}
],
"flashSuitChecked": true,
"blueSuitChecked": true,
"note": "Underwater wall jump to the top middle platform before sparking to save Energy."
},
{
"id": 27,
"link": [
2,
1
],
"name": "G-Mode Morph",
"entranceCondition": {
"comeInWithGMode": {
"mode": "any",
"morphed": true
}
},
"requires": [
{
  "or": [
    {
      "and": [
        "Gravity",
        "h_artificialMorphIBJ"
      ]
    },
    "h_artificialMorphDoubleSpringBallJump"
  ]
}
],
"flashSuitChecked": true,
"blueSuitChecked": true
},
{
"id": 37,
"link": [
2,
1
],
"name": "Precise Grapple Jump",
"entranceCondition": {
"comeInWithGrappleSwing": {
"blocks": [
{
"position": [
-1,
5
],
"environment": "water",
"note": "Mt. Everest"
}
]
}
},
"requires": [
"HiJump",
"canPreciseGrappleJump"
],
"flashSuitChecked": true,
"blueSuitChecked": true,
"note": [
"This is for entering from Mt. Everest.",
"Samus must be carefully positioned in order to make it up to the top of the room.",
"One method is to press against the pipes jutting out on either side of the room, turn around while morphed,",
"then arm pump in between grapple jumps in order to move one tile toward the center of the room."
],
"devNote": [
"This can also work well enough with other setup rooms such as Colosseum,",
"but given that this strat assumes having HiJump, it would be easier to just cross-room jump in those cases."
]
},
{
"id": 38,
"link": [
2,
1
],
"name": "Tricky Grapple Jump",
"entranceCondition": {
"comeInWithGrappleSwing": {
"blocks": [
{
"position": [
-1,
5
],
"environment": "water",
"note": "Mt. Everest"
},
{
"position": [
8,
3
],
"note": "Grapple Beam Room"
},
{
"position": [
7,
3
],
"note": "Colosseum"
},
{
"position": [
6,
4
],
"note": "Grapple Tutorial Room 2"
},
{
"position": [
6,
2
],
"note": "Lava Grapple Tunnel"
},
{
"position": [
5,
2
],
"note": "The Moat, Double Chamber, Wrecked Ship Energy Tank Room"
},
{
"position": [
2.375,
4.5625
],
"note": "Post Crocomire Farming Room"
}
]
}
},
"requires": [
"canTrickyGrappleJump"
],
"flashSuitChecked": false,
"blueSuitChecked": true,
"note": [
"Samus must be carefully positioned in order to make it up to the top of the room.",
"One method is to press against the pipes jutting out on either side of the room, turn around while morphed,",
"then arm pump in between grapple jumps in order to move one tile toward the center of the room."
]
},
{
"id": 28,
"link": [
2,
1
],
"name": "Grapple Teleport",
"entranceCondition": {
"comeInWithGrappleTeleport": {
"blockPositions": [
[
12,
12
],
[
12,
13
]
]
}
},
"requires": [],
"flashSuitChecked": true,
"blueSuitChecked": true
},
{
"id": 29,
"link": [
2,
2
],
"name": "Leave with Runway",
"requires": [],
"exitCondition": {
"leaveWithRunway": {
"length": 13,
"openEnd": 0
}
},
"flashSuitChecked": true,
"blueSuitChecked": true
},
{
"id": 31,
"link": [
2,
2
],
"name": "Crystal Flash",
"requires": [
"h_CrystalFlash"
],
"flashSuitChecked": true,
"blueSuitChecked": true
},
{
"id": 47,
"link": [
2,
2
],
"name": "Precise Stutter Shinecharge, Leave Shinecharged (5-tile runway)",
"entranceCondition": {
"comeInStutterShinecharging": {
"minTiles": 5
}
},
"requires": [
"canPreciseStutterWaterShineCharge",
"canShinechargeMovementTricky",
"canInsaneJump",
{
"shineChargeFrames": 130
},
{
"or": [
"canBeVeryPatient",
{
"shineChargeFrames": 15
}
]
}
],
"exitCondition": {
"leaveShinecharged": {}
},
"unlocksDoors": [
{
"types": [
"super"
],
"requires": []
},
{
"types": [
"missiles",
"powerbomb"
],
"requires": [
"never"
]
}
],
"flashSuitChecked": true,
"blueSuitChecked": true,
"note": [
"With a runway of 5 tiles (open end) in the other room,",
"the ideal timing for the stutter is to release forward for 5 frames, and repress forward on the last possible frame before the transition.",
"Other timings can work, but will gain the shinecharge further from the door, leaving fewer shinecharge frames remaining.",
"After gaining the shinecharge, continue holding forward in order to make Samus stand.",
"Then turnaround spin jump back toward the door, and continue spin jumping to reach the transition with a shinecharge."
]
},
{
"id": 48,
"link": [
2,
2
],
"name": "Precise Stutter Shinecharge, Leave Shinecharged (4-tile runway)",
"entranceCondition": {
"comeInStutterShinecharging": {
"minTiles": 4
}
},
"requires": [
"canPreciseStutterWaterShineCharge",
"canShinechargeMovementTricky",
"canInsaneJump",
{
"shineChargeFrames": 140
},
{
"or": [
"canBeVeryPatient",
{
"shineChargeFrames": 10
}
]
}
],
"exitCondition": {
"leaveShinecharged": {}
},
"unlocksDoors": [
{
"types": [
"super"
],
"requires": []
},
{
"types": [
"missiles",
"powerbomb"
],
"requires": [
"never"
]
}
],
"flashSuitChecked": true,
"blueSuitChecked": true,
"note": [
"With only a runway of 4 tiles (open end) in the other room,",
"the ideal timing for the stutter is to release forward for 4 frames, and repress forward on the last possible frame before the transition.",
"It also works well to release forward for 3 frames and repress on the last possible frame.",
"Other timings can also work, but may gain the shinecharge further from the door, leaving fewer shinecharge frames remaining.",
"After gaining the shinecharge, continue holding forward in order to make Samus stand.",
"Then turnaround spin jump back toward the door, and continue spin jumping to reach the transition with a shinecharge."
]
},
{
"id": 49,
"link": [
2,
2
],
"name": "Precise Stutter Shinecharge, Leave Shinecharged (3-tile runway)",
"entranceCondition": {
"comeInStutterShinecharging": {
"minTiles": 3
}
},
"requires": [
"canPreciseStutterWaterShineCharge",
"canShinechargeMovementTricky",
"canInsaneJump",
{
"shineChargeFrames": 145
},
{
"or": [
"canBeVeryPatient",
{
"shineChargeFrames": 10
}
]
}
],
"exitCondition": {
"leaveShinecharged": {}
},
"unlocksDoors": [
{
"types": [
"super"
],
"requires": []
},
{
"types": [
"missiles",
"powerbomb"
],
"requires": [
"never"
]
}
],
"flashSuitChecked": true,
"blueSuitChecked": true,
"note": [
"With only a runway of 3 tiles (open end) in the other room,",
"the ideal timing for the stutter is to release forward for 3 or 4 frames, and repress forward on the last possible frame before the transition.",
"Other timings can work, but will gain the shinecharge further from the door, leaving fewer shinecharge frames remaining.",
"After gaining the shinecharge, continue holding forward in order to make Samus stand.",
"Then turnaround spin jump back toward the door, and continue spin jumping to reach the transition with a shinecharge.",
"Alternatively, with greater difficulty but saving some shinecharge frames,",
"after performing the turnaround spin jump, briefly moonwalk back, then retain momentum by boomeranging forward",
"(switching from pressing backward to pressing forward on the next frame),",
"and arm pump to reach the door quickly."
],
"devNote": [
"The same shinecharge frames could be achieved with a closed end runway (effective length of 2.4375),",
"with a 3-frame stutter, but there doesn't appear to be any application."
]
},
{
"id": 50,
"link": [
2,
2
],
"name": "Precise Stutter Shinecharge, Leave Shinecharged (2-tile runway)",
"entranceCondition": {
"comeInStutterShinecharging": {
"minTiles": 2
}
},
"requires": [
"canPreciseStutterWaterShineCharge",
"canShinechargeMovementTricky",
"canInsaneJump",
{
"shineChargeFrames": 150
},
{
"or": [
"canBeVeryPatient",
{
"shineChargeFrames": 15
}
]
}
],
"exitCondition": {
"leaveShinecharged": {}
},
"unlocksDoors": [
{
"types": [
"super"
],
"requires": []
},
{
"types": [
"missiles",
"powerbomb"
],
"requires": [
"never"
]
}
],
"flashSuitChecked": true,
"blueSuitChecked": true,
"note": [
"With only a runway of 2 tiles (open end) in the other room,",
"the ideal timing for the stutter is to release forward for 3 frames, and repress forward on the last possible frame before the transition.",
"Other timings can work, but will gain the shinecharge further from the door, leaving fewer shinecharge frames remaining.",
"After gaining the shinecharge, continue holding forward in order to make Samus stand.",
"Then turnaround spin jump back toward the door, and continue spin jumping to reach the transition with a shinecharge.",
"Alternatively, with greater difficulty but saving some shinecharge frames,",
"after performing the turnaround spin jump, briefly moonwalk back, then retain momentum by boomeranging forward",
"(switching from pressing backward to pressing forward on the next frame),",
"and arm pump to reach the door quickly."
],
"devNote": [
"FIXME: The canBeVeryPatient requirement is for difficulty placement of the boomerang method;",
"but the boomerang (or maybe specifically the moonwalk boomerang) should possibly be its own tech,",
"and the same with rapid arm pumping."
]
},
{
"id": 52,
"link": [
2,
2
],
"name": "Come in Shinecharging, Crystal Spark",
"entranceCondition": {
"comeInShinecharging": {
"length": 12,
"openEnd": 0
},
"comesInHeated": "no"
},
"requires": [
"Gravity",
"h_CrystalSpark"
],
"flashSuitChecked": true,
"blueSuitChecked": true
},
{
"id": 53,
"link": [
2,
2
],
"name": "Precise Stutter Water Shinecharge, Crystal Spark",
"entranceCondition": {
"comeInStutterShinecharging": {
"minTiles": 2.4375
},
"comesInHeated": "no"
},
"requires": [
"canPreciseStutterWaterShineCharge",
"h_underwaterCrystalSpark"
],
"flashSuitChecked": true,
"blueSuitChecked": true,
"note": [
"With only a runway length of 3 tiles (closed end) in the other room, this requires a precise setup:",
"release forward for 3 or 4 frames, then repress forward on the last possible frame before the transition;",
"alternatively, release forward for 2 frames and repress forward on the second-to-last possible frame before the transition."
],
"detailNote": [
"If a longer runway is available (4 tiles), the timing windows are a bit more lenient:",
"1. Release forward for 3, 4, or 5 frames, repress forward on the last possible frame;",
"2. Release forward for 2 or 3 frames, repress forward on the 2nd-to-last possible frame;",
"3. Release forward for 1 or 2 frames, repress forward on the 3rd-to-last possible frame."
],
"devNote": [
"FIXME: This is possible with a 2-tile runway, but it's a lot worse.",
"It would require more duplication and could be very tedious to set up for many attempts."
]
},
{
"id": 41,
"link": [
2,
4
],
"name": "Come In Shinecharging (Gravity)",
"entranceCondition": {
"comeInShinecharging": {
"length": 12,
"openEnd": 0
}
},
"requires": [
"Gravity",
{
"shineChargeFrames": 0
}
],
"endsWithShineCharge": true,
"flashSuitChecked": true,
"blueSuitChecked": true
},
{
"id": 42,
"link": [
2,
4
],
"name": "Water Shinecharge",
"entranceCondition": {
"comeInShinecharging": {
"length": 4,
"openEnd": 0
}
},
"requires": [
"canWaterShineCharge",
{
"shineChargeFrames": 0
}
],
"endsWithShineCharge": true,
"flashSuitChecked": true,
"blueSuitChecked": true
},
{
"id": 15,
"link": [
2,
4
],
"name": "Precise Stutter Water Shinecharge",
"entranceCondition": {
"comeInStutterShinecharging": {
"minTiles": 2.4375
}
},
"requires": [
"canPreciseStutterWaterShineCharge",
{
"shineChargeFrames": 0
}
],
"endsWithShineCharge": true,
"flashSuitChecked": true,
"blueSuitChecked": true,
"note": [
"With only a runway length of 3 tiles (closed end) in the other room, this requires a precise setup:",
"release forward for 3 or 4 frames, then repress forward on the last possible frame before the transition;",
"alternatively, release forward for 2 frames and repress forward on the second-to-last possible frame before the transition."
],
"detailNote": [
"If a longer runway is available (4 tiles), the timing windows are a bit more lenient:",
"1. Release forward for 3, 4, or 5 frames, repress forward on the last possible frame;",
"2. Release forward for 2 or 3 frames, repress forward on the 2nd-to-last possible frame;",
"3. Release forward for 1 or 2 frames, repress forward on the 3rd-to-last possible frame."
]
},
{
"id": 43,
"link": [
2,
4
],
"name": "Very Precise Stutter Water Shinecharge",
"entranceCondition": {
"comeInStutterShinecharging": {
"minTiles": 2
}
},
"requires": [
"canPreciseStutterWaterShineCharge",
"canInsaneJump",
{
"shineChargeFrames": 0
}
],
"endsWithShineCharge": true,
"flashSuitChecked": true,
"blueSuitChecked": true,
"note": [
"With only a runway of 2 tiles (open end) in the other room, this requires a double-frame-perfect setup:",
"release forward for exactly 3 frames, and repress forward on the last possible frame before the transition."
],
"devNote": [
"FIXME: canInsaneJump is for difficulty placement; replace with a more appropriate tech since no jump is involved."
]
},
{
"id": 32,
"link": [
3,
1
],
"name": "Base",
"requires": [
{
  "or": [
    "h_navigateUnderwater",
    "Grapple",
    "SpaceJump"
  ]
}
],
"flashSuitChecked": true,
"blueSuitChecked": true
},
{
"id": 44,
"link": [
4,
1
],
"name": "Start Shinecharged, Shinespark",
"startsWithShineCharge": true,
"requires": [
{
"shineChargeFrames": 60
},
{
"or": [
{
"shinespark": {
"frames": 40,
"excessFrames": 8
}
},
{
"and": [
"canMidairShinespark",
{
"shinespark": {
"frames": 37,
"excessFrames": 8
}
}
]
},
{
"and": [
"Gravity",
"canMidairShinespark",
{
"shinespark": {
"frames": 33,
"excessFrames": 8
}
}
]
}
]
}
],
"flashSuitChecked": true,
"blueSuitChecked": true
},
{
"id": 16,
"link": [
4,
1
],
"name": "Start Shinecharged, Leave With Temporary Blue",
"startsWithShineCharge": true,
"requires": [
"h_shinechargeMaxRunway",
{
"shineChargeFrames": 0
},
"canXRayTurnaround",
"canLongChainTemporaryBlue",
{
"or": [
"canGravityJump",
{
"and": [
"HiJump",
"canTrickySpringBallJump"
]
}
]
}
],
"exitCondition": {
"leaveWithTemporaryBlue": {}
},
"unlocksDoors": [
{
"types": [
"ammo"
],
"requires": []
}
],
"flashSuitChecked": true,
"blueSuitChecked": true,
"note": [
"To get out of the water at the top, do another gravity jump or spring ball jump, preferably while the water is high."
]
},
{
"id": 30,
"link": [
4,
2
],
"name": "Start Shinecharged, Leave with Spark",
"startsWithShineCharge": true,
"requires": [
{
"shineChargeFrames": 50
},
"canShinechargeMovementComplex",
{
"shinespark": {
"frames": 12,
"excessFrames": 0
}
}
],
"exitCondition": {
"leaveWithSpark": {}
},
"unlocksDoors": [
{
"types": [
"missiles",
"super"
],
"requires": []
},
{
"types": [
"powerbomb"
],
"requires": [
"never"
]
}
],
"flashSuitChecked": true,
"blueSuitChecked": true
},
{
"id": 46,
"link": [
4,
2
],
"name": "Start Shinecharged, Leave With Temporary Blue",
"startsWithShineCharge": true,
"requires": [
"h_shinechargeMaxRunway",
{
"shineChargeFrames": 0
},
"canXRayTurnaround",
"canChainTemporaryBlue"
],
"exitCondition": {
"leaveWithTemporaryBlue": {}
},
"unlocksDoors": [
{
"types": [
"ammo"
],
"requires": []
}
],
"flashSuitChecked": true,
"blueSuitChecked": true
}
],
"notables": [],
"nextStratId": 54,
"nextNotableId": 1
}