Screw Attack Room: Side Platform Blue Speed Jump
Room ID: 151
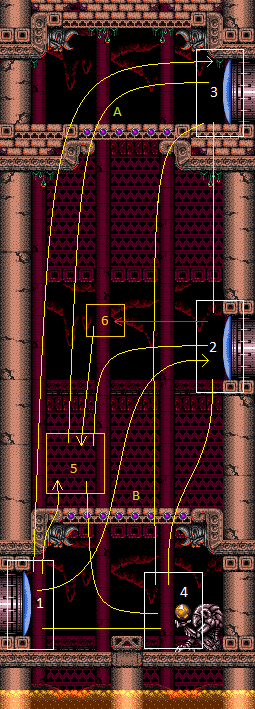
From: 2
Middle Right Door
To: 3
Top Right Door
Jump into the room morphing with blue speed, then unmorph and continue holding up to retain blue speed and break the bomb blocks. A momentum-conserving morph through the transition is not always required but usually makes the strat easier. In many cases, pause buffering the morph can also be helpful. Entrance condition: {
"comeInWithSidePlatform": {
"platforms": [
{
"minHeight": 2,
"maxHeight": 2,
"minTiles": 27.4375,
"speedBooster": "yes",
"obstructions": [
[
1,
0
]
],
"requires": [
"HiJump",
{
"heatFrames": 110
}
],
"note": [
"This applies to Dust Torizo Room and Noob Bridge."
]
},
{
"minHeight": 2,
"maxHeight": 2,
"minTiles": 45,
"speedBooster": "yes",
"obstructions": [
[
1,
0
]
],
"requires": [
"canTrickyDashJump",
"canInsaneJump",
{
"heatFrames": 150
}
],
"note": [
"This applies to Noob Bridge."
]
},
{
"minHeight": 3,
"maxHeight": 3,
"minTiles": 28.2472,
"speedBooster": "yes",
"obstructions": [
[
1,
0
]
],
"requires": [
"HiJump",
{
"heatFrames": 110
}
],
"note": [
"This applies to Double Chamber."
]
},
{
"minHeight": 1,
"maxHeight": 1,
"minTiles": 23.8731,
"speedBooster": "yes",
"obstructions": [
[
3,
0
]
],
"environment": "water",
"requires": [
"HiJump",
"canGravityJump",
{
"heatFrames": 110
}
],
"note": [
"This applies to Below Botwoon Energy Tank and Botwoon Energy Tank Room."
],
"detailNote": [
"Gain run speed, and time a pause to hit after Samus jumps and aims down;",
"then unequip Gravity and buffer the morph while unpausing."
]
},
{
"minHeight": 1,
"maxHeight": 1,
"minTiles": 36.3703,
"speedBooster": "yes",
"obstructions": [
[
3,
0
]
],
"environment": "water",
"requires": [
"canTrickyDashJump",
"canInsaneJump",
"canGravityJump",
{
"heatFrames": 110
}
],
"note": [
"This applies to Botwoon Energy Tank Room."
],
"detailNote": [
"Gain run speed, and time a pause to hit after Samus jumps and aims down;",
"then unequip Gravity and buffer the morph while unpausing."
]
},
{
"minHeight": 2,
"maxHeight": 2,
"minTiles": 31,
"speedBooster": "yes",
"obstructions": [
[
3,
0
]
],
"requires": [
"HiJump",
"canInsaneJump",
{
"heatFrames": 110
}
],
"note": [
"This applies to Metroid Room 1, Statues Hallway, and Baby Kraid Room."
]
},
{
"minHeight": 3,
"maxHeight": 3,
"minTiles": 30.4375,
"speedBooster": "yes",
"obstructions": [
[
3,
0
]
],
"requires": [
"HiJump",
"canInsaneJump",
{
"heatFrames": 110
}
],
"note": [
"This applies to Blue Brinstar Energy Tank Room, Bowling Alley (middle, power off), and Basement (power on)."
]
},
{
"minHeight": 3,
"maxHeight": 3,
"minTiles": 32.4375,
"speedBooster": "yes",
"obstructions": [
[
3,
2
]
],
"requires": [
"HiJump",
{
"heatFrames": 110
}
],
"note": [
"This applies to Metal Pirates Room."
]
},
{
"minHeight": 3,
"maxHeight": 3,
"minTiles": 31.4375,
"speedBooster": "yes",
"obstructions": [
[
5,
2
]
],
"requires": [
"HiJump",
"canInsaneJump",
{
"heatFrames": 110
}
],
"note": [
"This applies to Flyway."
]
}
]
}
}Requires: {
"getBlueSpeed": {
"usedTiles": 20,
"openEnd": 1
}
}
"h_blueJump"
"canMomentumConservingMorph"Clears obstacles: A Dev note: FIXME: Add side platform Screw Attack jumps (without blue speed); also add blue speed strats (side platform and otherwise) that break both sets of bomb blocks, falling down to the item. FIXME: The getBlueSpeed requirement could be refined for each platform. |