Screw Attack Room: Side Platform Jump with Blue Speed
Room ID: 151
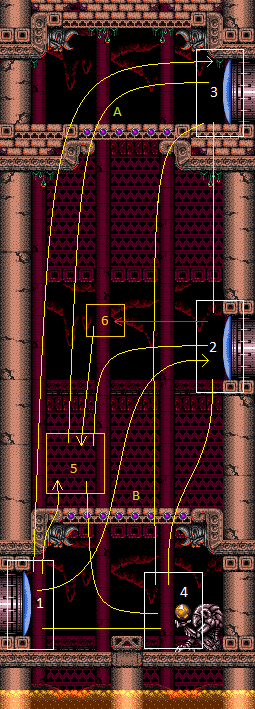
From: 1
Bottom Left Door
To: 4
Item
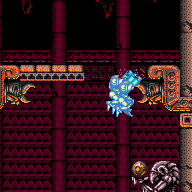

Jump into the room with blue speed, using it to break some of the bomb blocks above. Entrance condition: "comeInWithSidePlatform": {
"platforms": [
{
"minHeight": 1,
"maxHeight": 1,
"minTiles": 17,
"speedBooster": "yes",
"obstructions": [[1, 0]],
"requires": [
{"getBlueSpeed": {"usedTiles": 15, "openEnd": 1}},
"h_blueJump",
{"or": [
{"and": [
"canLateralMidAirMorph",
"canTrickyJump"
]},
"canInsaneJump"
]},
{"heatFrames": 80}
],
"note": ["This applies to Warehouse Entrance."]
},
{
"minHeight": 2,
"maxHeight": 2,
"minTiles": 27.4375,
"speedBooster": "yes",
"obstructions": [[1, 0]],
"requires": [
{"getBlueSpeed": {"usedTiles": 24, "openEnd": 1}},
"h_blueJump",
{"heatFrames": 60}
],
"note": ["This applies to Dust Torizo Room and Halfie Climb Room."]
},
{
"minHeight": 2,
"maxHeight": 2,
"minTiles": 27.4375,
"speedBooster": "yes",
"obstructions": [[1, 0]],
"requires": [
{"getBlueSpeed": {"usedTiles": 15, "openEnd": 1}},
"h_blueJump",
"canLateralMidAirMorph",
"canTrickyDashJump",
{"heatFrames": 70}
],
"note": [
"This applies to Noob Bridge and Halfie Climb Room.",
"Use a 2-tap in order to gain blue speed with high momentum."
],
"detailNote": [
"A lower speed of $3.1 can work, but it is recommended to instead do a double-stutter 2-tap with an early second tap,",
"to more reliably gain a speed of $3.3 or higher, in order to get a shorter jump.",
"The specific speed $3.2 does not work as Samus will not quite get high enough to break the blocks."
]
},
{
"minHeight": 3,
"maxHeight": 3,
"minTiles": 37.4375,
"speedBooster": "yes",
"obstructions": [[3, 0]],
"requires": [
"canMomentumConservingMorph",
{"heatFrames": 70}
],
"note": ["This applies to Flyway."]
},
{
"minHeight": 2,
"maxHeight": 2,
"minTiles": 45,
"speedBooster": "yes",
"obstructions": [[4, 0]],
"requires": [
"canMomentumConservingMorph",
"canInsaneMidAirMorph",
{"heatFrames": 150}
],
"note": [
"This applies to Baby Kraid Room.",
"Perform a ceiling mockball through the transition,",
"and unmorph after the transition to avoid bonking on the overhang."
]
},
{
"minHeight": 3,
"maxHeight": 3,
"minTiles": 39.4375,
"speedBooster": "yes",
"obstructions": [[3, 2]],
"requires": [
{"heatFrames": 60}
],
"note": ["This applies to Metal Pirates Room."]
}
]
}Requires: "canTrickyJump" Clears obstacles: B Dev note: FIXME: A similar strat from 1 to 2 would also be possible, saving some heat frames by going directly to the middle door instead of stopping at the item. |