Metal Pirates Room: Kill the Pirates, R-Mode Spark Interrupt
Room ID: 139
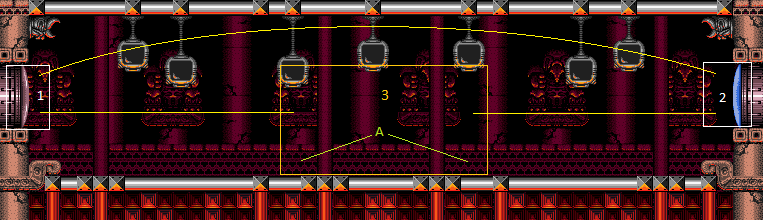
From: 2
Right Door
To: 3
Metal Pirates Junction
Kill both pirates with ammo or beams. Collect their drops and use heat to interrupt. Or kill and farm one pirate, then hitbox the other and interrupt from it before killing it with ammo or beams. Blue suit doesn't damage the pirates, but keeps Samus invulnerable while moving. Entrance condition: {
"comeInWithRMode": {}
}Requires: {
"heatFrames": 125
}
{
"or": [
{
"and": [
"Charge",
"Plasma",
"canDodgeWhileShooting",
{
"or": [
{
"and": [
"Ice",
{
"heatFrames": 700
}
]
},
{
"and": [
"Wave",
{
"heatFrames": 700
}
]
},
{
"and": [
"Ice",
"Wave",
{
"heatFrames": 450
}
]
},
{
"heatFrames": 950
},
{
"and": [
"canXRayWaitForIFrames",
{
"heatFrames": 420
}
]
},
{
"and": [
"Ice",
"Wave",
"canTrickyJump",
{
"heatFrames": 400
}
]
},
{
"and": [
"Ice",
"canInsaneJump",
{
"heatFrames": 520
}
]
},
{
"and": [
"Wave",
"canInsaneJump",
{
"heatFrames": 520
}
]
},
{
"and": [
"canInsaneJump",
{
"heatFrames": 700
}
]
}
]
}
]
},
{
"and": [
"h_heatProof",
"canDodgeWhileShooting",
{
"or": [
"Plasma",
{
"and": [
"Charge",
"Wave"
]
},
{
"and": [
"Charge",
"Spazer",
"Ice",
"Wave"
]
},
{
"and": [
"Charge",
"Spazer",
"canBePatient"
]
},
{
"and": [
"Charge",
"Ice",
"canBePatient"
]
},
{
"and": [
"canBeVeryPatient",
{
"or": [
"Charge",
"Spazer"
]
}
]
},
{
"enemyKill": {
"enemies": [
[
"Space Pirate (fighting)",
"Space Pirate (fighting)"
]
],
"explicitWeapons": [
"Missile"
]
}
}
]
}
]
},
{
"and": [
"canDodgeWhileShooting",
{
"enemyKill": {
"enemies": [
[
"Space Pirate (fighting)",
"Space Pirate (fighting)"
]
],
"explicitWeapons": [
"Super"
]
}
},
{
"heatFrames": 450
}
]
}
]
}
{
"or": [
"h_heatedCrystalFlashForReserveEnergy",
{
"and": [
"h_RModeCanRefillReserves",
{
"or": [
{
"and": [
{
"resourceMissingAtMost": [
{
"type": "Super",
"count": 0
}
]
},
{
"partialRefill": {
"type": "ReserveEnergy",
"limit": 240
}
}
]
},
{
"partialRefill": {
"type": "ReserveEnergy",
"limit": 120
}
}
]
}
]
},
{
"and": [
{
"disableEquipment": "ETank"
},
{
"or": [
{
"and": [
{
"resourceMissingAtMost": [
{
"type": "Super",
"count": 0
}
]
},
{
"partialRefill": {
"type": "ReserveEnergy",
"limit": 140
}
}
]
},
{
"partialRefill": {
"type": "ReserveEnergy",
"limit": 20
}
}
]
}
]
}
]
}
{
"heatFrames": 90
}
"h_shinechargeMaxRunway"
{
"or": [
{
"and": [
"canHitbox",
{
"autoReserveTrigger": {}
},
"canRModeSparkInterrupt"
]
},
"h_heatTriggerRModeSparkInterrupt"
]
}Clears obstacles: A, door_2 |