Red Tower: Hero Shot (Very Hard)
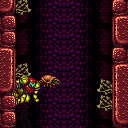
Wall jump between the Rippers. Either shoot the block, fall, and quickly climb again, or shoot from the bottom and follow Samus's shot up the tower.
Strats ()
|
Requires: {
"or": [
{
"and": [
{
"resetRoom": {
"nodes": [
1
]
}
},
{
"cycleFrames": 570
}
]
},
{
"and": [
{
"resetRoom": {
"nodes": [
1
]
}
},
"ScrewAttack",
{
"cycleFrames": 480
}
]
},
{
"and": [
{
"resetRoom": {
"nodes": [
3,
4
]
}
},
"HiJump",
"canWallJump",
{
"cycleFrames": 800
}
]
},
{
"and": [
{
"resetRoom": {
"nodes": [
5
]
}
},
{
"notable": "Hero Shot"
},
{
"or": [
{
"and": [
"ScrewAttack",
"canConsecutiveWallJump",
{
"cycleFrames": 1080
}
]
},
{
"and": [
"canTrickyWallJump",
{
"cycleFrames": 1770
}
]
}
]
}
]
}
]
}
{
"or": [
"ScrewAttack",
{
"haveBlueSuit": {}
},
"h_useMorphBombs",
"h_usePowerBomb",
{
"and": [
{
"or": [
{
"resourceCapacity": [
{
"type": "Missile",
"count": 1
}
]
},
{
"resourceCapacity": [
{
"type": "Super",
"count": 1
}
]
}
]
},
{
"cycleFrames": 500
}
]
}
]
}Resets obstacles: A, B Farm cycle drops: 1 Beetom Dev note: Using a Power Bomb to farm the Beetom is only useful if Power Bomb drops are modified to give more than 1. FIXME: Other options for resetting the room at the top and bottom nodes are possible. |
|
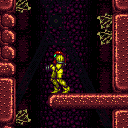
Fill up with the respawning Geegas. Climb to the top of the tower without killing the Rippers. Let the shot block respawn then shinecharge across it. Then quickly jump down into a Ripper to interrupt. Entrance condition: {
"comeInWithRMode": {}
}Requires: {
"refill": [
"Energy"
]
}
{
"or": [
"canTrivialUseFrozenEnemies",
{
"and": [
{
"notable": "Hero Shot"
},
"canHeroShot",
"canTrickyWallJump"
]
},
{
"and": [
"SpaceJump",
"HiJump",
"h_midAirShootUp",
"canTrickyJump"
]
},
{
"and": [
"canPreciseSpaceJump",
"canTrickyDodgeEnemies",
"h_midAirShootUp"
]
}
]
}
{
"or": [
{
"canShineCharge": {
"usedTiles": 12,
"openEnd": 0
}
},
{
"and": [
{
"doorUnlockedAtNode": 5
},
{
"canShineCharge": {
"usedTiles": 13,
"openEnd": 0
}
}
]
}
]
}
{
"autoReserveTrigger": {
"maxReserveEnergy": 95
}
}
"canRModeSparkInterrupt"Clears obstacles: B Unlocks doors: {"nodeId":5,"types":["ammo"],"requires":[]} |
From: 2
Middle Left Door (Behind Power Bomb Blocks)
To: 5
Top Right Door
Fill up with the respawning Geegas. Climb to the top of the tower without killing the Rippers. Let the shot block respawn then shinecharge across it. Then quickly jump down into a Ripper to interrupt. Entrance condition: {
"comeInWithRMode": {}
}Requires: "h_usePowerBomb"
{
  "refill": [
    "Energy"
  ]
}
{
  "or": [
    "canTrivialUseFrozenEnemies",
    {
      "and": [
        {
          "notable": "Hero Shot"
        },
        "canHeroShot",
        "canTrickyWallJump"
      ]
    },
    {
      "and": [
        "SpaceJump",
        "HiJump",
        "h_midAirShootUp",
        "canTrickyJump"
      ]
    },
    {
      "and": [
        "canPreciseSpaceJump",
        "canTrickyDodgeEnemies",
        "h_midAirShootUp"
      ]
    }
  ]
}
{
  "or": [
    {
      "canShineCharge": {
        "usedTiles": 12,
        "openEnd": 0
      }
    },
    {
      "and": [
        {
          "doorUnlockedAtNode": 5
        },
        {
          "canShineCharge": {
            "usedTiles": 13,
            "openEnd": 0
          }
        }
      ]
    }
  ]
}
{
  "autoReserveTrigger": {
    "maxReserveEnergy": 95
  }
}
"canRModeSparkInterrupt"
Clears obstacles: B Unlocks doors: {"nodeId":5,"types":["ammo"],"requires":[]} |
|
Fill up with the respawning Geegas. Climb back to the top of the tower without killing the Rippers. Let the shot block respawn then shinecharge across it. Then quickly jump down into a Ripper to interrupt. Entrance condition: {
"comeInWithRMode": {}
}Requires: {
"refill": [
"Energy"
]
}
{
"or": [
"canTrivialUseFrozenEnemies",
{
"and": [
{
"notable": "Hero Shot"
},
"canHeroShot",
"canTrickyWallJump"
]
},
{
"and": [
"SpaceJump",
"HiJump",
"h_midAirShootUp",
"canTrickyJump"
]
},
{
"and": [
"canPreciseSpaceJump",
"canTrickyDodgeEnemies",
"h_midAirShootUp"
]
}
]
}
{
"or": [
{
"canShineCharge": {
"usedTiles": 12,
"openEnd": 0
}
},
{
"and": [
{
"doorUnlockedAtNode": 5
},
{
"canShineCharge": {
"usedTiles": 13,
"openEnd": 0
}
}
]
}
]
}
{
"autoReserveTrigger": {
"maxReserveEnergy": 95
}
}
"canRModeSparkInterrupt"Clears obstacles: B Unlocks doors: {"nodeId":5,"types":["ammo"],"requires":[]} |
|
Wall jump between the Rippers. Either shoot the block, fall, and quickly climb again, or shoot from the bottom and follow Samus's shot up the tower. Requires: {
"notable": "Hero Shot"
}
{
"noBlueSuit": {}
}
"canHeroShot"
"canTrickyWallJump" |