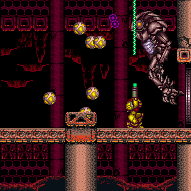
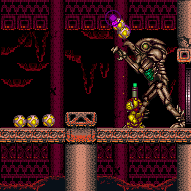
Golden Torizo's Room: Safe Spot Kill (Lenient) (Hard)
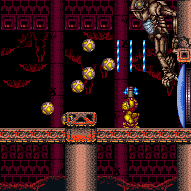
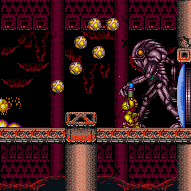
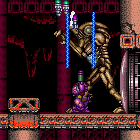
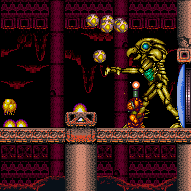
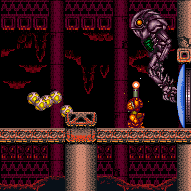
The ability to get into the safe spot in the Golden Torizo fight, where Samus can attack while being safe from most of GT's attacks. Samus is not able to shoot GT with Supers in this lenient safe spot and she must have fewer than 32 Missiles at all times. To get into the safe spot near the door: Stand on the left side of the floor pillar for GT to jump back. Then stand to the right of the nearby background pillar. This safe spot expects getting hit by GT before it jumps back. The space includes the less lenient spot, and also extends left 9 extra pixels. If Samus is in the far end of the safe spot away from Golden Torizo near the end of the fight, it is possible to get hit by his bird spawner attack. This attack is unlikely to occur with a strong beam. It is possible to jump over all the birds with one jump without moving horizontally.
Strats ()
|
Stand in the safe spot and fire Charge shots into GT. Requires: {
"or": [
{
"notable": "Safe Spot Kill"
},
{
"and": [
{
"notable": "Safe Spot Kill (Lenient)"
},
{
"resourceAtMost": [
{
"type": "Missile",
"count": 31
}
]
},
{
"enemyDamage": {
"enemy": "Golden Torizo",
"type": "contact",
"hits": 1
}
}
]
}
]
}
"Charge"
"Wave"
"Plasma"
{
"heatFrames": 1400
}Clears obstacles: f_DefeatedGoldenTorizo Sets flags: f_DefeatedGoldenTorizo |
|
Stand in the safe spot and fire Charge shots into GT. Requires: {
"or": [
{
"notable": "Safe Spot Kill"
},
{
"and": [
{
"notable": "Safe Spot Kill (Lenient)"
},
{
"resourceAtMost": [
{
"type": "Missile",
"count": 31
}
]
},
{
"enemyDamage": {
"enemy": "Golden Torizo",
"type": "contact",
"hits": 1
}
}
]
}
]
}
"Charge"
"Plasma"
{
"heatFrames": 2000
}Clears obstacles: f_DefeatedGoldenTorizo Sets flags: f_DefeatedGoldenTorizo |
|

Stand in the safe spot and fire Charge shots into GT. Requires: {
"or": [
{
"notable": "Safe Spot Kill"
},
{
"and": [
{
"notable": "Safe Spot Kill (Lenient)"
},
{
"resourceAtMost": [
{
"type": "Missile",
"count": 31
}
]
},
{
"enemyDamage": {
"enemy": "Golden Torizo",
"type": "contact",
"hits": 1
}
}
]
}
]
}
"Charge"
"Ice"
"Wave"
"Plasma"
{
"heatFrames": 1250
}Clears obstacles: f_DefeatedGoldenTorizo Sets flags: f_DefeatedGoldenTorizo |
|
Stand in the safe spot and fire Charge shots into GT. Requires: {
"or": [
{
"notable": "Safe Spot Kill"
},
{
"and": [
{
"notable": "Safe Spot Kill (Lenient)"
},
{
"resourceAtMost": [
{
"type": "Missile",
"count": 31
}
]
},
{
"enemyDamage": {
"enemy": "Golden Torizo",
"type": "contact",
"hits": 1
}
}
]
}
]
}
"Charge"
"Ice"
"Wave"
"Spazer"
{
"heatFrames": 4000
}Clears obstacles: f_DefeatedGoldenTorizo Sets flags: f_DefeatedGoldenTorizo |
|
Stand in the safe spot and fire Charge shots into GT. Requires: {
"or": [
{
"notable": "Safe Spot Kill"
},
{
"and": [
{
"notable": "Safe Spot Kill (Lenient)"
},
{
"resourceAtMost": [
{
"type": "Missile",
"count": 31
}
]
},
{
"enemyDamage": {
"enemy": "Golden Torizo",
"type": "contact",
"hits": 1
}
}
]
}
]
}
"h_heatProof"
"Charge"
"canBeVeryPatient"Clears obstacles: f_DefeatedGoldenTorizo Sets flags: f_DefeatedGoldenTorizo |
|
Stand in the safe spot and fire Charge shots into GT. Requires: {
"or": [
{
"notable": "Safe Spot Kill"
},
{
"and": [
{
"notable": "Safe Spot Kill (Lenient)"
},
{
"resourceAtMost": [
{
"type": "Missile",
"count": 31
}
]
},
{
"enemyDamage": {
"enemy": "Golden Torizo",
"type": "contact",
"hits": 1
}
}
]
}
]
}
"Charge"
{
"heatFrames": 6500
}
{
"or": [
{
"and": [
"Ice",
"Wave"
]
},
{
"and": [
"Ice",
"Spazer"
]
},
{
"and": [
"Wave",
"Spazer"
]
}
]
}Clears obstacles: f_DefeatedGoldenTorizo Sets flags: f_DefeatedGoldenTorizo |