Crocomire Escape: Ceiling Mockball Spring Fling (Extreme)
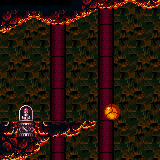

Perform a last-frame jump and ceiling mockball, then spring fling to just barely make it onto the ledge with the item.
Strats ()
From: 2
Right Door
To: 1
Left Door


Entrance condition: "comeInWithGMode": {
"mode": "indirect",
"morphed": false
}Requires: {"or": [
"SpaceJump",
{"and": [
"HiJump",
"canSpeedyJump",
"canWallJump"
]},
{"and": [
"HiJump",
"canSpringBallJumpMidAir",
{"or": [
{"noBlueSuit": {}},
{"and": [
"Gravity",
{"lavaFrames": 25}
]}
]}
]},
{"and": [
{"notable": "Spring Ball Bomb Boost"},
{"noBlueSuit": {}},
"canSpringBallJumpMidAir",
"canUnmorphBombBoost",
"h_crouchJumpDownGrab",
{"or": [
"canInsaneJump",
"h_additionalBomb"
]}
]},
{"and": [
{"or": [
{"canShineCharge": {"usedTiles": 15, "openEnd": 2}},
"h_storedSpark"
]},
"canShinechargeMovementComplex",
{"or": [
{"shinespark": {"frames": 12, "excessFrames": 2}},
{"and": [
"h_speedJump",
{"shinespark": {"frames": 9, "excessFrames": 3}}
]}
]}
]},
{"and": [
{"notable": "Ceiling Mockball Spring Fling"},
"h_speedJump",
"canInsaneJump",
"canMomentumConservingMorph",
"canSpringFling"
]}
]},
"h_heatedGModeOpenDifferentDoor" |
From: 2
Right Door
To: 2
Right Door


Touch the item as little as possible in order to prevent PLMs from being overloaded, so the platforms below remain solid. Entrance condition: "comeInWithGMode": {
"mode": "direct",
"morphed": false
}Requires: "canRemoteAcquire", {"or": [ "SpaceJump", {"and": [ "HiJump", "canSpeedyJump", "canWallJump" ]}, {"and": [ "HiJump", "canSpringBallJumpMidAir", {"or": [ {"noBlueSuit": {}}, {"and": [ "Gravity", {"lavaFrames": 25} ]} ]} ]}, {"and": [ {"notable": "Spring Ball Bomb Boost"}, {"noBlueSuit": {}}, "canSpringBallJumpMidAir", "canUnmorphBombBoost", "h_crouchJumpDownGrab", "canInsaneJump" ]}, {"and": [ {"or": [ {"canShineCharge": {"usedTiles": 15, "openEnd": 2}}, "h_storedSpark" ]}, "canShinechargeMovementComplex", {"or": [ {"shinespark": {"frames": 12, "excessFrames": 2}}, {"and": [ "h_speedJump", {"shinespark": {"frames": 9, "excessFrames": 3}} ]} ]} ]}, {"and": [ {"notable": "Ceiling Mockball Spring Fling"}, "h_speedJump", "canInsaneJump", "canMomentumConservingMorph", "canSpringFling" ]} ]}, "h_heatedDirectGModeLeaveSameDoor" Collects items: 3 Dev note: There is no leniency option for using an extra Power Bomb, because it will contribute to PLM overload. (2 PBs is technically barely possible) |
|
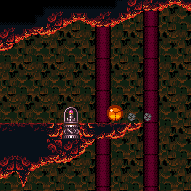

Position at the end of the runway (or up to 4 pixels away) at the top-right of the room, gain run speed, perform a last-frame jump and ceiling mockball, then equip or unequip Spring Ball in order to reset Samus' vertical speed and just barely make it onto the ledge with the item. Requires: {"notable": "Ceiling Mockball Spring Fling"},
"h_speedJump",
"canInsaneJump",
{"heatFrames": 500},
"canMomentumConservingMorph",
"canSpringFling",
{"or": [
"h_heatProof",
"canBeVeryPatient"
]} |
|
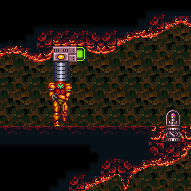

Entrance condition: "comeInWithGMode": {
"mode": "indirect",
"morphed": false
}Requires: "h_heatedGMode", {"or": [ "SpaceJump", {"and": [ "HiJump", "canSpeedyJump", "canWallJump" ]}, {"and": [ "HiJump", "canSpringBallJumpMidAir", {"or": [ {"noBlueSuit": {}}, {"and": [ "Gravity", {"lavaFrames": 25} ]} ]} ]}, {"and": [ {"notable": "Spring Ball Bomb Boost"}, {"noBlueSuit": {}}, "canSpringBallJumpMidAir", "canUnmorphBombBoost", "h_crouchJumpDownGrab", {"or": [ "canInsaneJump", "h_additionalBomb" ]} ]}, {"and": [ {"or": [ {"canShineCharge": {"usedTiles": 15, "openEnd": 2}}, "h_storedSpark" ]}, "canShinechargeMovementComplex", {"or": [ {"shinespark": {"frames": 12, "excessFrames": 2}}, {"and": [ "h_speedJump", {"shinespark": {"frames": 9, "excessFrames": 3}} ]} ]} ]}, {"and": [ {"notable": "Ceiling Mockball Spring Fling"}, "h_speedJump", "canInsaneJump", "canMomentumConservingMorph", "canSpringFling" ]} ]}, {"heatFrames": 90} Clears obstacles: A Dev note: Goes to 3 because opening the gate mostly only makes sense when going back to the right for a longer runway or obtaining the item. FIXME: Variants with shinesparking or Geruta damage boost can be added. (Energy from immobile, CF, or energy free sparks) |
|
Entrance condition: "comeInWithGMode": {
"mode": "any",
"morphed": false
}Requires: "h_heatedGMode", {"or": [ "SpaceJump", {"and": [ "HiJump", "canSpeedyJump", "canWallJump" ]}, {"and": [ "HiJump", "canSpringBallJumpMidAir", {"or": [ "canDash", {"and": [ {"haveBlueSuit": {}}, "Gravity" ]} ]} ]}, {"and": [ "canDash", {"notable": "Spring Ball Bomb Boost"}, "canSpringBallJumpMidAir", "canUnmorphBombBoost", "h_crouchJumpDownGrab", {"or": [ "canInsaneJump", "h_additionalBomb" ]} ]}, {"and": [ {"canShineCharge": {"usedTiles": 15, "openEnd": 2}}, "canShinechargeMovementComplex", {"or": [ {"shinespark": {"frames": 12, "excessFrames": 2}}, {"and": [ "h_speedJump", {"shinespark": {"frames": 9, "excessFrames": 3}} ]} ]} ]}, {"and": [ {"notable": "Ceiling Mockball Spring Fling"}, "h_speedJump", "canInsaneJump", "canMomentumConservingMorph", "canSpringFling" ]} ]}, {"heatFrames": 0} Dev note: FIXME: Variants with Geruta damage boost can be added. (Energy from immobile or CF) |