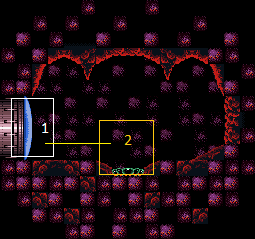
Purple Farming Room
Room ID: 96
|
Exit condition: {
"leaveWithRunway": {
"length": 4,
"openEnd": 0
}
} |
From: 1
Left Door
To: 1
Left Door
Entrance condition: {
"comeInGettingBlueSpeed": {
"length": 5,
"openEnd": 0,
"gentleDownTiles": 1
}
}Requires: "h_shinechargeMaxRunway"
{
"or": [
{
"and": [
"h_enemyDrops",
"h_heatedCrystalSparkWithoutLenience"
]
},
"h_heatedCrystalSpark"
]
}Dev note: No lenience, since the Gamets are a good Power Bomb farm. |
From: 1
Left Door
To: 1
Left Door
Entrance condition: {
"comeInShinecharging": {
"length": 12,
"openEnd": 0,
"gentleUpTiles": 3,
"gentleDownTiles": 1
}
}Requires: "Wave"
{
"or": [
{
"and": [
"h_enemyDrops",
"h_heatedCrystalSparkWithoutLenience"
]
},
"h_heatedCrystalSpark"
]
}Dev note: No lenience, since the Gamets are a good Power Bomb farm. |
|
Requires: {
"heatFrames": 10
}
{
"or": [
"canDash",
{
"heatFrames": 5
}
]
} |
|


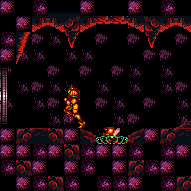
Fill up on the Gamets. Lure the next spawn wave high and kill one higher Gamet to leave the drop hanging above the runway. Shinecharge across the room, and then use the next Gamet spawn cycle, or heat damage, to interrupt. Entrance condition: {
"comeInWithRMode": {}
}Requires: {
"heatFrames": 60
}
{
"refill": [
"Energy"
]
}
"h_runOverRespawningEnemies"
{
"or": [
"canBeVeryPatient",
"h_heatProof"
]
}
{
"canShineCharge": {
"usedTiles": 13,
"gentleUpTiles": 3,
"gentleDownTiles": 1,
"openEnd": 0
}
}
{
"autoReserveTrigger": {}
}
"canRModeSparkInterrupt" |
|
Requires: {
"heatFrames": 30
}
{
"or": [
"canDash",
{
"heatFrames": 20
}
]
} |
|
Involves leaving some drops hanging after killing the Gamets so they don't respawn. Requires: "canDash"
"h_runOverRespawningEnemies"
{
"heatFrames": 0
}Exit condition: {
"leaveWithRunway": {
"length": 13,
"openEnd": 0,
"gentleUpTiles": 1,
"gentleDownTiles": 3,
"startingGentleDownTiles": 2
}
}Unlocks doors: {"types":["ammo"],"requires":[]}Dev note: Health drops are collected while using this runway, offsetting any heat frames used to get into position. |
From: 2
Gamet Farm Junction
To: 1
Left Door

Requires: {
"heatFrames": 220
}Exit condition: {
"leaveWithGModeSetup": {}
}Unlocks doors: {"types":["ammo"],"requires":[]} |
|
Regain some energy in order to use the Gamet Farm. Requires: {
"or": [
{
"and": [
{
"heatFrames": 0
},
"canPauseAbuse"
]
},
{
"heatFrames": 50
}
]
}
{
"partialRefill": {
"type": "RegularEnergy",
"limit": 50
}
} |
|
Requires: {
"simpleHeatFrames": 100
}
{
"heatFrames": 20
}
{
"simpleCycleFrames": 100
}
{
"cycleFrames": 20
}Farm cycle drops: 5 Gamet |
{
"$schema": "../../../schema/m3-room.schema.json",
"id": 96,
"name": "Purple Farming Room",
"area": "Norfair",
"subarea": "Upper",
"subsubarea": "East",
"roomAddress": "0x7B051",
"roomEnvironments": [
{
"heated": true
}
],
"mapTileMask": [
[
1
]
],
"nodes": [
{
"id": 1,
"name": "Left Door",
"nodeType": "door",
"nodeSubType": "blue",
"nodeAddress": "0x001979e",
"doorOrientation": "left",
"doorEnvironments": [
{
"physics": "air"
}
],
"mapTileMask": [
[
2
]
]
},
{
"id": 2,
"name": "Gamet Farm Junction",
"nodeType": "junction",
"nodeSubType": "junction",
"mapTileMask": [
[
2
]
]
}
],
"enemies": [
{
"id": "e1",
"groupName": "Purple Farming Room Gamets",
"enemyName": "Gamet",
"quantity": 5,
"homeNodes": [
2
]
}
],
"strats": [
{
"link": [
1,
1
],
"name": "Base (Unlock Door)",
"requires": [],
"unlocksDoors": [
{
"types": [
"missiles"
],
"requires": [
{
"heatFrames": 50
}
]
},
{
"types": [
"super"
],
"requires": []
},
{
"types": [
"powerbomb"
],
"requires": [
{
"heatFrames": 110
}
]
}
],
"flashSuitChecked": true,
"blueSuitChecked": true
},
{
"link": [
1,
1
],
"name": "Base (Come In Normally)",
"entranceCondition": {
"comeInNormally": {}
},
"requires": [],
"flashSuitChecked": true,
"blueSuitChecked": true
},
{
"link": [
1,
1
],
"name": "Base (Come In With Mockball)",
"entranceCondition": {
"comeInWithMockball": {
"adjacentMinTiles": 0,
"remoteAndLandingMinTiles": [
[
0,
0
]
],
"speedBooster": "any"
}
},
"requires": [
{
"heatFrames": 10
}
],
"flashSuitChecked": true,
"blueSuitChecked": true
},
{
"id": 5,
"link": [
1,
1
],
"name": "Leave with Runway",
"requires": [],
"exitCondition": {
"leaveWithRunway": {
"length": 4,
"openEnd": 0
}
},
"flashSuitChecked": true,
"blueSuitChecked": true
},
{
"id": 9,
"link": [
1,
1
],
"name": "Come in Getting Blue Speed, Shinecharge, Crystal Spark",
"entranceCondition": {
"comeInGettingBlueSpeed": {
"length": 5,
"openEnd": 0,
"gentleDownTiles": 1
}
},
"requires": [
"h_shinechargeMaxRunway",
{
"or": [
{
"and": [
"h_enemyDrops",
"h_heatedCrystalSparkWithoutLenience"
]
},
"h_heatedCrystalSpark"
]
}
],
"flashSuitChecked": true,
"blueSuitChecked": true,
"devNote": [
"No lenience, since the Gamets are a good Power Bomb farm."
]
},
{
"id": 10,
"link": [
1,
1
],
"name": "Come in Getting Blue Speed, Shinecharge, Crystal Spark (Wave)",
"entranceCondition": {
"comeInShinecharging": {
"length": 12,
"openEnd": 0,
"gentleUpTiles": 3,
"gentleDownTiles": 1
}
},
"requires": [
"Wave",
{
"or": [
{
"and": [
"h_enemyDrops",
"h_heatedCrystalSparkWithoutLenience"
]
},
"h_heatedCrystalSpark"
]
}
],
"flashSuitChecked": true,
"blueSuitChecked": true,
"devNote": [
"No lenience, since the Gamets are a good Power Bomb farm."
]
},
{
"id": 1,
"link": [
1,
2
],
"name": "Base",
"requires": [
{
"heatFrames": 10
},
{
"or": [
"canDash",
{
"heatFrames": 5
}
]
}
],
"flashSuitChecked": true,
"blueSuitChecked": true
},
{
"id": 8,
"link": [
1,
2
],
"name": "R-Mode Spark Interrupt",
"entranceCondition": {
"comeInWithRMode": {}
},
"requires": [
{
"heatFrames": 60
},
{
"refill": [
"Energy"
]
},
"h_runOverRespawningEnemies",
{
"or": [
"canBeVeryPatient",
"h_heatProof"
]
},
{
"canShineCharge": {
"usedTiles": 13,
"gentleUpTiles": 3,
"gentleDownTiles": 1,
"openEnd": 0
}
},
{
"autoReserveTrigger": {}
},
"canRModeSparkInterrupt"
],
"flashSuitChecked": true,
"blueSuitChecked": true,
"note": [
"Fill up on the Gamets. Lure the next spawn wave high and kill one higher Gamet to leave the drop",
"hanging above the runway.",
"Shinecharge across the room, and then use the next Gamet spawn cycle, or heat damage, to interrupt."
]
},
{
"id": 2,
"link": [
2,
1
],
"name": "Base",
"requires": [
{
"heatFrames": 30
},
{
"or": [
"canDash",
{
"heatFrames": 20
}
]
}
],
"flashSuitChecked": true,
"blueSuitChecked": true
},
{
"id": 3,
"link": [
2,
1
],
"name": "Leave with Runway",
"requires": [
"canDash",
"h_runOverRespawningEnemies",
{
"heatFrames": 0
}
],
"exitCondition": {
"leaveWithRunway": {
"length": 13,
"openEnd": 0,
"gentleUpTiles": 1,
"gentleDownTiles": 3,
"startingGentleDownTiles": 2
}
},
"unlocksDoors": [
{
"types": [
"ammo"
],
"requires": []
}
],
"flashSuitChecked": true,
"blueSuitChecked": true,
"note": "Involves leaving some drops hanging after killing the Gamets so they don't respawn.",
"devNote": "Health drops are collected while using this runway, offsetting any heat frames used to get into position."
},
{
"id": 6,
"link": [
2,
1
],
"name": "G-Mode Setup - Get Hit By Gamet",
"requires": [
{
  "heatFrames": 220
}
],
"exitCondition": {
"leaveWithGModeSetup": {}
},
"unlocksDoors": [
{
"types": [
"ammo"
],
"requires": []
}
],
"flashSuitChecked": true,
"blueSuitChecked": true
},
{
"id": 7,
"link": [
2,
2
],
"name": "Approach Farm",
"requires": [
{
"or": [
{
"and": [
{
"heatFrames": 0
},
"canPauseAbuse"
]
},
{
"heatFrames": 50
}
]
},
{
"partialRefill": {
"type": "RegularEnergy",
"limit": 50
}
}
],
"flashSuitChecked": true,
"blueSuitChecked": true,
"note": "Regain some energy in order to use the Gamet Farm."
},
{
"id": 4,
"link": [
2,
2
],
"name": "Gamet Farm",
"requires": [
{
"simpleHeatFrames": 100
},
{
"heatFrames": 20
},
{
"simpleCycleFrames": 100
},
{
"cycleFrames": 20
}
],
"farmCycleDrops": [
{
"enemy": "Gamet",
"count": 5
}
],
"flashSuitChecked": true,
"blueSuitChecked": true
}
],
"notables": [],
"nextStratId": 11,
"nextNotableId": 1
}