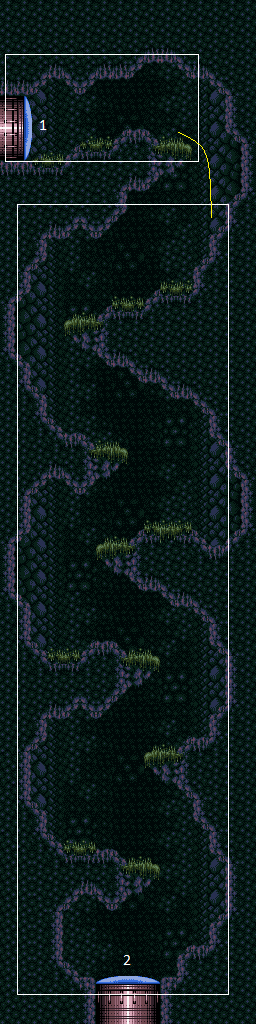
Forgotten Highway Kago Room
Room ID: 35
|
Exit condition: {
"leaveWithRunway": {
"length": 11,
"openEnd": 1,
"steepUpTiles": 1,
"steepDownTiles": 2
}
} |
|
Requires: {
"or": [
{
"and": [
{
"resetRoom": {
"nodes": [
1
]
}
},
{
"cycleFrames": 1230
}
]
},
{
"and": [
{
"resetRoom": {
"nodes": [
2
]
}
},
{
"cycleFrames": 1710
}
]
}
]
}Farm cycle drops: 2 Kago |
|
Requires: "h_CrystalFlash" |
From: 1
Top Left Door
To: 1
Top Left Door
Entrance condition: {
"comeInShinecharging": {
"length": 10,
"openEnd": 0,
"steepUpTiles": 2,
"steepDownTiles": 1
},
"comesInHeated": "no"
}Requires: "h_CrystalSpark" |
|
|
From: 1
Top Left Door
To: 2
Bottom Door
Entrance condition: {
"comeInShinecharging": {
"length": 10,
"openEnd": 1,
"steepUpTiles": 2,
"steepDownTiles": 1
}
}Requires: "canLongChainTemporaryBlue" "canXRayTurnaround" Exit condition: {
"leaveWithTemporaryBlue": {
"direction": "any"
}
}Unlocks doors: {"types":["ammo"],"requires":[]} |
|
|
|
Enter on the left side of the doorway to reduce the amount of energy used. Entrance condition: {
"comeInWithSpark": {},
"comesThroughToilet": "any"
}Requires: {
"shinespark": {
"frames": 3,
"excessFrames": 3
}
}Dev note: This strat is not useful in-room, but can satisfy a strat in the room before with an exit shinespark. |
{
"$schema": "../../../schema/m3-room.schema.json",
"id": 35,
"name": "Forgotten Highway Kago Room",
"area": "Crateria",
"subarea": "East",
"roomAddress": "0x79552",
"roomEnvironments": [
{
"heated": false
}
],
"mapTileMask": [
[
1
],
[
1
],
[
1
],
[
1
]
],
"nodes": [
{
"id": 1,
"name": "Top Left Door",
"nodeType": "door",
"nodeSubType": "blue",
"nodeAddress": "0x0018a7e",
"doorOrientation": "left",
"doorEnvironments": [
{
"physics": "air"
}
],
"mapTileMask": [
[
2
],
[
1
],
[
1
],
[
1
]
]
},
{
"id": 2,
"name": "Bottom Door",
"nodeType": "door",
"nodeSubType": "blue",
"nodeAddress": "0x0018a8a",
"doorOrientation": "down",
"doorEnvironments": [
{
"physics": "air"
}
],
"mapTileMask": [
[
1
],
[
2
],
[
2
],
[
2
]
]
}
],
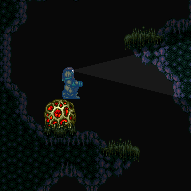
"enemies": [
{
"id": "e1",
"groupName": "Forgotten Highway Kagos",
"enemyName": "Kago",
"quantity": 2,
"homeNodes": [
2
]
}
],
"strats": [
{
"link": [
1,
1
],
"name": "Base (Unlock Door)",
"requires": [],
"unlocksDoors": [
{
"types": [
"ammo"
],
"requires": []
}
],
"flashSuitChecked": true,
"blueSuitChecked": true
},
{
"link": [
1,
1
],
"name": "Base (Come In Normally)",
"entranceCondition": {
"comeInNormally": {}
},
"requires": [],
"flashSuitChecked": true,
"blueSuitChecked": true
},
{
"link": [
1,
1
],
"name": "Base (Come In With Mockball)",
"entranceCondition": {
"comeInWithMockball": {
"adjacentMinTiles": 0,
"remoteAndLandingMinTiles": [
[
0,
0
]
],
"speedBooster": "any"
}
},
"requires": [],
"flashSuitChecked": true,
"blueSuitChecked": true
},
{
"link": [
2,
2
],
"name": "Base (Unlock Door)",
"requires": [],
"unlocksDoors": [
{
"types": [
"ammo"
],
"requires": []
}
],
"flashSuitChecked": true,
"blueSuitChecked": true
},
{
"link": [
2,
2
],
"name": "Base (Come In Normally)",
"entranceCondition": {
"comeInNormally": {}
},
"requires": [],
"flashSuitChecked": true,
"blueSuitChecked": true
},
{
"link": [
2,
2
],
"name": "Base (Come In With Grapple Jump)",
"entranceCondition": {
"comeInWithGrappleJump": {
"position": "any"
}
},
"requires": [],
"flashSuitChecked": true,
"blueSuitChecked": true
},
{
"id": 1,
"link": [
1,
1
],
"name": "Leave with Runway",
"requires": [],
"exitCondition": {
"leaveWithRunway": {
"length": 11,
"openEnd": 1,
"steepUpTiles": 1,
"steepDownTiles": 2
}
},
"flashSuitChecked": true,
"blueSuitChecked": true
},
{
"id": 9,
"link": [
1,
1
],
"name": "Kago Farm",
"requires": [
{
  "or": [
    {
      "and": [
        {
          "resetRoom": {
            "nodes": [
              1
            ]
          }
        },
        {
          "cycleFrames": 1230
        }
      ]
    },
    {
      "and": [
        {
          "resetRoom": {
            "nodes": [
              2
            ]
          }
        },
        {
          "cycleFrames": 1710
        }
      ]
    }
  ]
}
],
"farmCycleDrops": [
{
"enemy": "Kago",
"count": 2
}
],
"flashSuitChecked": true,
"blueSuitChecked": true
},
{
"id": 3,
"link": [
1,
1
],
"name": "Crystal Flash",
"requires": [
"h_CrystalFlash"
],
"flashSuitChecked": true,
"blueSuitChecked": true
},
{
"id": 10,
"link": [
1,
1
],
"name": "Come in Shinecharging, Crystal Spark",
"entranceCondition": {
"comeInShinecharging": {
"length": 10,
"openEnd": 0,
"steepUpTiles": 2,
"steepDownTiles": 1
},
"comesInHeated": "no"
},
"requires": [
"h_CrystalSpark"
],
"flashSuitChecked": true,
"blueSuitChecked": true
},
{
"id": 4,
"link": [
1,
2
],
"name": "Base",
"requires": [],
"flashSuitChecked": true,
"blueSuitChecked": true
},
{
"id": 5,
"link": [
1,
2
],
"name": "Come in Shinecharging, Leave With Temporary Blue",
"entranceCondition": {
"comeInShinecharging": {
"length": 10,
"openEnd": 1,
"steepUpTiles": 2,
"steepDownTiles": 1
}
},
"requires": [
"canLongChainTemporaryBlue",
"canXRayTurnaround"
],
"exitCondition": {
"leaveWithTemporaryBlue": {
"direction": "any"
}
},
"unlocksDoors": [
{
"types": [
"ammo"
],
"requires": []
}
],
"flashSuitChecked": true,
"blueSuitChecked": true
},
{
"id": 6,
"link": [
2,
1
],
"name": "Base",
"requires": [],
"flashSuitChecked": true,
"blueSuitChecked": true
},
{
"id": 8,
"link": [
2,
2
],
"name": "Shinespark",
"entranceCondition": {
"comeInWithSpark": {},
"comesThroughToilet": "any"
},
"requires": [
{
  "shinespark": {
    "frames": 3,
    "excessFrames": 3
  }
}
],
"flashSuitChecked": true,
"blueSuitChecked": true,
"note": "Enter on the left side of the doorway to reduce the amount of energy used.",
"devNote": "This strat is not useful in-room, but can satisfy a strat in the room before with an exit shinespark."
}
],
"notables": [],
"nextStratId": 11,
"nextNotableId": 1
}