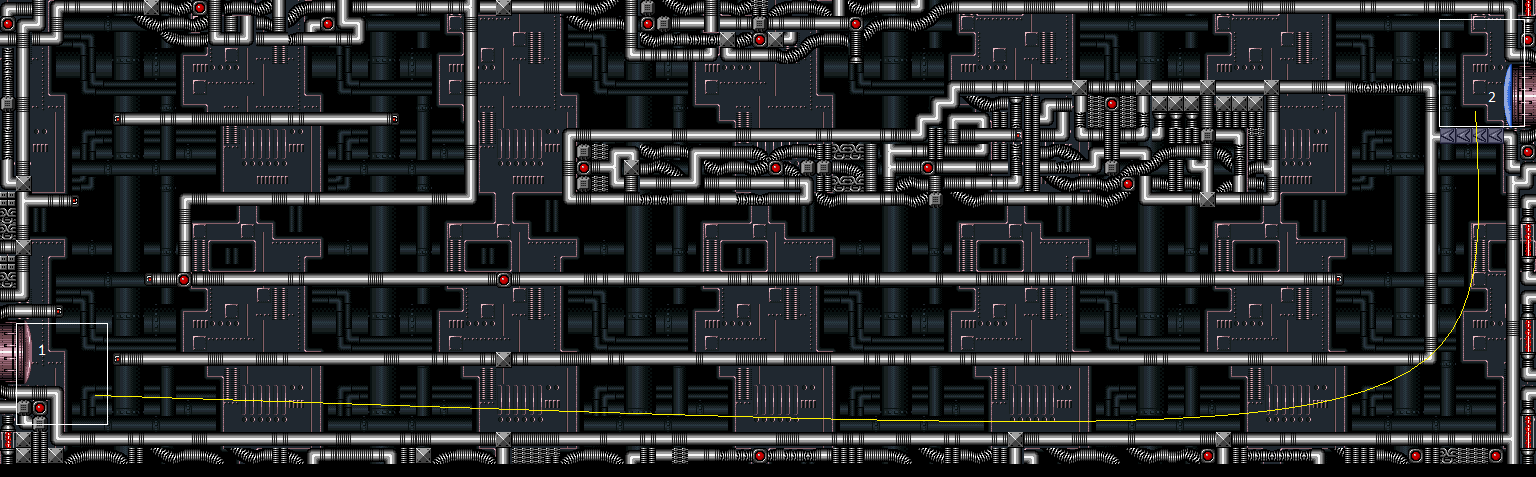
Tourian Escape Room 3
Room ID: 241
|
Exit condition: {
"leaveWithRunway": {
"length": 3,
"openEnd": 1
}
} |
|
Requires: "h_shinechargeMaxRunway"
"canShinechargeMovement"
{
"shineChargeFrames": 45
}Exit condition: {
"leaveShinecharged": {}
} |
|
Use the lower runway. Exit condition: {
"leaveSpinning": {
"remoteRunway": {
"length": 43,
"openEnd": 1
}
}
} |
|


Use the lower runway. Exit condition: {
"leaveWithMockball": {
"remoteRunway": {
"length": 43,
"openEnd": 1
},
"landingRunway": {
"length": 2,
"openEnd": 1
}
}
} |
|


Use the upper runway. Exit condition: {
"leaveWithSpringBallBounce": {
"remoteRunway": {
"length": 43,
"openEnd": 1
},
"landingRunway": {
"length": 1,
"openEnd": 1
},
"movementType": "uncontrolled"
}
} |
|


Use the upper runway. Exit condition: {
"leaveSpaceJumping": {
"remoteRunway": {
"length": 43,
"openEnd": 1
}
}
} |
|

Requires: "h_getBlueSpeedMaxRunway" "canChainTemporaryBlue" Exit condition: {
"leaveWithTemporaryBlue": {}
} |
|
Requires: "h_CrystalFlash" |
|
Kill the Pirates fast enough that they won't attack, or shoot them from below with Wave. Requires: {
"or": [
"Wave",
"ScrewAttack",
{
"and": [
"Plasma",
"canXRayWaitForIFrames"
]
},
{
"enemyKill": {
"enemies": [
[
"Tourian Space Pirate (all)",
"Tourian Space Pirate (all)",
"Tourian Space Pirate (all)"
],
[
"Tourian Space Pirate (all)",
"Tourian Space Pirate (all)",
"Tourian Space Pirate (all)"
]
],
"explicitWeapons": [
"Missile",
"Super",
"Ice+Plasma"
]
}
}
]
}Clears obstacles: A Dev note: These requirements are to kill all of the pirates, but another strat is needed to cross the room to get to the top half. |
|


Safely kill the first pirate, then run from or roll under the remaining pirate lasers. The Pirates will also not shoot if they come on screen while Samus is crouched. Requires: {
"or": [
{
"and": [
"canDodgeWhileShooting",
"canCameraManip",
{
"or": [
"Plasma",
{
"and": [
"h_hasBeamUpgrade",
"canBePatient"
]
},
"canBeVeryPatient"
]
}
]
},
{
"and": [
{
"or": [
"canBePatient",
{
"enemyDamage": {
"enemy": "Tourian Space Pirate (all)",
"type": "contact",
"hits": 1
}
}
]
},
"Morph"
]
}
]
}Clears obstacles: A Dev note: These requirements are to kill all of the pirates, but another strat is needed to cross the room to get to the top half. |
|
Requires: {
"haveBlueSuit": {}
}Clears obstacles: A Dev note: This will only kill the bottom pirates if Samus has no way up without using the shinespark. But Samus will either have SpeedBooster or some high-level tech, which will be enough to get through the rest damageless. |
|
Crystal Flash at the bottom right corner, then run to the left to shinecharge. Use Pirate laser to interrupt. Entrance condition: {
"comeInWithRMode": {}
}Requires: "h_CrystalFlashForReserveEnergy"
"h_shinechargeMaxRunway"
{
"autoReserveTrigger": {
"maxReserveEnergy": 95
}
}
"canRModeSparkInterrupt" |
|
Requires: {
"obstaclesCleared": [
"A"
]
}
{
"or": [
"HiJump",
"canWallJump",
"SpaceJump",
"canIBJ",
"canSpringBallJumpMidAir"
]
} |
|
Safely kill the first pirate, then walk through the rest while taking damage or by using Plasma Beam. It is possible to get through the lower three pirates with a single hit while using i-frames to prevent a second hit. Either go below the pirates and use the camera to manipulate them to be closer together, or arm-pump or horizontal damage boost to get through them fast enough. Requires: {
"or": [
"HiJump",
"canWallJump",
"SpaceJump",
"canIBJ",
"canSpringBallJumpMidAir"
]
}
{
"or": [
{
"enemyDamage": {
"enemy": "Tourian Space Pirate (all)",
"type": "contact",
"hits": 3
}
},
{
"and": [
"Plasma",
"canHitbox"
]
},
{
"and": [
"canUseIFrames",
{
"enemyDamage": {
"enemy": "Tourian Space Pirate (all)",
"type": "contact",
"hits": 2
}
},
{
"or": [
"canCameraManip",
"canHorizontalDamageBoost"
]
},
"canTrickyJump"
]
}
]
} |
|
Safely kill the first pirate, then run into the rest with blue speed. A speedy jump can reach the top platform to save Energy over shinesparking. Requires: "h_getBlueSpeedMaxRunway"
{
"or": [
"canSpeedyJump",
{
"and": [
"h_shinechargeMaxRunway",
{
"shinespark": {
"frames": 15,
"excessFrames": 5
}
}
]
}
]
}Clears obstacles: A |
|
Requires: "canSpeedyJump" "h_shinechargeMaxRunway" "h_CrystalSpark" Clears obstacles: A Dev note: This is listed here because its free to get from 1 to 2 with SpeedBooster alone, but only with being able to dash. |
|
With the pirates killed, Samus can spark up near the center of the room to save Energy. Requires: {
"obstaclesCleared": [
"A"
]
}
"h_storedSpark"
{
"shinespark": {
"frames": 7,
"excessFrames": 5
}
}Dev note: The top pirates can be killed the same way as the lower pirates, where the obstacle was cleared. Using blue suit to kill the pirates and then using it to spark up would make it so that there is potentially no way to kill the upper pirates; But Samus will either have SpeedBooster or some high-level tech, which will be enough to get through the rest damageless. |
From: 1
Left Door
To: 2
Right Door
Requires: {
"useFlashSuit": {}
}
{
"shinespark": {
"frames": 19,
"excessFrames": 7
}
}
{
"enemyDamage": {
"enemy": "Tourian Space Pirate (all)",
"type": "laser",
"hits": 1
}
}Dev note: With low Energy, Samus will also avoid the Pirate laser, but that is not modeled. |
From: 1
Left Door
To: 2
Right Door
IBJ or spring ball bomb jump to avoid the wall jump. Killing the first pirate takes 2 Power Bombs, the next three can be killed with 3 total Power Bombs if they are placed under the middle pirate. Entrance condition: {
"comeInWithGMode": {
"mode": "any",
"morphed": true
}
}Requires: {
"or": [
"h_artificialMorphIBJ",
"h_artificialMorphSpringBallBombJump"
]
}
{
"ammo": {
"type": "PowerBomb",
"count": 5
}
}Clears obstacles: A |
From: 1
Left Door
To: 2
Right Door
IBJ or spring ball bomb jump to avoid the wall jump. Using a total of 3 Power Bombs will allow Samus to roll through the bottom four pirates. Entrance condition: {
"comeInWithGMode": {
"mode": "any",
"morphed": true
}
}Requires: {
"or": [
"h_artificialMorphIBJ",
"h_artificialMorphSpringBallBombJump"
]
}
"h_artificialMorphPowerBomb"
"h_artificialMorphPowerBomb"
"h_artificialMorphPowerBomb"
"canHitbox" |
|
Tank 3 pirate hits then IBJ or spring ball bomb jump to avoid the wall jump. Entrance condition: {
"comeInWithGMode": {
"mode": "any",
"morphed": true
}
}Requires: {
"or": [
"h_artificialMorphIBJ",
"h_artificialMorphSpringBallBombJump"
]
}
{
"enemyDamage": {
"enemy": "Tourian Space Pirate (all)",
"type": "contact",
"hits": 3
}
} |
From: 1
Left Door
To: 2
Right Door
Take the bottom path and place many bombs near the speed blocks to overload PLMs and go through them. Entrance condition: {
"comeInWithGMode": {
"mode": "any",
"morphed": true
}
}Requires: "h_artificialMorphLongIBJ"
{
"or": [
"h_artificialMorphCeilingBombJump",
"canBeVeryPatient"
]
} |
|

Roll through the pirates then IBJ or spring ball bomb jump to avoid the wall jump. Entrance condition: {
"comeInWithGMode": {
"mode": "any",
"morphed": true
}
}Requires: "h_blueSuitGMode"
{
"or": [
"h_artificialMorphIBJ",
"h_artificialMorphSpringBallBombJump"
]
} |
|
Requires: {
"obstaclesCleared": [
"A"
]
} |
|
Requires: {
"haveBlueSuit": {}
}Dev note: Fall through the speed blocks on entry. This would require alternate entrance conditions to prevent falling, but theres no benefit to that. |
|
Run through the pirates while taking damage or by using Plasma Beam. It is possible to get through the lower three pirates with a single hit while using i-frames to prevent a second hit. Either wait above until the pirates are a bit closer together and then run through, or arm-pump or horizontal damage boost to get through them fast enough. Requires: {
"or": [
{
"enemyDamage": {
"enemy": "Tourian Space Pirate (all)",
"type": "contact",
"hits": 4
}
},
{
"and": [
"Plasma",
"canHitbox"
]
},
{
"and": [
"canUseIFrames",
{
"enemyDamage": {
"enemy": "Tourian Space Pirate (all)",
"type": "contact",
"hits": 3
}
},
{
"or": [
"canCameraManip",
"canHorizontalDamageBoost"
]
}
]
}
]
} |
|
Fall through the speed blocks from above with Temporary Blue, or kill the pirates from above with speed echoes. Requires: "h_getBlueSpeedMaxRunway"
{
"enemyDamage": {
"enemy": "Tourian Space Pirate (all)",
"type": "contact",
"hits": 1
}
}
{
"or": [
"canTemporaryBlue",
{
"and": [
"canUseSpeedEchoes",
"h_shinechargeMaxRunway",
{
"shinespark": {
"frames": 2,
"excessFrames": 2
}
}
]
}
]
} |
|
Crystal Flash on top of the speed blocks. Kill the upper tier of pirates, using the chance to damage down. Shinecharge on the level below, then drop down to interrupt using the Pirate laser. Entrance condition: {
"comeInWithRMode": {}
}Requires: "h_CrystalFlashForReserveEnergy"
"h_shinechargeMaxRunway"
{
"autoReserveTrigger": {
"maxReserveEnergy": 95
}
}
"canRModeSparkInterrupt" |
|


Entrance condition: {
"comeInGettingBlueSpeed": {
"length": 4,
"openEnd": 0
}
} |
|
Entrance condition: {
"comeInWithStoredFallSpeed": {
"fallSpeedInTiles": 1
}
}Requires: "canMoonfall" |
|


Enter the room with a super sink, to clip down past the Speed blocks. Entrance condition: {
"comeInWithSuperSink": {}
} |
|
Entrance condition: {
"comeInWithGrappleTeleport": {
"blockPositions": [
[
2,
28
],
[
2,
29
]
]
}
}Bypasses door shell: true |
From: 2
Right Door
To: 1
Left Door
Entrance condition: {
"comeInWithGrappleTeleport": {
"blockPositions": [
[
2,
28
]
]
}
}Exit condition: {
"leaveWithGrappleTeleport": {
"blockPositions": [
[
2,
28
]
]
}
}Bypasses door shell: true |
From: 2
Right Door
To: 1
Left Door
Entrance condition: {
"comeInWithGrappleTeleport": {
"blockPositions": [
[
2,
29
]
]
}
}Exit condition: {
"leaveWithGrappleTeleport": {
"blockPositions": [
[
2,
29
]
]
}
}Bypasses door shell: true |
|
Exit condition: {
"leaveWithRunway": {
"length": 5,
"openEnd": 0
}
} |
|


Run from or Roll under the pirate lasers. The Pirates will also not shoot if they come on screen while Samus is crouched. Requires: {
"or": [
{
"and": [
"canDodgeWhileShooting",
"canCameraManip",
{
"or": [
"Plasma",
{
"and": [
"h_hasBeamUpgrade",
"canDash",
"canBePatient"
]
},
"canBeVeryPatient"
]
}
]
},
{
"and": [
{
"or": [
"canBePatient",
{
"enemyDamage": {
"enemy": "Tourian Space Pirate (all)",
"type": "contact",
"hits": 1
}
}
]
},
"Morph"
]
}
]
}Clears obstacles: A Dev note: Technically it's not possible to kill the bottom Pirates while staying at node 2 (not dropping down); but if we're not going down, then it doesn't matter that the bottom ones aren't killed. |
|
Kill the Pirates fast enough that they won't attack, or shoot them from above with Wave. Requires: {
"or": [
"Wave",
"ScrewAttack",
{
"haveBlueSuit": {}
},
{
"and": [
"Plasma",
"canXRayWaitForIFrames"
]
},
{
"enemyKill": {
"enemies": [
[
"Tourian Space Pirate (all)",
"Tourian Space Pirate (all)"
],
[
"Tourian Space Pirate (all)",
"Tourian Space Pirate (all)"
],
[
"Tourian Space Pirate (all)"
]
],
"explicitWeapons": [
"Missile",
"Super",
"Ice+Plasma"
]
}
}
]
}Clears obstacles: A Dev note: Technically it's not possible to kill the bottom Pirates while staying at node 2 (not dropping down); but if we're not going down, then it doesn't matter that the bottom ones aren't killed. FIXME: The enemyKill requirements could be reduced if it is only needed to kill the top ones, which could be modeled as a separate obstacle. |
|
Requires: {
"obstaclesCleared": [
"A"
]
}
"h_shinechargeMaxRunway"
{
"shineChargeFrames": 60
}Exit condition: {
"leaveShinecharged": {}
} |
|


Requires: {
"obstaclesCleared": [
"A"
]
}Exit condition: {
"leaveWithMockball": {
"remoteRunway": {
"length": 23,
"openEnd": 1
},
"landingRunway": {
"length": 1,
"openEnd": 1
}
}
} |
|


Requires: {
"obstaclesCleared": [
"A"
]
}Exit condition: {
"leaveWithSpringBallBounce": {
"remoteRunway": {
"length": 19,
"openEnd": 1
},
"landingRunway": {
"length": 1,
"openEnd": 1
},
"movementType": "uncontrolled"
}
} |
|


Requires: {
"obstaclesCleared": [
"A"
]
}Exit condition: {
"leaveSpaceJumping": {
"remoteRunway": {
"length": 37,
"openEnd": 1
}
}
} |
|
Gain temporary blue with a shinecharge; then do a tight lateral mid-air morph to jump past the speed blocks. Alernatively, start the temporary blue chain by doing a running jump over them rather than doing a shinecharge. Requires: {
"obstaclesCleared": [
"A"
]
}
"h_shinechargeMaxRunway"
"can4HighMidAirMorph"
"canChainTemporaryBlue"Exit condition: {
"leaveWithTemporaryBlue": {}
} |
|
Requires: "h_CrystalFlash" |
{
"$schema": "../../../schema/m3-room.schema.json",
"id": 241,
"name": "Tourian Escape Room 3",
"area": "Tourian",
"subarea": "Main",
"roomAddress": "0x7DEA7",
"roomEnvironments": [
{
"heated": false
}
],
"mapTileMask": [
[
1,
1,
1,
1,
1,
1
],
[
1,
1,
1,
1,
1,
1
]
],
"nodes": [
{
"id": 1,
"name": "Left Door",
"nodeType": "door",
"nodeSubType": "gray",
"nodeAddress": "0x001ab10",
"doorOrientation": "left",
"doorEnvironments": [
{
"physics": "air"
}
],
"locks": [
{
"name": "Tourian Escape 3 Lock (to Escape Room 2)",
"lockType": "permanent",
"unlockStrats": [
{
"name": "Base",
"requires": [
"never"
],
"flashSuitChecked": true,
"blueSuitChecked": true
}
]
}
],
"mapTileMask": [
[
2,
2,
1,
1,
1,
1
],
[
2,
2,
2,
2,
2,
2
]
]
},
{
"id": 2,
"name": "Right Door",
"nodeType": "door",
"nodeSubType": "blue",
"nodeAddress": "0x001ab1c",
"doorOrientation": "right",
"doorEnvironments": [
{
"physics": "air"
}
],
"mapTileMask": [
[
1,
1,
2,
2,
2,
2
],
[
1,
1,
1,
1,
1,
1
]
]
}
],
"obstacles": [
{
"id": "A",
"name": "Space Pirates",
"obstacleType": "enemies"
}
],
"enemies": [
{
"id": "e1",
"groupName": "Tourian Escape Room 3 Bottom Pirates",
"enemyName": "Tourian Space Pirate (all)",
"quantity": 4,
"homeNodes": [
1
]
},
{
"id": "e2",
"groupName": "Tourian Escape Room 3 Top Pirates",
"enemyName": "Tourian Space Pirate (all)",
"quantity": 3,
"homeNodes": [
2
]
}
],
"strats": [
{
"link": [
1,
1
],
"name": "Base (Unlock Door)",
"requires": [],
"unlocksDoors": [
{
"types": [
"ammo"
],
"requires": []
}
],
"flashSuitChecked": true,
"blueSuitChecked": true
},
{
"link": [
1,
1
],
"name": "Base (Come In Normally)",
"entranceCondition": {
"comeInNormally": {}
},
"requires": [],
"flashSuitChecked": true,
"blueSuitChecked": true
},
{
"link": [
1,
1
],
"name": "Base (Come In With Mockball)",
"entranceCondition": {
"comeInWithMockball": {
"adjacentMinTiles": 0,
"remoteAndLandingMinTiles": [
[
0,
0
]
],
"speedBooster": "any"
}
},
"requires": [],
"flashSuitChecked": true,
"blueSuitChecked": true
},
{
"link": [
2,
2
],
"name": "Base (Unlock Door)",
"requires": [],
"unlocksDoors": [
{
"types": [
"ammo"
],
"requires": []
}
],
"flashSuitChecked": true,
"blueSuitChecked": true
},
{
"link": [
2,
2
],
"name": "Base (Come In Normally)",
"entranceCondition": {
"comeInNormally": {}
},
"requires": [],
"flashSuitChecked": true,
"blueSuitChecked": true
},
{
"link": [
2,
2
],
"name": "Base (Come In With Mockball)",
"entranceCondition": {
"comeInWithMockball": {
"adjacentMinTiles": 0,
"remoteAndLandingMinTiles": [
[
0,
0
]
],
"speedBooster": "any"
}
},
"requires": [],
"flashSuitChecked": true,
"blueSuitChecked": true
},
{
"id": 1,
"link": [
1,
1
],
"name": "Leave with Runway",
"requires": [],
"exitCondition": {
"leaveWithRunway": {
"length": 3,
"openEnd": 1
}
},
"flashSuitChecked": true,
"blueSuitChecked": true
},
{
"id": 2,
"link": [
1,
1
],
"name": "Leave Shinecharged",
"requires": [
"h_shinechargeMaxRunway",
"canShinechargeMovement",
{
"shineChargeFrames": 45
}
],
"exitCondition": {
"leaveShinecharged": {}
},
"flashSuitChecked": true,
"blueSuitChecked": true
},
{
"id": 3,
"link": [
1,
1
],
"name": "Leave Spinning",
"requires": [],
"exitCondition": {
"leaveSpinning": {
"remoteRunway": {
"length": 43,
"openEnd": 1
}
}
},
"flashSuitChecked": true,
"blueSuitChecked": true,
"note": "Use the lower runway."
},
{
"id": 4,
"link": [
1,
1
],
"name": "Leave With Mockball",
"requires": [],
"exitCondition": {
"leaveWithMockball": {
"remoteRunway": {
"length": 43,
"openEnd": 1
},
"landingRunway": {
"length": 2,
"openEnd": 1
}
}
},
"flashSuitChecked": true,
"blueSuitChecked": true,
"note": "Use the lower runway."
},
{
"id": 5,
"link": [
1,
1
],
"name": "Leave With Spring Ball Bounce",
"requires": [],
"exitCondition": {
"leaveWithSpringBallBounce": {
"remoteRunway": {
"length": 43,
"openEnd": 1
},
"landingRunway": {
"length": 1,
"openEnd": 1
},
"movementType": "uncontrolled"
}
},
"flashSuitChecked": true,
"blueSuitChecked": true,
"note": "Use the upper runway."
},
{
"id": 6,
"link": [
1,
1
],
"name": "Leave Space Jumping",
"requires": [],
"exitCondition": {
"leaveSpaceJumping": {
"remoteRunway": {
"length": 43,
"openEnd": 1
}
}
},
"flashSuitChecked": true,
"blueSuitChecked": true,
"note": "Use the upper runway."
},
{
"id": 7,
"link": [
1,
1
],
"name": "Leave With Temporary Blue",
"requires": [
"h_getBlueSpeedMaxRunway",
"canChainTemporaryBlue"
],
"exitCondition": {
"leaveWithTemporaryBlue": {}
},
"flashSuitChecked": true,
"blueSuitChecked": true
},
{
"id": 8,
"link": [
1,
1
],
"name": "Crystal Flash",
"requires": [
"h_CrystalFlash"
],
"flashSuitChecked": true,
"blueSuitChecked": true
},
{
"id": 12,
"link": [
1,
1
],
"name": "Kill Pirates Quickly",
"requires": [
{
  "or": [
    "Wave",
    "ScrewAttack",
    {
      "and": [
        "Plasma",
        "canXRayWaitForIFrames"
      ]
    },
    {
      "enemyKill": {
        "enemies": [
          [
            "Tourian Space Pirate (all)",
            "Tourian Space Pirate (all)",
            "Tourian Space Pirate (all)"
          ],
          [
            "Tourian Space Pirate (all)",
            "Tourian Space Pirate (all)",
            "Tourian Space Pirate (all)"
          ]
        ],
        "explicitWeapons": [
          "Missile",
          "Super",
          "Ice+Plasma"
        ]
      }
    }
  ]
}
],
"clearsObstacles": [
"A"
],
"flashSuitChecked": true,
"blueSuitChecked": true,
"note": "Kill the Pirates fast enough that they won't attack, or shoot them from below with Wave.",
"devNote": "These requirements are to kill all of the pirates, but another strat is needed to cross the room to get to the top half."
},
{
"id": 11,
"link": [
1,
1
],
"name": "Kill Pirates Slowly",
"requires": [
{
  "or": [
    {
      "and": [
        "canDodgeWhileShooting",
        "canCameraManip",
        {
          "or": [
            "Plasma",
            {
              "and": [
                "h_hasBeamUpgrade",
                "canBePatient"
              ]
            },
            "canBeVeryPatient"
          ]
        }
      ]
    },
    {
      "and": [
        {
          "or": [
            "canBePatient",
            {
              "enemyDamage": {
                "enemy": "Tourian Space Pirate (all)",
                "type": "contact",
                "hits": 1
              }
            }
          ]
        },
        "Morph"
      ]
    }
  ]
}
],
"clearsObstacles": [
"A"
],
"flashSuitChecked": true,
"blueSuitChecked": true,
"note": [
"Safely kill the first pirate, then run from or roll under the remaining pirate lasers.",
"The Pirates will also not shoot if they come on screen while Samus is crouched."
],
"devNote": "These requirements are to kill all of the pirates, but another strat is needed to cross the room to get to the top half."
},
{
"id": 40,
"link": [
1,
1
],
"name": "Kill Pirates with Blue Suit",
"requires": [
{
  "haveBlueSuit": {}
}
],
"clearsObstacles": [
"A"
],
"flashSuitChecked": true,
"blueSuitChecked": true,
"devNote": [
"This will only kill the bottom pirates if Samus has no way up without using the shinespark.",
"But Samus will either have SpeedBooster or some high-level tech, which will be enough to get through the rest damageless."
]
},
{
"id": 38,
"link": [
1,
1
],
"name": "R-Mode Spark Interrupt",
"entranceCondition": {
"comeInWithRMode": {}
},
"requires": [
"h_CrystalFlashForReserveEnergy",
"h_shinechargeMaxRunway",
{
"autoReserveTrigger": {
"maxReserveEnergy": 95
}
},
"canRModeSparkInterrupt"
],
"flashSuitChecked": true,
"blueSuitChecked": true,
"note": [
"Crystal Flash at the bottom right corner, then run to the left to shinecharge. Use Pirate laser to interrupt."
]
},
{
"id": 9,
"link": [
1,
2
],
"name": "Pirates Already Dead",
"requires": [
{
  "obstaclesCleared": [
    "A"
  ]
},
{
"or": [
"HiJump",
"canWallJump",
"SpaceJump",
"canIBJ",
"canSpringBallJumpMidAir"
]
}
],
"flashSuitChecked": true,
"blueSuitChecked": true
},
{
"id": 10,
"link": [
1,
2
],
"name": "Pass Through Pirates",
"requires": [
{
"or": [
"HiJump",
"canWallJump",
"SpaceJump",
"canIBJ",
"canSpringBallJumpMidAir"
]
},
{
"or": [
{
"enemyDamage": {
"enemy": "Tourian Space Pirate (all)",
"type": "contact",
"hits": 3
}
},
{
"and": [
"Plasma",
"canHitbox"
]
},
{
"and": [
"canUseIFrames",
{
"enemyDamage": {
"enemy": "Tourian Space Pirate (all)",
"type": "contact",
"hits": 2
}
},
{
"or": [
"canCameraManip",
"canHorizontalDamageBoost"
]
},
"canTrickyJump"
]
}
]
}
],
"flashSuitChecked": true,
"blueSuitChecked": true,
"note": [
"Safely kill the first pirate, then walk through the rest while taking damage or by using Plasma Beam.",
"It is possible to get through the lower three pirates with a single hit while using i-frames to prevent a second hit.",
"Either go below the pirates and use the camera to manipulate them to be closer together,",
"or arm-pump or horizontal damage boost to get through them fast enough."
]
},
{
"id": 13,
"link": [
1,
2
],
"name": "Speed Booster",
"requires": [
"h_getBlueSpeedMaxRunway",
{
"or": [
"canSpeedyJump",
{
"and": [
"h_shinechargeMaxRunway",
{
"shinespark": {
"frames": 15,
"excessFrames": 5
}
}
]
}
]
}
],
"clearsObstacles": [
"A"
],
"flashSuitChecked": true,
"blueSuitChecked": true,
"note": [
"Safely kill the first pirate, then run into the rest with blue speed.",
"A speedy jump can reach the top platform to save Energy over shinesparking."
]
},
{
"id": 43,
"link": [
1,
2
],
"name": "Crystal Spark",
"requires": [
"canSpeedyJump",
"h_shinechargeMaxRunway",
"h_CrystalSpark"
],
"clearsObstacles": [
"A"
],
"flashSuitChecked": true,
"blueSuitChecked": true,
"devNote": "This is listed here because its free to get from 1 to 2 with SpeedBooster alone, but only with being able to dash."
},
{
"id": 35,
"link": [
1,
2
],
"name": "Use Stored Spark",
"requires": [
{
"obstaclesCleared": [
"A"
]
},
"h_storedSpark",
{
"shinespark": {
"frames": 7,
"excessFrames": 5
}
}
],
"flashSuitChecked": true,
"blueSuitChecked": true,
"note": "With the pirates killed, Samus can spark up near the center of the room to save Energy.",
"devNote": [
"The top pirates can be killed the same way as the lower pirates, where the obstacle was cleared.",
"Using blue suit to kill the pirates and then using it to spark up would make it so that there is potentially no way to kill the upper pirates;",
"But Samus will either have SpeedBooster or some high-level tech, which will be enough to get through the rest damageless."
]
},
{
"id": 36,
"link": [
1,
2
],
"name": "Use Flash Suit, Through the Speed Blocks",
"requires": [
{
"useFlashSuit": {}
},
{
"shinespark": {
"frames": 19,
"excessFrames": 7
}
},
{
"enemyDamage": {
"enemy": "Tourian Space Pirate (all)",
"type": "laser",
"hits": 1
}
}
],
"flashSuitChecked": true,
"blueSuitChecked": true,
"devNote": "With low Energy, Samus will also avoid the Pirate laser, but that is not modeled."
},
{
"id": 14,
"link": [
1,
2
],
"name": "G-Mode Morph Power Bomb Pirate Kill",
"entranceCondition": {
"comeInWithGMode": {
"mode": "any",
"morphed": true
}
},
"requires": [
{
"or": [
"h_artificialMorphIBJ",
"h_artificialMorphSpringBallBombJump"
]
},
{
"ammo": {
"type": "PowerBomb",
"count": 5
}
}
],
"clearsObstacles": [
"A"
],
"flashSuitChecked": true,
"blueSuitChecked": true,
"note": [
"IBJ or spring ball bomb jump to avoid the wall jump.",
"Killing the first pirate takes 2 Power Bombs, the next three can be killed with 3 total Power Bombs if they are placed under the middle pirate."
]
},
{
"id": 15,
"link": [
1,
2
],
"name": "G-Mode Morph Power Bomb Pirate Hitbox",
"entranceCondition": {
"comeInWithGMode": {
"mode": "any",
"morphed": true
}
},
"requires": [
{
"or": [
"h_artificialMorphIBJ",
"h_artificialMorphSpringBallBombJump"
]
},
"h_artificialMorphPowerBomb",
"h_artificialMorphPowerBomb",
"h_artificialMorphPowerBomb",
"canHitbox"
],
"flashSuitChecked": true,
"blueSuitChecked": true,
"note": [
"IBJ or spring ball bomb jump to avoid the wall jump.",
"Using a total of 3 Power Bombs will allow Samus to roll through the bottom four pirates."
]
},
{
"id": 16,
"link": [
1,
2
],
"name": "G-Mode Morph Pirate Tank",
"entranceCondition": {
"comeInWithGMode": {
"mode": "any",
"morphed": true
}
},
"requires": [
{
"or": [
"h_artificialMorphIBJ",
"h_artificialMorphSpringBallBombJump"
]
},
{
"enemyDamage": {
"enemy": "Tourian Space Pirate (all)",
"type": "contact",
"hits": 3
}
}
],
"wallJumpAvoid": true,
"flashSuitChecked": true,
"blueSuitChecked": true,
"note": "Tank 3 pirate hits then IBJ or spring ball bomb jump to avoid the wall jump."
},
{
"id": 17,
"link": [
1,
2
],
"name": "G-Mode Morph Overload Speed Blocks",
"entranceCondition": {
"comeInWithGMode": {
"mode": "any",
"morphed": true
}
},
"requires": [
"h_artificialMorphLongIBJ",
{
"or": [
"h_artificialMorphCeilingBombJump",
"canBeVeryPatient"
]
}
],
"flashSuitChecked": true,
"blueSuitChecked": true,
"note": "Take the bottom path and place many bombs near the speed blocks to overload PLMs and go through them."
},
{
"id": 42,
"link": [
1,
2
],
"name": "G-Mode Morph with Blue Suit",
"entranceCondition": {
"comeInWithGMode": {
"mode": "any",
"morphed": true
}
},
"requires": [
"h_blueSuitGMode",
{
"or": [
"h_artificialMorphIBJ",
"h_artificialMorphSpringBallBombJump"
]
}
],
"wallJumpAvoid": true,
"flashSuitChecked": true,
"blueSuitChecked": true,
"note": "Roll through the pirates then IBJ or spring ball bomb jump to avoid the wall jump."
},
{
"id": 18,
"link": [
2,
1
],
"name": "Pirates Already Dead",
"requires": [
{
"obstaclesCleared": [
"A"
]
}
],
"flashSuitChecked": true,
"blueSuitChecked": true
},
{
"id": 41,
"link": [
2,
1
],
"name": "Blue Suit",
"requires": [
{
  "haveBlueSuit": {}
}
],
"flashSuitChecked": true,
"blueSuitChecked": true,
"devNote": "Fall through the speed blocks on entry. This would require alternate entrance conditions to prevent falling, but theres no benefit to that."
},
{
"id": 19,
"link": [
2,
1
],
"name": "Pass Through Pirates",
"requires": [
{
  "or": [
    {
      "enemyDamage": {
        "enemy": "Tourian Space Pirate (all)",
        "type": "contact",
        "hits": 4
      }
    },
    {
      "and": [
        "Plasma",
        "canHitbox"
      ]
    },
    {
      "and": [
        "canUseIFrames",
        {
          "enemyDamage": {
            "enemy": "Tourian Space Pirate (all)",
            "type": "contact",
            "hits": 3
          }
        },
        {
          "or": [
            "canCameraManip",
            "canHorizontalDamageBoost"
          ]
        }
      ]
    }
  ]
}
],
"flashSuitChecked": true,
"blueSuitChecked": true,
"note": [
"Run through the pirates while taking damage or by using Plasma Beam.",
"It is possible to get through the lower three pirates with a single hit while using i-frames to prevent a second hit.",
"Either wait above until the pirates are a bit closer together and then run through,",
"or arm-pump or horizontal damage boost to get through them fast enough."
]
},
{
"id": 20,
"link": [
2,
1
],
"name": "Speed Booster",
"requires": [
"h_getBlueSpeedMaxRunway",
{
"enemyDamage": {
"enemy": "Tourian Space Pirate (all)",
"type": "contact",
"hits": 1
}
},
{
"or": [
"canTemporaryBlue",
{
"and": [
"canUseSpeedEchoes",
"h_shinechargeMaxRunway",
{
"shinespark": {
"frames": 2,
"excessFrames": 2
}
}
]
}
]
}
],
"flashSuitChecked": true,
"blueSuitChecked": true,
"note": "Fall through the speed blocks from above with Temporary Blue, or kill the pirates from above with speed echoes."
},
{
"id": 39,
"link": [
2,
1
],
"name": "R-Mode Spark Interrupt",
"entranceCondition": {
"comeInWithRMode": {}
},
"requires": [
"h_CrystalFlashForReserveEnergy",
"h_shinechargeMaxRunway",
{
"autoReserveTrigger": {
"maxReserveEnergy": 95
}
},
"canRModeSparkInterrupt"
],
"flashSuitChecked": true,
"blueSuitChecked": true,
"note": [
"Crystal Flash on top of the speed blocks. Kill the upper tier of pirates, using the chance to damage down.",
"Shinecharge on the level below, then drop down to interrupt using the Pirate laser."
]
},
{
"id": 21,
"link": [
2,
1
],
"name": "Enter with Speed",
"entranceCondition": {
"comeInGettingBlueSpeed": {
"length": 4,
"openEnd": 0
}
},
"requires": [],
"flashSuitChecked": true,
"blueSuitChecked": true
},
{
"id": 22,
"link": [
2,
1
],
"name": "Stored Moonfall Clip",
"entranceCondition": {
"comeInWithStoredFallSpeed": {
"fallSpeedInTiles": 1
}
},
"requires": [
"canMoonfall"
],
"flashSuitChecked": true,
"blueSuitChecked": true
},
{
"id": 37,
"link": [
2,
1
],
"name": "Super Sink",
"entranceCondition": {
"comeInWithSuperSink": {}
},
"requires": [],
"flashSuitChecked": true,
"blueSuitChecked": true,
"note": [
"Enter the room with a super sink, to clip down past the Speed blocks."
]
},
{
"id": 23,
"link": [
2,
1
],
"name": "Grapple Teleport Door Lock Skip",
"entranceCondition": {
"comeInWithGrappleTeleport": {
"blockPositions": [
[
2,
28
],
[
2,
29
]
]
}
},
"requires": [],
"bypassesDoorShell": "yes",
"flashSuitChecked": true,
"blueSuitChecked": true
},
{
"id": 24,
"link": [
2,
1
],
"name": "Carry Grapple Teleport (Middle Position)",
"entranceCondition": {
"comeInWithGrappleTeleport": {
"blockPositions": [
[
2,
28
]
]
}
},
"requires": [],
"exitCondition": {
"leaveWithGrappleTeleport": {
"blockPositions": [
[
2,
28
]
]
}
},
"bypassesDoorShell": "yes",
"flashSuitChecked": true,
"blueSuitChecked": true
},
{
"id": 25,
"link": [
2,
1
],
"name": "Carry Grapple Teleport (Bottom Position)",
"entranceCondition": {
"comeInWithGrappleTeleport": {
"blockPositions": [
[
2,
29
]
]
}
},
"requires": [],
"exitCondition": {
"leaveWithGrappleTeleport": {
"blockPositions": [
[
2,
29
]
]
}
},
"bypassesDoorShell": "yes",
"flashSuitChecked": true,
"blueSuitChecked": true
},
{
"id": 26,
"link": [
2,
2
],
"name": "Leave with Runway",
"requires": [],
"exitCondition": {
"leaveWithRunway": {
"length": 5,
"openEnd": 0
}
},
"flashSuitChecked": true,
"blueSuitChecked": true
},
{
"id": 27,
"link": [
2,
2
],
"name": "Fight Pirates Slowly",
"requires": [
{
  "or": [
    {
      "and": [
        "canDodgeWhileShooting",
        "canCameraManip",
        {
          "or": [
            "Plasma",
            {
              "and": [
                "h_hasBeamUpgrade",
                "canDash",
                "canBePatient"
              ]
            },
            "canBeVeryPatient"
          ]
        }
      ]
    },
    {
      "and": [
        {
          "or": [
            "canBePatient",
            {
              "enemyDamage": {
                "enemy": "Tourian Space Pirate (all)",
                "type": "contact",
                "hits": 1
              }
            }
          ]
        },
        "Morph"
      ]
    }
  ]
}
],
"clearsObstacles": [
"A"
],
"flashSuitChecked": true,
"blueSuitChecked": true,
"note": [
"Run from or Roll under the pirate lasers.",
"The Pirates will also not shoot if they come on screen while Samus is crouched."
],
"devNote": [
"Technically it's not possible to kill the bottom Pirates while staying at node 2 (not dropping down);",
"but if we're not going down, then it doesn't matter that the bottom ones aren't killed."
]
},
{
"id": 28,
"link": [
2,
2
],
"name": "Kill Pirates Fast",
"requires": [
{
  "or": [
    "Wave",
    "ScrewAttack",
    {
      "haveBlueSuit": {}
    },
    {
      "and": [
        "Plasma",
        "canXRayWaitForIFrames"
      ]
    },
    {
      "enemyKill": {
        "enemies": [
          [
            "Tourian Space Pirate (all)",
            "Tourian Space Pirate (all)"
          ],
          [
            "Tourian Space Pirate (all)",
            "Tourian Space Pirate (all)"
          ],
          [
            "Tourian Space Pirate (all)"
          ]
        ],
        "explicitWeapons": [
          "Missile",
          "Super",
          "Ice+Plasma"
        ]
      }
    }
  ]
}
],
"clearsObstacles": [
"A"
],
"flashSuitChecked": true,
"blueSuitChecked": true,
"note": "Kill the Pirates fast enough that they won't attack, or shoot them from above with Wave.",
"devNote": [
"Technically it's not possible to kill the bottom Pirates while staying at node 2 (not dropping down);",
"but if we're not going down, then it doesn't matter that the bottom ones aren't killed.",
"FIXME: The enemyKill requirements could be reduced if it is only needed to kill the top ones, which could be modeled as a separate obstacle."
]
},
{
"id": 29,
"link": [
2,
2
],
"name": "Leave Shinecharged",
"requires": [
{
  "obstaclesCleared": [
    "A"
  ]
},
"h_shinechargeMaxRunway",
{
"shineChargeFrames": 60
}
],
"exitCondition": {
"leaveShinecharged": {}
},
"flashSuitChecked": true,
"blueSuitChecked": true
},
{
"id": 30,
"link": [
2,
2
],
"name": "Leave With Mockball",
"requires": [
{
  "obstaclesCleared": [
    "A"
  ]
}
],
"exitCondition": {
"leaveWithMockball": {
"remoteRunway": {
"length": 23,
"openEnd": 1
},
"landingRunway": {
"length": 1,
"openEnd": 1
}
}
},
"flashSuitChecked": true,
"blueSuitChecked": true
},
{
"id": 31,
"link": [
2,
2
],
"name": "Leave With Spring Ball Bounce",
"requires": [
{
  "obstaclesCleared": [
    "A"
  ]
}
],
"exitCondition": {
"leaveWithSpringBallBounce": {
"remoteRunway": {
"length": 19,
"openEnd": 1
},
"landingRunway": {
"length": 1,
"openEnd": 1
},
"movementType": "uncontrolled"
}
},
"flashSuitChecked": true,
"blueSuitChecked": true
},
{
"id": 32,
"link": [
2,
2
],
"name": "Leave Space Jumping",
"requires": [
{
"obstaclesCleared": [
"A"
]
}
],
"exitCondition": {
"leaveSpaceJumping": {
"remoteRunway": {
"length": 37,
"openEnd": 1
}
}
},
"flashSuitChecked": true,
"blueSuitChecked": true
},
{
"id": 33,
"link": [
2,
2
],
"name": "Leave With Temporary Blue",
"requires": [
{
"obstaclesCleared": [
"A"
]
},
"h_shinechargeMaxRunway",
"can4HighMidAirMorph",
"canChainTemporaryBlue"
],
"exitCondition": {
"leaveWithTemporaryBlue": {}
},
"flashSuitChecked": true,
"blueSuitChecked": true,
"note": [
"Gain temporary blue with a shinecharge; then do a tight lateral mid-air morph to jump past the speed blocks.",
"Alernatively, start the temporary blue chain by doing a running jump over them rather than doing a shinecharge."
]
},
{
"id": 34,
"link": [
2,
2
],
"name": "Crystal Flash",
"requires": [
"h_CrystalFlash"
],
"flashSuitChecked": true,
"blueSuitChecked": true
}
],
"notables": [],
"nextStratId": 44,
"nextNotableId": 1
}