Bomb Torizo Room
Room ID: 19
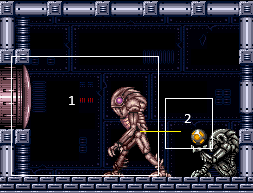
|
Exit condition: "leaveWithRunway": {
"length": 1,
"openEnd": 1
} |
From: 1
Left Door
To: 1
Left Door
Activate Bomb Torizo, and farm his eggs for energy. They can be farmed freely. Waste all but 5 Missiles to prevent the laser attack. Standing in the correct position will ensure he will be trapped against the wall. Quickly use a jump to perform a very narrow shinecharge, then get interrupted by any Bomb Torizo attack. Entrance condition: "comeInWithRMode": {}Requires: {"not": "f_DefeatedBombTorizo"},
{"not": "f_ZebesSetAblaze"},
"canRiskPermanentLossOfAccess",
"h_activateBombTorizo",
"canUseIFrames",
{"or": [
"canDodgeWhileShooting",
{"resourceAtMost": [{"type": "Missile", "count": 5}]}
]},
{"refill": ["Energy"]},
{"canShineCharge": {"usedTiles": 13, "openEnd": 0}},
{"autoReserveTrigger": {"maxReserveEnergy": 95}},
"canRModeSparkInterrupt"Collects items: 2 Dev note: May need an alternative helper in place of h_activateBombTorizo, due to R-Mode entrance condition. |
From: 1
Left Door
To: 1
Left Door
Save the animals to unlock the door, and Crystal Flash in the door frame. Stand in the knee-deep acid with suits disabled to bleed off energy quickly, then perform a pause abuse spark windup in the acid and interrupt it with auto-reserve (re-enable suits in the pause menu). Entrance condition: "comeInWithRMode": {}Requires: "f_ZebesSetAblaze", "h_CrystalFlashForReserveEnergy", "Gravity", {"acidFrames": 90}, {"canShineCharge": {"usedTiles": 13, "openEnd": 0}}, {"autoReserveTrigger": {}}, "canRModePauseAbuseSparkInterrupt", {"acidFrames": 30} Sets flags: f_AnimalsSaved Dev note: Disable E-Tanks required to avoid a patience requirement due to escape timer. |
From: 1
Left Door
To: 1
Left Door
Requires: "f_DefeatedBombTorizo" Exit condition: "leaveWithSidePlatform": {
"height": 3,
"runway": {
"length": 13,
"openEnd": 0
},
"obstruction": [1, 0]
}Dev note: Max extra run speed $2.B with spin, or $2.C with a quick aim-down. |
From: 1
Left Door
To: 1
Left Door
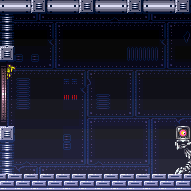

Exit condition: "leaveWithSidePlatform": {
"height": 3,
"runway": {
"length": 10,
"openEnd": 0
},
"obstruction": [1, 0]
}Dev note: Max extra run speed $2.2 with spin, or $2.3 with a quick aim-down. |
|
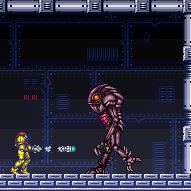

Requires: "h_activateBombTorizo", {"or": [ "canDodgeWhileShooting", {"ammo": {"type": "Super", "count": 2}}, {"enemyDamage": {"enemy": "Bomb Torizo", "type": "contact", "hits": 3}} ]} Sets flags: f_DefeatedBombTorizo |
|
Requires: "f_DefeatedBombTorizo",
{"canShineCharge": {"usedTiles": 13, "openEnd": 0}},
{"shineChargeFrames": 40}Exit condition: "leaveShinecharged": {} |
|
Exit condition: "leaveSpinning": {
"remoteRunway": {
"length": 7,
"openEnd": 1
}
} |
|
Exit condition: "leaveWithMockball": {
"remoteRunway": {
"length": 6,
"openEnd": 1
},
"landingRunway": {
"length": 1,
"openEnd": 1
}
} |
From: 1
Left Door
To: 1
Left Door
Exit condition: "leaveWithSpringBallBounce": {
"remoteRunway": {
"length": 5,
"openEnd": 1
},
"landingRunway": {
"length": 1,
"openEnd": 1
},
"movementType": "uncontrolled"
} |
|
Exit condition: "leaveSpaceJumping": {
"remoteRunway": {
"length": 3,
"openEnd": 1
}
} |
|
Requires: "f_DefeatedBombTorizo" Exit condition: "leaveSpinning": {
"remoteRunway": {
"length": 10,
"openEnd": 1
}
} |
|
Requires: "f_DefeatedBombTorizo" Exit condition: "leaveWithMockball": {
"remoteRunway": {
"length": 9,
"openEnd": 1
},
"landingRunway": {
"length": 1,
"openEnd": 1
}
} |
From: 1
Left Door
To: 1
Left Door
Requires: "f_DefeatedBombTorizo" Exit condition: "leaveWithSpringBallBounce": {
"remoteRunway": {
"length": 8,
"openEnd": 1
},
"landingRunway": {
"length": 1,
"openEnd": 1
},
"movementType": "uncontrolled"
} |
|
Requires: "f_DefeatedBombTorizo" Exit condition: "leaveSpaceJumping": {
"remoteRunway": {
"length": 5,
"openEnd": 1
}
} |
|
Requires: "h_CrystalFlash" |
|
Requires: "f_DefeatedBombTorizo",
{"canShineCharge": {"usedTiles": 13, "openEnd": 0}},
"h_CrystalSpark" |
|


As Bomb Torizo is standing, Crystal Flash in front of it in order to get hit and reserve trigger. Entrance condition: "comeInWithRMode": {}Requires: {"not": "f_DefeatedBombTorizo"},
{"not": "f_ZebesSetAblaze"},
"canRiskPermanentLossOfAccess",
"h_activateBombTorizo",
"canRModeCrystalFlashInterrupt",
{"ammo": {"type": "Missile", "count": 10}}Dev note: FIXME: If h_activateBombTorizo is changed to require collecting the item in-room, this strat would need a collectsItems. Otherwise, it is possible to avoid picking up the item while doing this. FIXME: This could be done with G-mode, but not if h_activateBombTorizo is changed to require collecting the item in-room (unless somehow the item was collected earlier without killing BT). FIXME: It is possible to farm during the fight before Crystal Flashing, but it requires Samus to be low on Missiles and it is much more difficult to find a safe time to CF. |
|
Requires: "f_ZebesSetAblaze" Sets flags: f_AnimalsSaved Dev note: Technically this also requires opening the wall. |
|
|
|
|