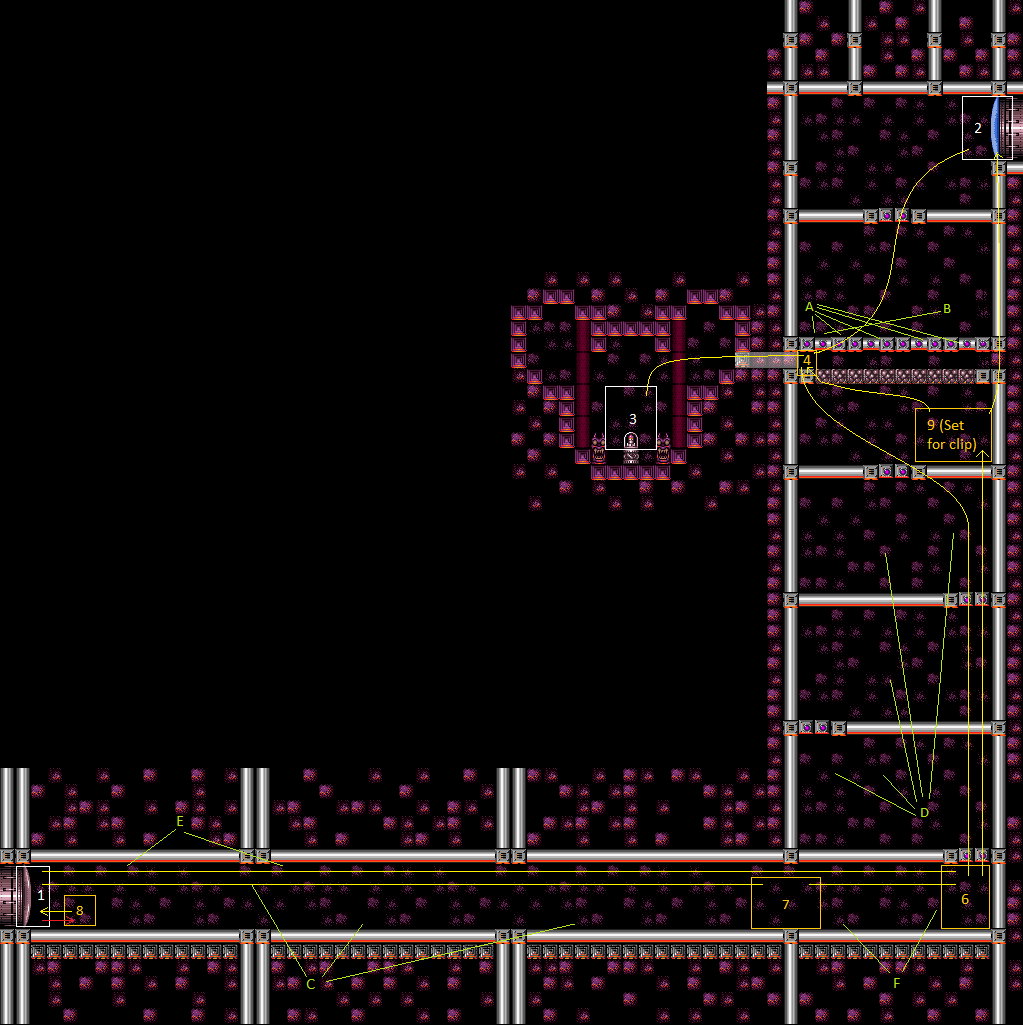
Mickey Mouse Room: R-Mode Spark Interrupt
Room ID: 144
|
Use normal bombs or a Power Bomb to open the bomb blocks, then navigate the Multiviola boxes. Kill the two right Dessgeegas, then clear the rest of the runway. Use the Multiviola at the end to interrupt, or use a heat interrupt. If Samus ends up needing to Crystal Flash at any point, remember that Samus cannot use Power Bombs or X-Ray afterwards until R-Mode ends. Entrance condition: {
"comeInWithRMode": {}
}Requires: "canBeLucky"
{
"or": [
{
"and": [
"h_usePowerBomb",
{
"heatFrames": 180
}
]
},
{
"and": [
{
"heatFrames": 160
},
{
"or": [
"ScrewAttack",
{
"and": [
"h_useMorphBombs",
{
"heatFrames": 60
}
]
}
]
}
]
}
]
}
{
"or": [
{
"and": [
"ScrewAttack",
{
"heatFrames": 650
}
]
},
{
"and": [
"Plasma",
{
"heatFrames": 850
},
{
"or": [
"Wave",
{
"heatFrames": 300
}
]
}
]
},
{
"and": [
{
"or": [
{
"and": [
{
"enemyKill": {
"enemies": [
[
"Multiviola",
"Multiviola"
],
[
"Multiviola",
"Multiviola",
"Multiviola"
]
],
"explicitWeapons": [
"PowerBomb"
]
}
},
{
"heatFrames": 500
}
]
},
{
"and": [
"Ice",
"Wave",
"Spazer",
{
"heatFrames": 750
}
]
},
{
"and": [
"Wave",
{
"heatFrames": 1350
}
]
},
{
"and": [
{
"heatFrames": 400
},
{
"enemyDamage": {
"enemy": "Multiviola",
"type": "contact",
"hits": 3
}
}
]
}
]
},
{
"or": [
{
"and": [
{
"enemyKill": {
"enemies": [
[
"Dessgeega",
"Dessgeega"
]
],
"explicitWeapons": [
"Missile"
]
}
},
{
"heatFrames": 670
}
]
},
{
"and": [
{
"enemyKill": {
"enemies": [
[
"Dessgeega",
"Dessgeega"
]
],
"explicitWeapons": [
"Super"
]
}
},
{
"heatFrames": 400
}
]
},
{
"and": [
{
"enemyKill": {
"enemies": [
[
"Dessgeega",
"Dessgeega"
]
],
"explicitWeapons": [
"PowerBomb"
]
}
},
{
"heatFrames": 500
}
]
},
{
"and": [
"Ice",
"Wave",
"Spazer",
{
"heatFrames": 750
}
]
}
]
}
]
},
{
"and": [
"h_heatProof",
{
"enemyKill": {
"enemies": [
[
"Dessgeega",
"Dessgeega"
]
],
"excludedWeapons": [
"Bombs",
"PseudoScrew",
"PowerBomb"
]
}
}
]
}
]
}
{
"or": [
{
"and": [
{
"getBlueSpeed": {
"usedTiles": 23,
"openEnd": 2
}
},
{
"heatFrames": 200
}
]
},
{
"and": [
"h_heatProof",
"canDodgeWhileShooting",
{
"enemyKill": {
"enemies": [
[
"Dessgeega"
],
[
"Dessgeega"
],
[
"Dessgeega"
],
[
"Multiviola"
],
[
"Multiviola"
]
],
"excludedWeapons": [
"Bombs",
"PseudoScrew",
"PowerBomb",
"PowerBeam"
]
}
}
]
},
{
"and": [
{
"heatFrames": 400
},
"Plasma",
{
"or": [
"Wave",
{
"heatFrames": 100
}
]
}
]
},
{
"and": [
{
"enemyKill": {
"enemies": [
[
"Dessgeega"
],
[
"Dessgeega"
],
[
"Dessgeega"
],
[
"Multiviola"
],
[
"Multiviola"
]
],
"explicitWeapons": [
"Missile"
]
}
},
{
"heatFrames": 500
}
]
},
{
"and": [
{
"enemyKill": {
"enemies": [
[
"Dessgeega"
],
[
"Dessgeega"
],
[
"Dessgeega"
],
[
"Multiviola"
],
[
"Multiviola"
]
],
"explicitWeapons": [
"Super"
]
}
},
{
"heatFrames": 400
}
]
},
{
"and": [
"ScrewAttack",
{
"heatFrames": 320
}
]
}
]
}
"h_RModeCanRefillReserves"
{
"partialRefill": {
"type": "ReserveEnergy",
"limit": 20
}
}
"h_shinechargeMaxRunway"
{
"autoReserveTrigger": {
"maxReserveEnergy": 95
}
}
"canRModeSparkInterrupt"
{
"heatFrames": 30
}Clears obstacles: A, B, C, D, E, F |