Mickey Mouse Room: Crystal Flash at Bomb Blocks, R-Mode Spark Interrupt
Room ID: 144
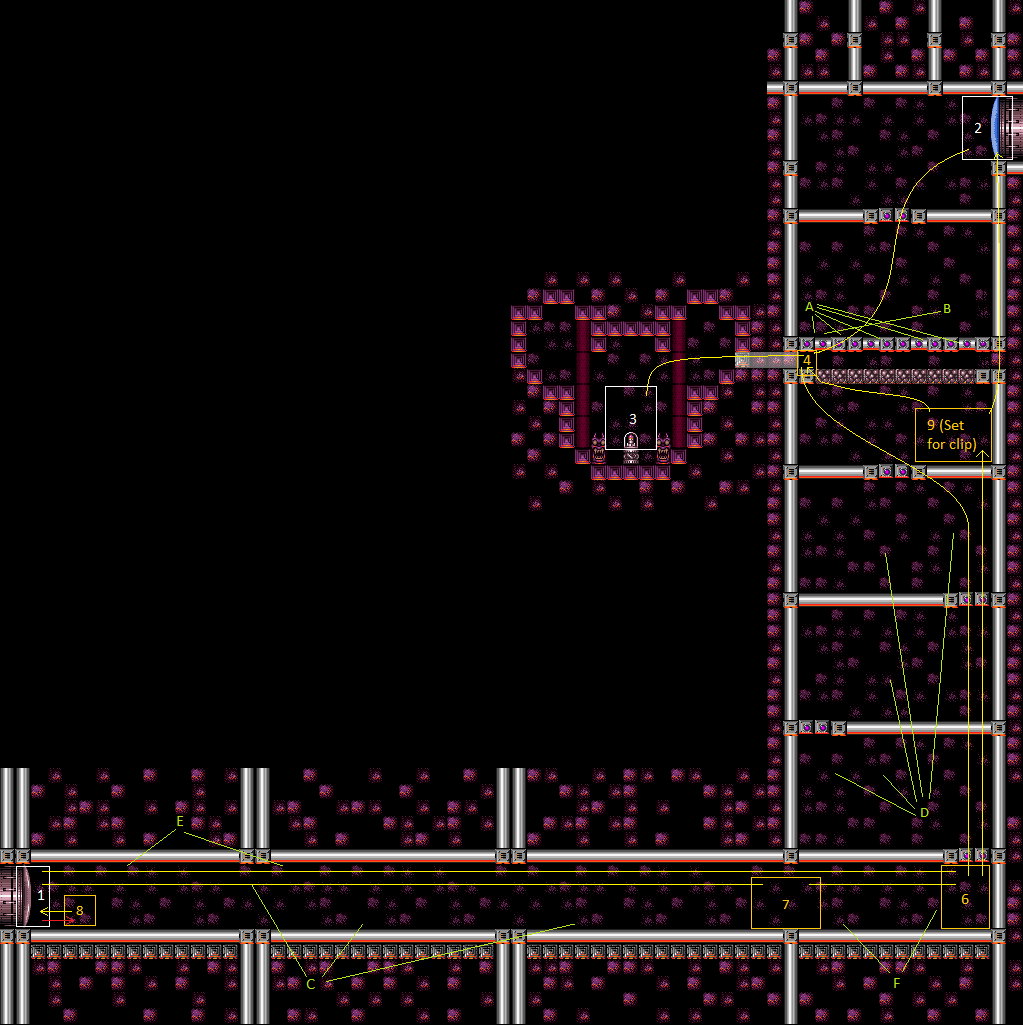
From: 2
Top Right Door
To: 1
Bottom Left Door
Crystal Flash on the topmost ledge to open the bomb blocks and navigate the Multiviola boxes. Samus cannot use Power Bombs or X-Ray after the Crystal Flash until R-Mode ends. Kill the two right Dessgeegas from the safety of the Multiviola box, then clear the rest of the runway. Use the Multiviola at the end to interrupt, or use a heat interrupt. Entrance condition: {
"comeInWithRMode": {}
}Requires: {
"heatFrames": 15
}
"h_heatedCrystalFlashForReserveEnergy"
{
"or": [
{
"and": [
"ScrewAttack",
{
"heatFrames": 650
}
]
},
{
"and": [
"Plasma",
{
"heatFrames": 850
},
{
"or": [
"Wave",
{
"heatFrames": 300
}
]
}
]
},
{
"and": [
"Ice",
"Wave",
"Spazer",
{
"heatFrames": 750
},
{
"or": [
{
"heatFrames": 750
},
{
"and": [
{
"enemyKill": {
"enemies": [
[
"Dessgeega",
"Dessgeega"
]
],
"explicitWeapons": [
"Missile"
]
}
},
{
"heatFrames": 670
}
]
},
{
"and": [
{
"enemyKill": {
"enemies": [
[
"Dessgeega",
"Dessgeega"
]
],
"explicitWeapons": [
"Super"
]
}
},
{
"heatFrames": 400
}
]
}
]
}
]
},
{
"and": [
"Wave",
{
"heatFrames": 1350
},
{
"or": [
{
"and": [
{
"enemyKill": {
"enemies": [
[
"Dessgeega",
"Dessgeega"
]
],
"excludedWeapons": [
"Bombs",
"PseudoScrew",
"PowerBomb"
]
}
},
{
"heatFrames": 3000
}
]
},
{
"and": [
{
"enemyKill": {
"enemies": [
[
"Dessgeega",
"Dessgeega"
]
],
"explicitWeapons": [
"Missile"
]
}
},
{
"heatFrames": 670
}
]
},
{
"and": [
{
"enemyKill": {
"enemies": [
[
"Dessgeega",
"Dessgeega"
]
],
"explicitWeapons": [
"Super"
]
}
},
{
"heatFrames": 400
}
]
}
]
}
]
},
{
"and": [
{
"heatFrames": 400
},
{
"enemyDamage": {
"enemy": "Multiviola",
"type": "contact",
"hits": 3
}
},
{
"or": [
{
"and": [
{
"enemyKill": {
"enemies": [
[
"Dessgeega",
"Dessgeega"
]
],
"excludedWeapons": [
"Bombs",
"PseudoScrew",
"PowerBomb"
]
}
},
{
"heatFrames": 3000
}
]
},
{
"and": [
{
"enemyKill": {
"enemies": [
[
"Dessgeega",
"Dessgeega"
]
],
"explicitWeapons": [
"Missile"
]
}
},
{
"heatFrames": 670
}
]
},
{
"and": [
{
"enemyKill": {
"enemies": [
[
"Dessgeega",
"Dessgeega"
]
],
"explicitWeapons": [
"Super"
]
}
},
{
"heatFrames": 400
}
]
}
]
}
]
},
{
"and": [
"h_heatProof",
{
"enemyKill": {
"enemies": [
[
"Dessgeega",
"Dessgeega"
]
],
"excludedWeapons": [
"Bombs",
"PseudoScrew",
"PowerBomb"
]
}
}
]
}
]
}
{
"or": [
{
"and": [
{
"getBlueSpeed": {
"usedTiles": 23,
"openEnd": 2
}
},
{
"heatFrames": 200
}
]
},
{
"and": [
"h_heatProof",
"canDodgeWhileShooting",
{
"enemyKill": {
"enemies": [
[
"Dessgeega"
],
[
"Dessgeega"
],
[
"Dessgeega"
],
[
"Multiviola"
],
[
"Multiviola"
]
],
"excludedWeapons": [
"Bombs",
"PseudoScrew",
"PowerBomb",
"PowerBeam"
]
}
}
]
},
{
"and": [
{
"heatFrames": 400
},
"Plasma",
{
"or": [
"Wave",
{
"heatFrames": 100
}
]
}
]
},
{
"and": [
{
"enemyKill": {
"enemies": [
[
"Dessgeega"
],
[
"Dessgeega"
],
[
"Dessgeega"
],
[
"Multiviola"
],
[
"Multiviola"
]
],
"explicitWeapons": [
"Missile"
]
}
},
{
"heatFrames": 500
}
]
},
{
"and": [
{
"enemyKill": {
"enemies": [
[
"Dessgeega"
],
[
"Dessgeega"
],
[
"Dessgeega"
],
[
"Multiviola"
],
[
"Multiviola"
]
],
"explicitWeapons": [
"Super"
]
}
},
{
"heatFrames": 400
}
]
},
{
"and": [
"ScrewAttack",
{
"heatFrames": 320
}
]
}
]
}
"h_shinechargeMaxRunway"
{
"autoReserveTrigger": {
"maxReserveEnergy": 95
}
}
"canRModeSparkInterrupt"
{
"heatFrames": 30
}Clears obstacles: A, B, C, D, E, F |