Fast Pillars Setup Room: R-Mode Spark Interrupt
Room ID: 133
|
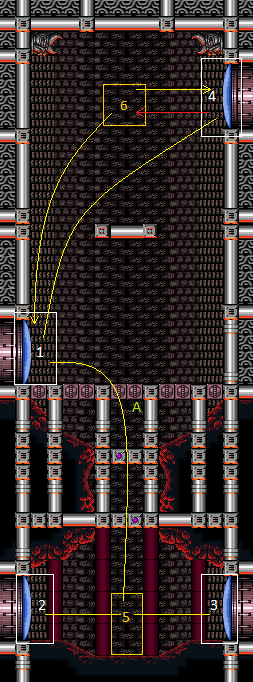
Kill the pirates to get them out of the way before using a Crystal Flash on the floating platform to open the bomb barrier. Alternatively, farm them for energy and use a Power Bomb on the floating platform. Shinecharge at the bottom runway and then jump into a Viola to interrupt. For power bomb pirate kill: interrupt the standing pirate with a shot then jump and place the power bomb low to hit all three pirates. Repeat three times. For slow charge beam: interrupt with a shot, then crouch and fire charged shots. Jump when the wall pirate approaches to make it jump to the other wall. Entrance condition: {
"comeInWithRMode": {}
}Requires: "h_heatProof"
{
"or": [
{
"and": [
{
"or": [
{
"enemyKill": {
"enemies": [
[
"Yellow Space Pirate (standing)",
"Yellow Space Pirate (wall)",
"Yellow Space Pirate (wall)"
]
],
"explicitWeapons": [
"ScrewAttack",
"Charge+Plasma",
"Charge+Ice+Wave+Spazer",
"Missile",
"Super"
]
}
},
{
"and": [
{
"enemyKill": {
"enemies": [
[
"Yellow Space Pirate (standing)",
"Yellow Space Pirate (wall)",
"Yellow Space Pirate (wall)"
]
],
"explicitWeapons": [
"Charge"
]
}
},
"canBePatient"
]
},
"h_usePowerBomb"
]
},
"h_heatedCrystalFlashForReserveEnergy"
]
},
{
"and": [
"h_heatProof",
"h_RModeCanRefillReserves",
"canDodgeWhileShooting",
{
"or": [
{
"enemyKill": {
"enemies": [
[
"Yellow Space Pirate (standing)",
"Yellow Space Pirate (wall)",
"Yellow Space Pirate (wall)"
]
],
"explicitWeapons": [
"ScrewAttack",
"Charge+Plasma",
"Charge+Ice+Wave+Spazer",
"Missile",
"Super"
]
}
},
{
"and": [
{
"enemyKill": {
"enemies": [
[
"Yellow Space Pirate (standing)",
"Yellow Space Pirate (wall)",
"Yellow Space Pirate (wall)"
]
],
"explicitWeapons": [
"Charge"
]
}
},
"canBePatient"
]
},
{
"and": [
{
"enemyKill": {
"enemies": [
[
"Yellow Space Pirate (standing)",
"Yellow Space Pirate (wall)",
"Yellow Space Pirate (wall)"
]
],
"explicitWeapons": [
"PowerBomb"
]
}
},
"canTrickyDodgeEnemies"
]
}
]
},
{
"or": [
{
"resourceMissingAtMost": [
{
"type": "Missile",
"count": 0
}
]
},
"canBeLucky"
]
},
"h_usePowerBomb",
{
"partialRefill": {
"type": "ReserveEnergy",
"limit": 20
}
}
]
}
]
}
{
"or": [
{
"canShineCharge": {
"usedTiles": 12,
"gentleUpTiles": 2,
"gentleDownTiles": 2,
"openEnd": 0
}
},
{
"and": [
{
"or": [
{
"doorUnlockedAtNode": 2
},
{
"doorUnlockedAtNode": 3
}
]
},
{
"canShineCharge": {
"usedTiles": 13,
"gentleUpTiles": 2,
"gentleDownTiles": 2,
"openEnd": 0
}
}
]
},
{
"and": [
{
"doorUnlockedAtNode": 2
},
{
"doorUnlockedAtNode": 3
},
{
"canShineCharge": {
"usedTiles": 14,
"gentleUpTiles": 2,
"gentleDownTiles": 2,
"openEnd": 0
}
}
]
}
]
}
{
"autoReserveTrigger": {}
}
"canRModeSparkInterrupt"Clears obstacles: A Unlocks doors: {"nodeId":2,"types":["ammo"],"requires":[]}
{"nodeId":3,"types":["ammo"],"requires":[]} |