Aqueduct: G-Mode Overload PLMs - Power Bomb the Items (Extreme)
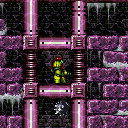
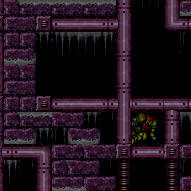
PLMs can be overloaded in direct G-Mode with a single Power Bomb if both items are still there and 2 PBs if only one item is. There is a row of tiles that works, just above and to the left of the right door. The row is one tile higher than the horizontal pipe that is part of the door frame, spanning from the left to one tile away from the right wall.
Strats ()
From: 5
Right Door
To: 11
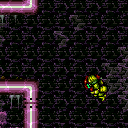
G-Mode Overloaded PLMs (By Bottom Left Door)
PLMs can be overloaded in direct G-Mode with a single Power Bomb if both items are still there and 2 PBs if only one item is. There is a row of tiles that works, just above and to the left of the right door. The row is one tile higher than the horizontal pipe that is part of the door frame, spanning from the left to one tile away from the right wall. Entrance condition: {
"comeInWithGMode": {
"mode": "direct",
"morphed": true
}
}Requires: "canPowerBombItemOverloadPLMs"
{
"notable": "G-Mode Overload PLMs - Power Bomb the Items"
}
"canRiskPermanentLossOfAccess"
{
"or": [
{
"itemNotCollectedAtNode": 7
},
{
"itemNotCollectedAtNode": 8
}
]
}
"h_artificialMorphSpringBall"
"h_artificialMorphPowerBomb"
"h_artificialMorphPowerBomb"Dev note: This canRiskPermanentLossOfAccess variant is only added from this door, as the only other place to use overloaded PLMs would be the top left bomb block, and if you can get here artificially morphed, you can get to the top left and instead use the bomb on the block. |
From: 13
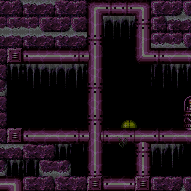
Direct G-Mode Morph (By Bottom Left Door)
To: 7
Top Right Left Item
PLMs can be overloaded in direct G-Mode with a single Power Bomb if both items are still there and 2 PBs if only one item is. There is a row of tiles that works, just above and to the left of the right door. The row is one tile higher than the horizontal pipe that is part of the door frame, spanning from the left to one tile away from the right wall. Requires: "canPowerBombItemOverloadPLMs"
{
"notable": "G-Mode Overload PLMs - Power Bomb the Items"
}
{
"or": [
{
"itemNotCollectedAtNode": 7
},
{
"itemNotCollectedAtNode": 8
}
]
}
"h_artificialMorphSpringBall"
"h_artificialMorphPowerBomb"
"h_artificialMorphPowerBomb"
"h_navigateUnderwater"
"canSnailClimb"
{
"or": [
"Gravity",
{
"and": [
"HiJump",
{
"or": [
"h_underwaterCrouchJump",
"canDownGrab"
]
}
]
}
]
}Dev note: This does not include canRiskPermanentLossOfAccess, as it is only worth doing this strat if the items are there. |
From: 13
Direct G-Mode Morph (By Bottom Left Door)
To: 7
Top Right Left Item
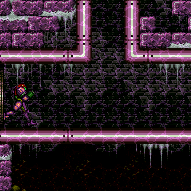
It is barely possible to start a snail climb with just Spring Ball. Get a snail positioned such that it is on the bottom of an overhang above, and sticking out a bit to be usable as a platform. Use Spring Ball to jump and press against the snail for the maximum possible duration, in order to gain enough height to get onto it. PLMs can be overloaded in direct G-Mode with a single Power Bomb if both items are still there and 2 PBs if only one item is. There is a row of tiles that works, just above and to the left of the right door. The row is one tile higher than the horizontal pipe that is part of the door frame, spanning from the left to one tile away from the right wall. Climb one snail to place the Power Bomb, then another to reduce the distance of the wall jump climb. Requires: "canPowerBombItemOverloadPLMs"
{
"notable": "G-Mode Overload PLMs - Power Bomb the Items"
}
{
"or": [
{
"itemNotCollectedAtNode": 7
},
{
"itemNotCollectedAtNode": 8
}
]
}
"h_artificialMorphSpringBall"
"h_artificialMorphPowerBomb"
"h_artificialMorphPowerBomb"
"canSnailClimb"
"canBootless2WideUWJ"Dev note: This does not include canRiskPermanentLossOfAccess, as it is only worth doing this strat if the items are there. |
From: 13
Direct G-Mode Morph (By Bottom Left Door)
To: 7
Top Right Left Item
PLMs can be overloaded in direct G-Mode with a single Power Bomb if both items are still there and 2 PBs if only one item is. There is a row of tiles that works, just above and to the left of the right door. The row is one tile higher than the horizontal pipe that is part of the door frame, spanning from the left to one tile away from the right wall. Requires: "canPowerBombItemOverloadPLMs"
{
"notable": "G-Mode Overload PLMs - Power Bomb the Items"
}
{
"or": [
{
"itemNotCollectedAtNode": 7
},
{
"itemNotCollectedAtNode": 8
}
]
}
"h_usePowerBomb"
"h_usePowerBomb"
"h_navigateUnderwater"
"canSnailClimb"
{
"or": [
"Gravity",
"h_underwaterMaxHeightSpringBallJump",
{
"and": [
"HiJump",
{
"or": [
"h_underwaterCrouchJump",
"canDownGrab"
]
}
]
}
]
}Dev note: This does not include canRiskPermanentLossOfAccess, as it is only worth doing this strat if the items are there. |
From: 13
Direct G-Mode Morph (By Bottom Left Door)
To: 7
Top Right Left Item
PLMs can be overloaded in direct G-Mode with a single Power Bomb if both items are still there and 2 PBs if only one item is. There is a row of tiles that works, just above and to the left of the right door. The row is one tile higher than the horizontal pipe that is part of the door frame, spanning from the left to one tile away from the right wall. Climb one snail to place the Power Bomb, then another to reduce the distance of the wall jump climb. Requires: "canPowerBombItemOverloadPLMs"
{
"notable": "G-Mode Overload PLMs - Power Bomb the Items"
}
{
"or": [
{
"itemNotCollectedAtNode": 7
},
{
"itemNotCollectedAtNode": 8
}
]
}
"h_usePowerBomb"
"h_usePowerBomb"
"canSnailClimb"
"canBootless2WideUWJ"Dev note: This does not include canRiskPermanentLossOfAccess, as it is only worth doing this strat if the items are there. |