Norfair Reserve Tank Room: Power Bomb with Damage Boost (Expert)
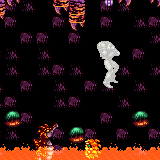
Dash jump from the door to the second ledge. Jump forward, morph, and place a Power Bomb on the ceiling between the second and third ledges. Press right as Samus begins falling. After falling for 1-2 blocks, unmorph. This will place Samus precisely in the path of a Dragon fireball to damage boost left. Samus can land on the lower item block, just before the block is destroyed in the Power Bomb explosion.
Strats ()
From: 1
Right Door
To: 1
Right Door
Requires: "canDash"
{
"notable": "Power Bomb with Damage Boost"
}
{
"enemyKill": {
"enemies": [
[
"Dragon"
],
[
"Dragon",
"Dragon"
]
],
"explicitWeapons": [
"PowerBomb"
]
}
}
"canHorizontalDamageBoost"
{
"enemyDamage": {
"enemy": "Dragon",
"type": "fireball",
"hits": 2
}
}
"canFlatleyJump"
"canTrickyJump"
{
"or": [
{
"tech": "canUsePowerBombLag"
},
"canInsaneJump"
]
}
{
"heatFrames": 400
}
"h_trickyToCarryFlashSuit"Collects items: 3 |
From: 1
Right Door
To: 2
Chozo Ball Item


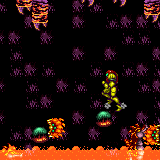
Place a Power Bomb while waiting for the middle Dragon to shoot a fireball, to clear the Sovas for later. While the item block is breaking, turn around to perform a Flatley jump to collect the item and jump to the ledge item in one motion. Place a second Power Bomb while jumping up from the lower item block to clear the remaining enemies for the return trip. Requires: "canDash"
{
"notable": "Power Bomb with Damage Boost"
}
"canFlatleyJump"
"canTrickyDodgeEnemies"
"canMidAirMorph"
"canHorizontalDamageBoost"
{
"enemyDamage": {
"enemy": "Dragon",
"type": "fireball",
"hits": 1
}
}
{
"enemyKill": {
"enemies": [
[
"Dragon"
],
[
"Dragon",
"Dragon"
]
],
"explicitWeapons": [
"PowerBomb"
]
}
}
{
"heatFrames": 260
}
"h_trickyToCarryFlashSuit"Clears obstacles: A Collects items: 3 |
From: 1
Right Door
To: 2
Chozo Ball Item
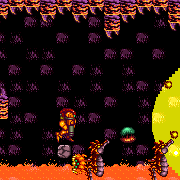
Place a Power Bomb while waiting for the middle Dragon to shoot a fireball, to clear the Sovas for later. Place a second Power Bomb while jumping up from the lower item block to clear the remaining enemies for the return trip. Requires: "canDash"
{
"notable": "Power Bomb with Damage Boost"
}
"canTrickyJump"
"canMidAirMorph"
"canHorizontalDamageBoost"
{
"enemyDamage": {
"enemy": "Dragon",
"type": "fireball",
"hits": 1
}
}
{
"enemyKill": {
"enemies": [
[
"Dragon"
],
[
"Dragon",
"Dragon"
]
],
"explicitWeapons": [
"PowerBomb"
]
}
}
{
"heatFrames": 270
}
"h_trickyToCarryFlashSuit"Clears obstacles: A |
From: 1
Right Door
To: 4
Junction Above Hidden Platform Item
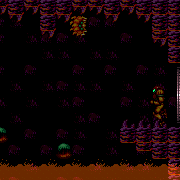
Place a Power Bomb while waiting for the middle Dragon to shoot a fireball, to clear the Sovas for later. A second Power Bomb will be needed to clear the remaining Dragons for the return trip. Requires: "canDash"
{
"notable": "Power Bomb with Damage Boost"
}
"canTrickyJump"
"canMidAirMorph"
"canHorizontalDamageBoost"
{
"enemyDamage": {
"enemy": "Dragon",
"type": "fireball",
"hits": 1
}
}
{
"enemyKill": {
"enemies": [
[
"Dragon"
]
],
"explicitWeapons": [
"PowerBomb"
]
}
}
{
"heatFrames": 180
}
"h_trickyToCarryFlashSuit"Dev note: Would be better if we could model 1 PB consumed + dragons half-dead. |