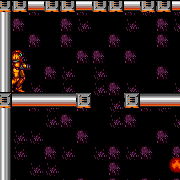
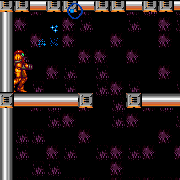
Mickey Mouse Room: Multiviola Ice Clip (Extreme)

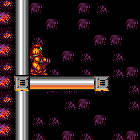
Guide the bottom right Multiviola from the bottom of the room all the way to the crumble blocks and use it to ice clip through. The Multiviola will bounce around the bottom area 4 times before it is able to pass through the shot block. The door to the left cannot be opened and the respawning shot blocks needs to be removed at the right time. Avoid damage by freezing the Multiviola, or letting it go off camera while setting up for the next step. Using the frozen Multiviola, Samus can jump through the crumble blocks and then either break the bomb blocks, clip again through the bomb blocks, or take the morph tunnel to the item.
Strats ()
From: 6
Bottom Right Corner Junction
To: 9
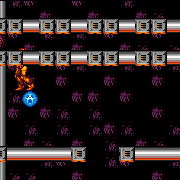
Junction Below Crumble Blocks, Set Up to Clip
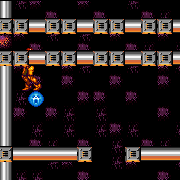
Guide the bottom-right Multiviola to the upper section of the room. Lure the Dessgeegas away to avoid killing the Multiviola. Remove all enemies and possibly also the row of bomb blocks with a power bomb before attempting to guide the Multiviola. It will need to bounce each room segment multiple times before lining up to go through each shot block. Ice can be used to more safely get around the Multiviola as it is bouncing. However, opening the left side door will change the bounce locations and make the strat no longer possible. Instead the enemy can be allowed to go off camera and then Samus can prepare to run away as it comes back. Waiting in the next room segment is a safe way to wait for the Multiviola to bounce and still be able to break shot blocks. Requires: {
"notable": "Multiviola Ice Clip"
}
"h_heatProof"
"canTrickyUseFrozenEnemies"
{
"or": [
"canCameraManip",
"canDodgeWhileShooting"
]
}
{
"obstaclesNotCleared": [
"E"
]
}
{
"enemyDamage": {
"enemy": "Multiviola",
"type": "contact",
"hits": 5
}
}
{
"or": [
{
"enemyKill": {
"enemies": [
[
"Dessgeega"
],
[
"Dessgeega"
],
[
"Dessgeega"
]
],
"explicitWeapons": [
"Plasma",
"ScrewAttack",
"Charge+Ice+Wave",
"Ice+Wave+Spazer",
"Missile",
"Super"
]
}
},
{
"obstaclesCleared": [
"C"
]
}
]
}
{
"or": [
{
"enemyKill": {
"enemies": [
[
"Dessgeega",
"Dessgeega"
]
],
"explicitWeapons": [
"Plasma",
"ScrewAttack",
"Charge+Ice+Wave",
"Ice+Wave+Spazer",
"Missile",
"Super"
]
}
},
{
"obstaclesCleared": [
"F"
]
}
]
}Clears obstacles: C, D, F Dev note: This is not just getting up there, but also bringing the correct Multiviola with you. Five hits for leniency because it is hard to avoid damage even while freezing the Multiviola. 2.5 minute strat with Plasma |
From: 9
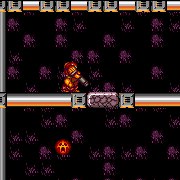
Junction Below Crumble Blocks, Set Up to Clip
To: 2
Top Right Door


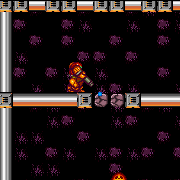
Breaking only the left side bomb blocks makes it easier for the Multiviola to enter a pattern where it will pass through the top shot block. The Multiviola needs to go through the crumble blocks moving to the right, if it goes through moving left it won't clear the shot blocks. If all the bomb blocks are broken, standing on the right side of the crumbles will allow the Multiviola to pass through the top shot block. Requires: {
"notable": "Multiviola Ice Clip"
}
"canBePatient"
"canTrickyGMode"
"h_heatProof"
{
"or": [
{
"and": [
"h_XRayMorphIceClip",
{
"or": [
"ScrewAttack",
"h_bombThings",
{
"obstaclesCleared": [
"B"
]
}
]
}
]
},
{
"and": [
"h_preciseIceClip",
{
"enemyDamage": {
"enemy": "Multiviola",
"type": "contact",
"hits": 1
}
},
{
"or": [
"ScrewAttack",
{
"obstaclesCleared": [
"B"
]
},
{
"and": [
"canTrickyCarryFlashSuit",
"canBeVeryLucky",
{
"useFlashSuit": {}
},
{
"shinespark": {
"frames": 11,
"excessFrames": 5
}
}
]
}
]
}
]
}
]
}Exit condition: {
"leaveWithGModeSetup": {}
}Unlocks doors: {"types":["ammo"],"requires":[]}Dev note: FIXME: This is possible with a flash suit but the flash suit needs a setup. This either needs a way that breaks both left crumble blocks or gets lucky getting the Multiviola up. |
From: 9
Junction Below Crumble Blocks, Set Up to Clip
To: 2
Top Right Door


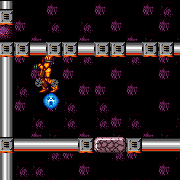
Bring the correct Viola up from the bottom, it can be frozen to avoid damage. After it comes though the uppermost shot blocks, back into the right hand corner and shot buffer on what would be the second hit from the Viola if you were not freezing or avoiding it. Should the shot buffer be missed then the Viola will have to bounce around many more times before being on a cycle where the buffered shot will freeze it in the correct position. Get onto the right side of the Viola, Samus should be standing and partially clipped into the solid tile. Crouch jump and 3 or 4 frames after pressing jump (2 frame window) hold down. Samus will appear to be stuck between the bomb blocks and the solid tile. Press forwards or up to stand up and jump to clip through. If Samus doesn't clip at all down was pressed too soon, if Samus clips the first blocks but appears to be floating while aiming down then down was pressed too late. Requires: {
"notable": "Multiviola Ice Clip"
}
"h_heatProof"
"h_preciseIceClip"
"canPartialFloorClip"
"canTrickyJump"
{
"enemyDamage": {
"enemy": "Multiviola",
"type": "contact",
"hits": 1
}
}
{
"or": [
"h_crouchJumpDownGrab",
"canWallJump",
"canSpringBallJumpMidAir",
"HiJump",
"SpaceJump",
"canJumpIntoIBJ"
]
}Dev note: This may be possible with a high pixel ice clip. FIXME: using a flash suit should also be possible. |
From: 9
Junction Below Crumble Blocks, Set Up to Clip
To: 2
Top Right Door
Freeze the Multiviola on the left side, just below the solid block. XRay standup and jump to clip up, then jump again to get on top of the bomb blocks. Requires: {
"notable": "Multiviola Ice Clip"
}
"h_heatProof"
"h_XRayMorphIceClip"
{
"or": [
"h_crouchJumpDownGrab",
"canWallJump",
"canSpringBallJumpMidAir",
"HiJump",
"SpaceJump",
"canJumpIntoIBJ"
]
} |
From: 9
Junction Below Crumble Blocks, Set Up to Clip
To: 4
Junction Below Bomb Blocks
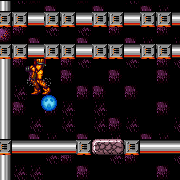
Ice Clip through the crumble blocks using a Multiviola from the bottom of the room. The ice clip can be setup by standing in a corner and firing forward when the Multiviola hits Samus, if it is moving downwards towards Samus. Clip through the crumble blocks then quickly jump again into the morph tunnel with a tight morph or Spring Ball. Requires: {
"notable": "Multiviola Ice Clip"
}
"h_heatProof"
"h_preciseIceClip"
{
"enemyDamage": {
"enemy": "Multiviola",
"type": "contact",
"hits": 1
}
}
{
"obstaclesNotCleared": [
"A"
]
}
{
"or": [
"h_useSpringBall",
"can4HighMidAirMorph"
]
}Clears obstacles: B |
From: 9
Junction Below Crumble Blocks, Set Up to Clip
To: 4
Junction Below Bomb Blocks
Ice Clip through the crumble blocks using a Multiviola from the bottom of the room. Freeze the Multiviola on the left side, just below the solid block. X-Ray standup and jump to clip up, then Morph to remain in the morph tunnel. Requires: {
"notable": "Multiviola Ice Clip"
}
"h_heatProof"
"h_XRayMorphIceClip" |
From: 9
Junction Below Crumble Blocks, Set Up to Clip
To: 4
Junction Below Bomb Blocks
Ice Clip through the crumble blocks using a Multiviola from the bottom of the room. The ice clip can be setup by standing in a corner and firing forward when the Multiviola hits Samus, if it is moving downwards towards Samus. Break the bomb blocks with a Power Bomb before bringing the Multiviola up for the clip. This variant is only useful if Samus needs to break some of the Bomb blocks to go up after collecting the item. Requires: {
"notable": "Multiviola Ice Clip"
}
"h_heatProof"
"h_preciseIceClip"
{
"enemyDamage": {
"enemy": "Multiviola",
"type": "contact",
"hits": 1
}
}
"canTrickyCarryFlashSuit"
{
"useFlashSuit": {}
}
{
"shinespark": {
"frames": 11,
"excessFrames": 5
}
}Clears obstacles: B |
From: 9
Junction Below Crumble Blocks, Set Up to Clip
To: 4
Junction Below Bomb Blocks
Ice Clip through the crumble blocks using a Multiviola from the bottom of the room. The ice clip can be setup by standing in a corner and firing forward when the Multiviola hits Samus, if it is moving downwards towards Samus. Break the bomb blocks with a Power Bomb before bringing the Multiviola up for the clip. This variant is only useful without the ability to 4-High mid air morph, Spring Ball, X-Ray, or Screw Attack. Requires: {
"notable": "Multiviola Ice Clip"
}
"h_heatProof"
"h_preciseIceClip"
{
"enemyDamage": {
"enemy": "Multiviola",
"type": "contact",
"hits": 1
}
}
{
"or": [
"h_usePowerBomb",
{
"obstaclesCleared": [
"A"
]
}
]
}Clears obstacles: A, B |
From: 9
Junction Below Crumble Blocks, Set Up to Clip
To: 4
Junction Below Bomb Blocks
Ice Clip through the crumble blocks using a Multiviola from the bottom of the room. With X-Ray, freeze the Multiviola on the left side, just below the solid block, X-Ray standup and jump to clip up. Otherwise, the ice clip can be setup by standing in a corner and firing forward when the Multiviola hits Samus, if it is moving downwards towards Samus. Jump and aim down to break the crumble blocks, then quickly spin jump to break the bomb blocks with Screw Attack. This variant is only useful if Samus needs to break some of the Bomb blocks to go up after collecting the item. Requires: {
"notable": "Multiviola Ice Clip"
}
"h_heatProof"
{
"or": [
"h_XRayMorphIceClip",
{
"and": [
"h_preciseIceClip",
{
"enemyDamage": {
"enemy": "Multiviola",
"type": "contact",
"hits": 1
}
}
]
}
]
}
"ScrewAttack"
{
"obstaclesNotCleared": [
"A"
]
}Clears obstacles: B |